Nissan Sentra B18 (2020-2025) Service Manual: Oil Pan (lower)
Exploded View
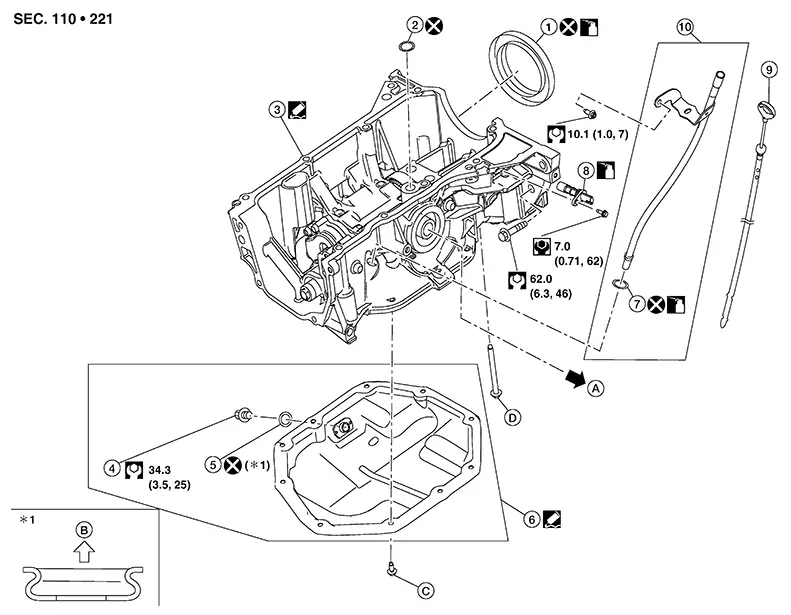
Exploded View
|
1. |
Rear oil seal |
2. |
O-ring |
3. |
Oil pan (upper) |
|
4. |
Drain plug |
5. |
Drain plug washer |
6. |
Oil pan (lower) |
|
7. |
O-ring |
8. |
Crankshaft position sensor (POS) |
9. |
Oil level gauge |
|
10. |
Oil level gauge guide |
A. |
To oil cooler. Refer to Exploded View. |
B. |
Oil pan (lower) side |
|
C. |
Refer to Removal and Installation. |
D. |
Refer to Removal and Installation. |
Removal and Installation
Removal and Installation
REMOVAL
Drain engine oil. Refer to Draining.
Remove oil
pan (lower) using the following procedure: Loosen oil pan (lower) bolts in
reverse of the sequence shown.
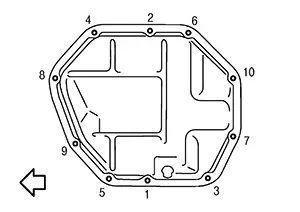
|
|
: Engine front |
CAUTION:
-
Be careful not to damage the mating surface.
-
Since factory default liquid gasket has better adhesion than conventional one, do not pick the area forcibly with a screw driver.
|
Tool number |
: KV10111100 (NI-37228) |
INSTALLATION
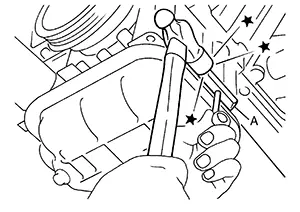
Install oil
pan (lower) using the following procedure: Use a
suitable tool (A) to remove old liquid gasket from mating
surfaces. 
-
Also remove old liquid gasket from mating surface of oil pan (upper).
-
Remove old liquid gasket from the bolt holes and threads.
CAUTION:
Do not scratch or damage the mating surface when cleaning off old liquid gasket.
Apply a continuous bead of liquid gasket (C) with a suitable tool as shown.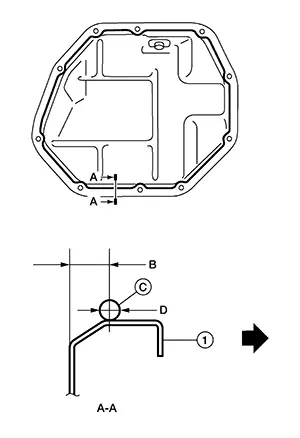
|
(1) |
: Oil pan (lower) |
|
(B) |
: 7.5 - 8.5 mm (0.295 - 0.374 in) |
|
(D) |
: 4.0 - 5.0 mm (0.157 - 0.197 in) |
|
|
: Engine outside |

Use Genuine Silicone RTV Sealant or equivalent. Refer to Recommended Chemical Products and Sealants.
CAUTION:
-
The components must be installed within 5 minutes of the liquid gasket application.
-
Do not confirm torque after 5 minutes have elapsed.
-
Then allow 30 minutes for the liquid gasket to set before adding oil to the engine.
|
Oil pan (lower) bolts |
: 10.1 N·m (1.0 kg-m, 7 ft-lb) |
Install drain plug.
CAUTION:
Do not reuse drain plug washer.
Installation of the remaining components is in the reverse order of removal.
-
Refill engine oil, refer to Refilling.
Note:
Wait at least 30 minutes after oil pan (lower) is installed before refilling engine oil.
Inspection
Inspection
INSPECTION AFTER REMOVAL
Clean oil strainer portion [part of the oil pan (upper)] if any object attached.
INSPECTION AFTER INSTALLATION
Check the engine oil level and adjust engine oil. Refer to Inspection.
Stop engine and wait for 10 minutes.
Check the engine oil level again. Refer to Inspection.
Other materials:
P27f0-00 Transmission Range Control B Position Sensor/switch
Dtc Description
DTC Description
DTC DETECTION LOGIC
DTC
CONSULT screen terms
(Trouble diagnosis
content)
DTC detection
...
B20c7-15 A/c Clutch
Dtc Description
DTC Description
DTC DETECTION LOGIC
DTC No.
CONSULT screen terms
(Trouble diagnosis content)
DTC detection condition
...
Cushion Heater Lh
Component Function Check
Component Function
Check
CHECK FUNCTION
Check that cushion heater LH warms to the preset
temperature when operating the heated seat switch LH to HIGH and LOW.
Is the inspection result normal?
...