Nissan Sentra B18 (2020-2025) Service Manual: Front Combination Lamp
Exploded View
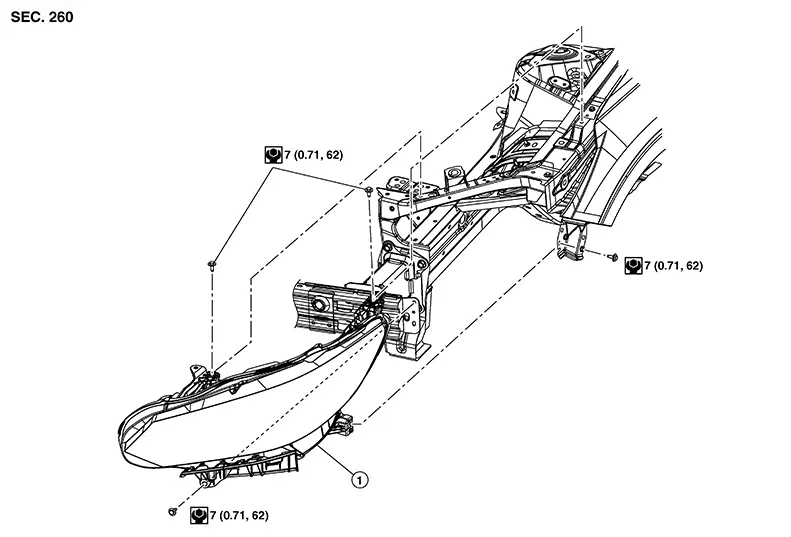
|
1. |
Front combination lamp |
Removal and Installation
REMOVAL
Remove the front bumper fascia. Refer to Removal and Installation.
Remove the front combination lamp bolts.
Pull the front combination lamp forward.
Disconnect the harness connectors from the front combination lamp.
INSTALLATION
Installation is in the reverse order of removal.
After installation, perform headlamp aiming adjustment. Refer to Aiming Adjustment.
Bulb Replacement
Warning:
Do not touch bulb by hand while it is lit or right after being turned off. Burning may result.
CAUTION:
-
Do not touch glass surface of the bulb with bare hands or allow oil or grease to get on it to prevent damage to bulb.
-
Do not leave the bulb out of the lamp reflector for a long time because dust, moisture, smoke, etc. may affect the performance of the lamp.
HEADLAMP HIGH BEAM/ DAYTIME RUNNING LAMP BULB
Removal
Remove the core support cover. Refer to Exploded View.
Rotate the plastic cover counterclockwise and remove.
Rotate the headlamp high beam/daytime running lamp bulb counterclockwise and remove.
Disconnect the harness connector from the headlamp high beam/daytime running lamp bulb.
Installation
Installation is in the reverse order of removal.
CAUTION:
After installing, be sure to install the cover securely to ensure watertightness.
HEADLAMP LOW BEAM LAMP BULB
Removal
Remove the core support cover. Refer to Exploded View.
Rotate the plastic cover counterclockwise and remove.
Rotate the headlamp low beam lamp bulb counterclockwise and remove.
Disconnect the harness connector from the headlamp low beam lamp bulb.
Installation
Installation is in the reverse order of removal.
CAUTION:
After installing, be sure to install the cover securely to ensure watertightness.
TURN/PARKING LAMP BULB
Removal
Remove the core support cover. Refer to Exploded View.
Rotate the turn/parking lamp bulb socket counterclockwise and remove.
Remove the turn/parking lamp bulb from the turn/parking lamp bulb socket.
Installation
Installation is in the reverse order of removal.
CAUTION:
After installing, be sure to install the bulb socket securely to ensure watertightness.
SIDE MARKER LAMP BULB
The side marker lamp bulb is LED and is serviced as an assembly to the front combination lamp. Refer to Removal and Installation.

 Door Mirror Turn Signal Lamp
Exploded View
Exploded View
1.
Door mirror assembly
...
Other materials:
System
System Diagram
FRONT POWER WINDOW LH ANTI-PINCH SYSTEM
System Description
MAIN POWER WINDOW AND DOOR LOCK/UNLOCK SWITCH
INPUT/OUTPUT SIGNAL CHART
Item
Input signal to main power window and
door lock/unlock switch
Main power window and door
lock/unlock switch function
A ...
Front Foot Duct
Removal and Installation
Removal and Installation
FRONT FOOT DUCT LH
Removal
Remove left
knee air bag module. Refer to Removal and Installation.
Remove
instrument finisher C. Refer to Removal and Installation.
Remove
screws (A).
...
Illumination Control System
System Description
System Description
SYSTEM DIAGRAM
OUTLINE
Each illumination lamp is controlled by each function
of BCM and combination meter.
Control by BCM
Parking, license plate, side marker and tail lamp
control function
Combination switc ...
