Nissan Sentra B18 (2020-2025) Owner's Manual: Rear-facing child restraint installation using the seat belts
WARNING
The three-point seat belt with Automatic Locking Retractor (ALR) must be used when installing a child restraint in the Nissan Sentra.
Failure to activate and use the ALR mode will prevent the child restraint from being properly secured. An improperly installed restraint may tip or loosen and cause serious injury to a child during a sudden stop or collision.
When installing a child restraint system in the rear center seating position, both the center seat belt connector tongue and the buckle tongue must be securely fastened.
Do not use the lower anchors if the combined weight of the child and the child restraint exceeds 65 lbs (29.5 kg). If the combined weight is greater than 65 lbs (29.5 kg), install the child restraint using the vehicle’s seat belt instead of the lower anchors. Always follow the child restraint manufacturer’s installation instructions when securing a child restraint in the Nissan Sentra.
Follow these steps to install a rear-facing child restraint using the vehicle seat belts in the rear seating positions:
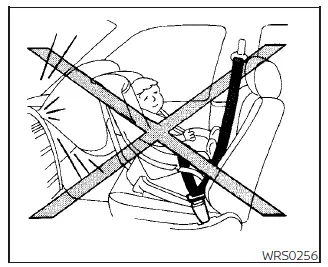
Rear-facing - step 1
1. Child restraints designed for infants must always be used in the rear-facing direction and must never be installed in the front seat. Position the child restraint on the rear seat and follow all instructions provided by the child restraint manufacturer.
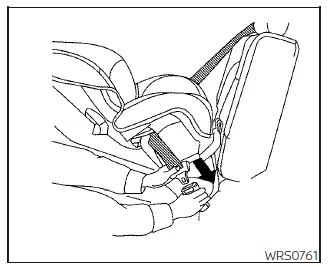
Rear-facing - step 2
2. Route the seat belt tongue through the designated belt path on the child restraint and insert it into the buckle until you hear and feel the latch engage. Be sure to follow the child restraint manufacturer’s instructions for correct belt routing.
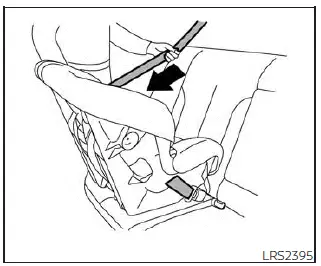
Rear-facing - step 3
3. Slowly pull the shoulder belt until it is fully extended. Once fully extended, the seat belt retractor switches to ALR mode (child restraint mode). The retractor will return to ELR mode after the seat belt is fully retracted.
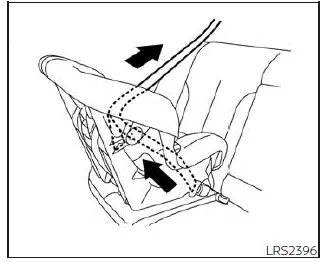
Rear-facing - step 4
4. Allow the seat belt to retract, then pull upward on the shoulder belt to remove any remaining slack from the belt.
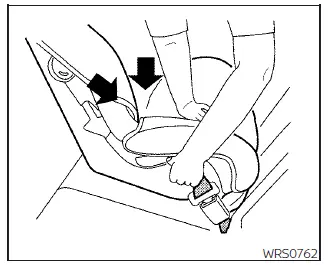
Rear-facing - step 5
5. Remove any additional slack by pressing firmly downward and rearward at the center of the child restraint. Compress the vehicle seat cushion and seatback while pulling upward on the seat belt to ensure a tight and secure fit.
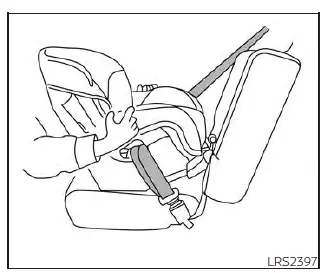
Rear-facing - step 6
6. After securing the child restraint, test the installation before placing the child in the seat. Hold the child restraint near the seat belt path and push it from side to side. The restraint should not move more than 1 inch (25 mm) from side to side. Pull forward on the restraint to confirm that the seat belt holds it firmly in place.
If the child restraint is not secure, tighten the seat belt as needed or reposition the restraint in another seating position and test it again. In some cases, a different child restraint may be required, as not all child restraints fit all vehicles equally.
7. Before each use, check that the child restraint is properly secured. If the seat belt is not locked, repeat steps 3 through 6.
After the child restraint is removed and the seat belt is fully retracted, the ALR mode (child restraint mode) is automatically canceled.
Other materials:
Text messaging
WARNING
Laws in some jurisdictions may restrict the use of Text-to-Speech features.
Always check local regulations before using this function in your Nissan
Sentra.
Laws in some jurisdictions may limit the use of certain applications
and features, including social networking a ...
Preparation. Preparation
Preparation
Special Service Tools
Special Service
Tools
The actual shape of the tools may differ from those
illustrated here.
Tool number
(TechMate No.)
Tool name
...
U2141 Can Comm Err (tcm)
Dtc Description
DTC Description
DTC DETECTION LOGIC
DTC No.
CONSULT screen
terms
(Trouble
diagnosis content)
DTC detection condition
...