Nissan Sentra B18 (2020-2025) Service Manual: Rear Combination Lamp (trunk Lid Side)
Exploded View
|
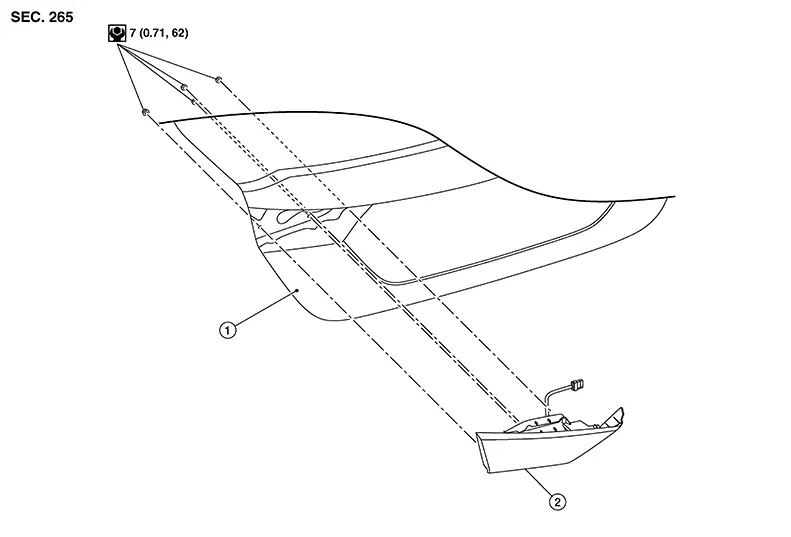
1. |
Trunk lid |
2. |
Rear combination lamp (trunk lid side) |
Removal and Installation
REMOVAL
Partially remove trunk lid trim. Refer to Removal and Installation.
Remove rear combination lamp (trunk lid side) nuts then remove rear combination lamp (trunk lid side).
INSTALLATION
Installation is in the reverse order of removal.
Bulb Replacement
Warning:
Do not touch bulb with bare hand while it is lit or right after being turned off. Burning may result.
CAUTION:
-
Do not touch glass surface of bulb with bare hands or allow oil or grease to get on it to prevent damage to bulb.
-
Do not leave bulb out of lamp reflector for a long time because dust, moisture smoke, etc. may affect performance of lamp. When replacing bulb, be sure to replace it with new one.
TAIL LAMP BULB
REMOVAL
Remove the rear combination lamp. Refer to Removal and Installation.
Rotate the tail lamp bulb socket counterclockwise and remove.
Remove the tail lamp bulb from bulb socket.
INSTALLATION
Installation is in the reverse order of removal.
CAUTION:
After installing, be sure to install the bulb socket securely to ensure watertightness.
BACK-UP LAMP BULB
REMOVAL
Remove the rear combination lamp (trunk lid side). Refer to Removal and Installation.
Rotate the back—up lamp bulb socket counterclockwise and remove.
Remove the back—up lamp bulb from bulb socket.
INSTALLATION
Installation is in the reverse order of removal.
CAUTION:
After installing, be sure to install the bulb socket securely to ensure watertightness.
 Rear Combination Lamp (body Side)
Exploded View
Exploded View
1.
Rear combination lamp
...
 Combination Switch
Exploded View
Exploded View
1.
Steering column assembly
...
Other materials:
Confirmation Procedure
Confirmation Procedure
PRECONDITIONING
If “Confirmation Procedure” has been
previously conducted, always place the ignition switch OFF and wait
at least 10 seconds before conducting the next test.
>&g ...
Wiring diagram
Wiper and washer system
Wiring diagram - with intelligent key
Wiring diagram - without intelligent key
...
Steering column covers
Removal and Installation
REMOVAL
Remove the steering column cover screws (A), then remove the
steering column upper (1) and lower (2) covers.
NOTE:
Shown with steering wheel removed for clarity.
If necessary, rotate steering wheel to access steering column
cover screws (A).
...
