Nissan Sentra B18 (2020-2025) Service Manual: Engine Mounting Insulator (lh)
Exploded View
Exploded View
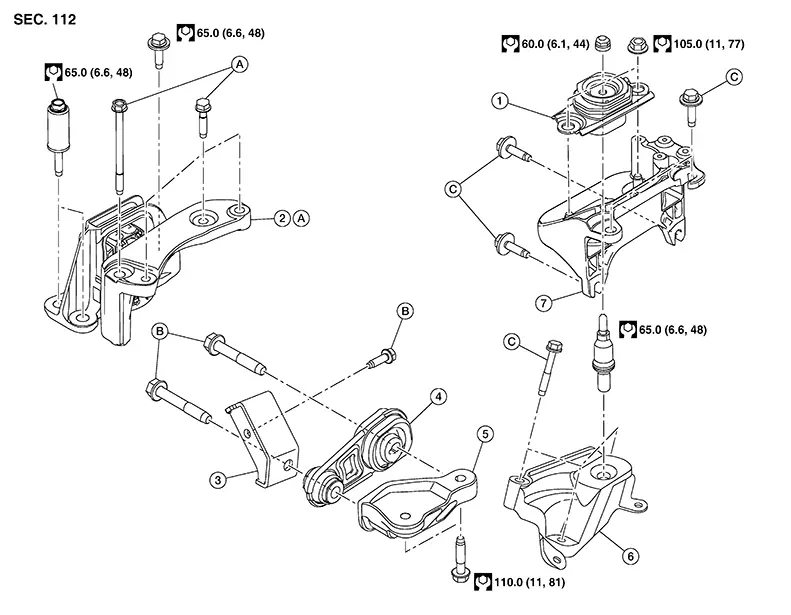
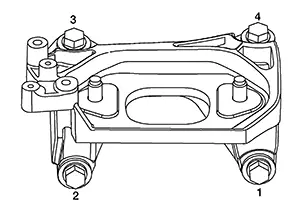
CVT Models
|
1. |
Engine mounting insulator (LH) |
2. |
Engine mounting insulator (RH) |
3. |
Torque rod stay |
|
4. |
Torque rod |
5. |
Torque rod bracket |
6. |
Engine mounting bracket (LH) |
|
7. |
Engine mounting support (LH) |
A. |
Refer to Removal and Installation. |
B. |
Refer to Removal and Installation. |
|
C. |
Refer to Removal and Installation. |
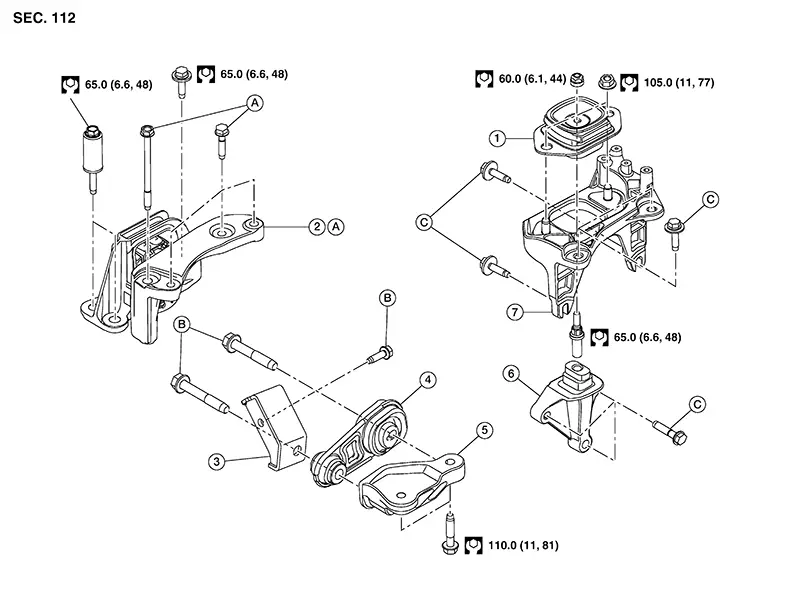
M/T Models
|
1. |
Engine mounting insulator (LH) |
2. |
Engine mounting insulator (RH) |
3. |
Torque rod stay |
|
4. |
Torque rod |
5. |
Torque rod bracket |
6. |
Engine mounting bracket (LH) |
|
7. |
Engine mounting support (LH) |
A. |
Refer to Removal and Installation. |
B. |
Refer to Removal and Installation. |
|
C. |
Refer to Removal and Installation. |
Removal and Installation
Removal and Installation
REMOVAL
Remove the battery tray. Refer to Removal and Installation.
Remove the front under cover. Refer to Removal and Installation.
Support the engine and transaxle assembly using a suitable jack.
CAUTION:
Do not damage oil pan (lower) or transaxle oil pan when supporting engine.
-
Place a piece of wood or equivalent between the suitable jack and supporting surface and secure in a stable condition.
Remove nuts and remove the engine mounting insulator (LH).
Remove bolts and remove the engine mounting support (LH).
Remove the stud from the engine mounting bracket (LH) (if necessary).
Remove bolts and remove the engine mounting bracket (LH) from the transaxle assembly.
INSTALLATION
Install the engine mounting bracket (LH) and tighten the bolts to the specified torque in the sequence shown.
-
M/T models
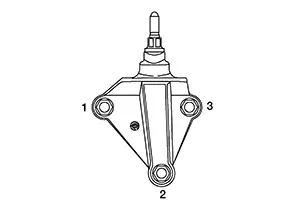
-
CVT models
|
Bolts |
: 60.0 N·m (6.1 kg-m, 44 ft-lb) |
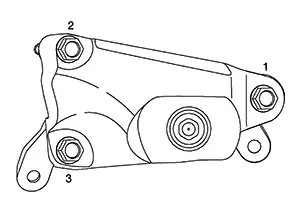
Install the
engine support bracket (LH) and tighten the bolts to the specified
torque in the sequence shown.
 Note:
Note: 
M/T models shown, CVT models similar.
|
Bolts |
: 45.0 N·m (4.6 kg-m, 33 ft-lb) |
Installation of the remaining components is in the reverse order of removal.
Other materials:
Operation
Switch Name and Function
Switch Name and Function
STEERING SWITCH
The steering switch is located on the steering
wheel.
Transmits the steering switch signal to the
combination meter.
...
Headlining
Exploded View
Exploded View
STANDARD ROOF
1.
Front room/map lamp assembly
bracket
2.
Headlining
...
P01f0 Engine Coolant Temperature
Dtc Description
DTC Description
DTC DETECTION LOGIC
DTC
CONSULT screen terms
(Trouble diagnosis
content)
DTC detection
condition
...