Nissan Sentra B18 (2020-2025) Service Manual: Defogger :: Dtc/circuit Diagnosis
Rear Window Defogger Switch. Component Function Check
Component Function Check
-
CHECK REAR WINDOW DEFOGGER SWITCH FUNCTION
-
Check that the indicator lamp of rear window defogger illuminates when rear window defogger switch ON.
Is the inspection result normal?
YES>>Rear window defogger switch function is OK.
NO>>Refer to Diagnosis Procedure.
-
Diagnosis Procedure
Diagnosis Procedure
-
REPLACE A/C SWITCH ASSEMBLY
-
-
Ignition switch OFF.
-
Replace A/C switch assembly (rear window defogger switch). Refer to Removal and Installation (with automatic air conditioner) or Removal and Installation (with manual air conditioner).
-
Start engine.
-
Operate rear window defogger switch and check the operating condition.
-
Is the inspection result normal?
YES>>Inspection End.
NO>>With automatic A/C: GO TO 2.
NO>>With manual A/C: GO TO 3.
-
-
REPLACE A/C AUTO AMP.
-
-
Ignition switch OFF.
-
Replace A/C auto amp. Refer to Removal and Installation.
-
Start engine.
-
Operate rear window defogger switch and check the operating condition.
-
Is the inspection result normal?
YES >>Inspection End.
NO >>Replace BCM. Refer to Removal and Installation.
-
-
REPLACE A/C AMP.
-
-
Ignition switch OFF.
-
Replace A/C amp. Refer to Removal and Installation.
-
Start engine.
-
Operate rear window defogger switch and check the operating condition.
-
Is the inspection result normal?
YES >>Inspection End.
NO >>Replace BCM. Refer to Removal and Installation.
-
Rear Window Defogger Relay. Component Function Check
Component Function Check
-
CHECK REAR WINDOW DEFOGGER RELAY CONTROL FUNCTION
-
 CONSULT
-
Ignition switch ON.
-
Select “REAR DEFOGGER� in “Active Test� mode of "BCM(REAR DEFOGGER)".
-
Select “On�.
-
Check that the rear window glass is getting warmer.
Note:
When glass is hot, never start inspection until it is cool enough.
-
Is the inspection result normal?
YES >>Rear window defogger relay control function is OK.
NO >>Refer to Diagnosis Procedure.
-
Diagnosis Procedure
Diagnosis Procedure
-
CHECK FUSE
-
-
Ignition switch OFF.
-
Check that the following fuse is not blown (open):
Unit
Location
Fuse No.
Capacity
Rear window defogger relay
Fuse block (J/B)
19
10 A
58
30 A
-
Is the fuse blown (open)?
YES>>Replace the blown fuse or fusible link after repairing the affected circuit.
NO>>GO TO 2.
-
-
CHECK REAR WINDOW DEFOGGER RELAY (COIL SIDE) CIRCUIT 1
-
-
Disconnect BCM connector.
-
Check voltage between BCM harness connector and ground.
(+)
(-)
Voltage
(Approx.)
BCM
Connector
Terminal
M83
63
Ground
Battery voltage
-
Is the inspection result normal?
YES>>GO TO 5.
NO>>GO TO 3.
-
-
CHECK REAR WINDOW DEFOGGER RELAY (COIL SIDE) CIRCUIT 2
-
-
Disconnect rear window defogger relay connector.
-
Check voltage between fuse block (J/B) harness connector and ground.
(+)
(-)
Voltage
(Approx.)
Fuse block (J/B)
Terminal
Coil upstream side of rear window defogger relay
Ground
Battery voltage
-
Is the inspection result normal?
YES>>GO TO 4.
NO>>Repair or replace the malfunctioning parts.
-
-
CHECK REAR WINDOW DEFOGGER RELAY (COIL SIDE) CIRCUIT 3
-
Check continuity between BCM harness connector and fuse block (J/B) harness connector.
BCM
Fuse block (J/B)
Continuity
Connector
Terminal
Terminal
M83
63
Coil downstream side of rear window defogger relay
Yes
Is the inspection result normal?
YES>>GO TO 7.
NO>>Repair or replace the malfunctioning parts.
-
-
CHECK REAR WINDOW DEFOGGER RELAY (SWITCH SIDE) CIRCUIT 1
-
-
Disconnect rear window defogger relay.
-
Check voltage between fuse block (J/B) harness connector and ground.
(+)
(-)
Voltage
(Approx.)
Fuse block (J/B)
Terminal
Switch upstream side of rear window defogger relay
Ground
Battery voltage
-
Is the inspection result normal?
YES>>GO TO 6.
NO>>Repair or replace the malfunctioning parts.
-
-
CHECK REAR WINDOW DEFOGGER RELAY (SWITCH SIDE) CIRCUIT 2
-
-
Disconnect Rear window defogger condenser connector..
-
Check continuity between Rear window defogger condenser harness connector and fuse block (J/B) harness connector.
Rear window defogger condenser
Fuse block (J/B)
Continuity
Connector
Terminal
Terminal
B50
1
Switch downstream side of rear window defogger relay
Yes
-
Is the inspection result normal?
YES>>GO TO 7.
NO>>Repair or replace the malfunctioning parts.
-
-
CHECK REAR WINDOW DEFOGGER RELAY
-
Check rear window defogger relay. Refer to Component Inspection.
Is the inspection result normal?
YES>>Inspection End.
NO>>Replace rear window defogger relay.
-
Component Inspection
Component Inspection
-
CHECK REAR WINDOW DEFOGGER RELAY
-
-
Ignition switch OFF.
-
Disconnect rear window defogger relay.
-
Check continuity between rear window defogger relay terminals.
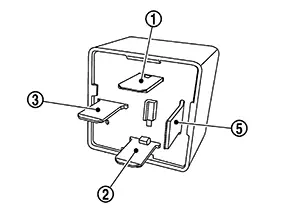
Rear window defogger relay
Condition
Continuity
Terminals
3
5
12 V direct current supply between terminals 1 and 2.
Yes
No current supply
No
-
Is the inspection result normal?
YES >>Inspection End.
NO >>Replace rear window defogger relay.
-
Rear Window Defogger Circuit. Component Function Check
Component Function Check
-
CHECK REAR WINDOW DEFOGGER FUNCTION
-
CONSULT
-
Ignition switch ON.
-
Select “REAR DEFOGGER� in “Active Test� mode of "BCM(REAR DEFOGGER)".
-
Select “On�.
-
Check that the rear window glass is getting warmer.
Note:
When glass is hot, never start inspection until it is cool enough.
-
Is the inspection result normal?
YES>>Inspection End.
NO>>Refer to Diagnosis Procedure.
-
Diagnosis Procedure
Diagnosis Procedure
-
CHECK REAR WINDOW DEFOGGER POWER SUPPLY CIRCUIT
-
-
Start engine.
-
Check voltage between rear window defogger harness connector and ground.
(+)
(–)
Condition
Voltage
(Approx.)
Rear window defogger
Connector
Terminal
B62
1
Ground
Rear window defogger switch
ON
Battery voltage
OFF
0 V
-
Is the inspection result normal?
YES >>GO TO 2.
NO >>GO TO 3.
-
-
CHECK REAR WINDOW DEFOGGER GROUND CIRCUIT
-
-
Ignition switch OFF.
-
Disconnect rear window defogger connector.
-
Check continuity between rear window defogger harness connector and ground.
Rear window defogger
—
Continuity
Connector
Terminal
B63
2
Ground
Yes
-
Is the inspection result normal?
YES >>GO TO 6.
NO >>Repair or replace harness.
-
-
CHECK REAR WINDOW DEFOGGER CIRCUIT 1
-
-
Ignition switch OFF.
-
Disconnect rear window defogger condenser connector and rear window defogger connector.
-
Check continuity between rear window defogger condenser harness connector and rear window defogger harness connector.
Rear window defogger condenser
Rear window defogger
Continuity
Connector
Terminal
Connector
Terminal
B50
1
B62
1
Yes
-
Is the inspection result normal?
YES >>GO TO 4.
NO >>Repair or replace harness.
-
-
CHECK REAR WINDOW DEFOGGER CIRCUIT 2
-
-
Disconnect rear window defogger relay connector.
-
Check continuity between rear window defogger condenser harness connector and fuse block (J/B) harness connector.
Rear window defogger condenser
Fuse block (J/B)
Continuity
Connector
Terminal
Terminal
B50
1
Switch downstream side of rear window defogger relay
Yes
-
Is the inspection result normal?
YES >>GO TO 5.
NO >>Repair or replace the malfunctioning parts.
-
-
CHECK REAR WINDOW DEFOGGER CONDENSER
-
-
Ignition switch OFF.
-
Check rear window defogger condenser. Refer to Component Inspection.
-
Is the inspection result normal?
YES>>Inspection End.
NO>>Replace rear window defogger condenser. Refer to Removal and Installation.
-
-
CHECK FILAMENT
-
Check the filament for damage or blown. Refer to Inspection and Repair.
Is the inspection result normal?
YES >>Inspection End.
NO >>Repair filament. Refer to Inspection and Repair.
-
Component Inspection
Component Inspection
-
CHECK REAR WINDOW DEFOGGER CONDENSER
-
-
Ignition switch OFF.
-
Disconnect rear window defogger condenser connector.
-
Check continuity between rear window defogger condenser and ground part of rear window defogger condenser.
Rear window defogger condenser
—
Continuity
Terminal
1
Ground part of rear window defogger condenser
No
-
Is the inspection result normal?
YES >>Inspection End.
NO >>Replace rear window defogger condenser. Refer to Removal and Installation.
-
Door Mirror Lh Defogger. Component Function Check
Component Function Check
-
CHECK DOOR MIRROR LH DEFOGGER FUNCTION
-
CONSULT
-
Ignition switch ON.
-
Select “REAR DEFOGGER� in “Active Test� mode of "BCM(REAR DEFOGGER)".
-
Select “On�.
-
Check that the door mirror LH glass is getting warmer.
Note:
When glass is hot, never start inspection until it is cool enough.
-
Is the inspection result normal?
YES>>Inspection End.
NO>>Refer to Diagnosis Procedure.
-
Diagnosis Procedure
Diagnosis Procedure
-
CHECK DOOR MIRROR LH POWER SUPPLY CIRCUIT
-
-
Ignition switch OFF.
-
Disconnect door mirror LH connector.
-
Start engine.
-
Check voltage between door mirror LH harness connector and ground.
WITH INTELLIGENT AROUND VIEW MONITOR SYSTEM (+)
(-)
Condition
Voltage
(Approx.)
Door mirror LH
Connector
Terminal
D7
6
Ground
Rear window defogger switch
ON
Battery voltage
OFF
0 V
WITHOUT INTELLIGENT AROUND VIEW MONITOR SYSTEM (+)
(-)
Condition
Voltage
(Approx.)
Door mirror LH
Connector
Terminal
D4
4
Ground
Rear window defogger switch
ON
Battery voltage
OFF
0 V
-
Is the inspection result normal?
YES >>GO TO 2.
NO >>Repair or replace harness.
-
-
CHECK DOOR MIRROR LH GROUND CIRCUIT
-
-
Ignition switch OFF.
-
Check continuity between door mirror LH harness connector and ground.
WITH INTELLIGENT AROUND VIEW MONITOR SYSTEM Door mirror LH
—
Continuity
Connector
Terminal
D7
12
Ground
Yes
WITHOUT INTELLIGENT AROUND VIEW MONITOR SYSTEM Door mirror LH
—
Continuity
Connector
Terminal
D4
8
Ground
Yes
-
Is the inspection result normal?
YES >>Replace door mirror LH. Refer to Removal and Installation.
NO >>Repair or replace harness.
-
Door Mirror Rh Defogger. Component Function Check
Component Function Check
-
CHECK DOOR MIRROR RH DEFOGGER FUNCTION
-
CONSULT
-
Ignition switch ON.
-
Select “REAR DEFOGGER� in “Active Test� mode of "BCM(REAR DEFOGGER)".
-
Select “On�.
-
Check that the door mirror RH glass is getting warmer.
Note:
When glass is hot, never start inspection until it is cool enough.
-
Is the inspection result normal?
YES >>Inspection End.
NO >>Refer to Diagnosis Procedure.
-
Diagnosis Procedure
Diagnosis Procedure
-
CHECK DOOR MIRROR RH POWER SUPPLY CIRCUIT
-
-
Ignition switch OFF.
-
Disconnect door mirror RH connector.
-
Start engine.
-
Check voltage between door mirror RH harness connector and ground.
WITH INTELLIGENT AROUND VIEW MONITOR (+)
(-)
Condition
Voltage
(Approx.)
Door mirror RH
Connector
Terminal
D106
6
Ground
Rear window
defogger switch
ON
Battery voltage
OFF
0 V
WITHOUT INTELLIGENT AROUND VIEW MONITOR (+)
(-)
Condition
Voltage
(Approx.)
Door mirror RH
Connector
Terminal
D113
4
Ground
Rear window
defogger switch
ON
Battery voltage
OFF
0 V
-
Is the inspection result normal?
YES >>GO TO 2.
NO >>Repair or replace harness.
-
-
CHECK DOOR MIRROR RH GROUND CIRCUIT
-
-
Ignition switch OFF.
-
Check continuity between door mirror RH harness connector and ground.
WITH INTELLIGENT AROUND VIEW MONITOR SYSTEM Door mirror RH
—
Continuity
Connector
Terminal
D106
12
Ground
Yes
WITHOUT INTELLIGENT AROUND VIEW MONITOR SYSTEM Door mirror RH
—
Continuity
Connector
Terminal
D113
8
Ground
Yes
-
Is the inspection result normal?
YES>>Replace door mirror RH. Refer to Removal and Installation.
NO>>Repair or replace harness.
-
Other materials:
Sonar System. Removal and Installation. Sonar Control Unit. Removal and Installation
Sonar Control Unit. Removal and Installation
Removal and Installation
Removal and Installation
REMOVAL
CAUTION:
When replacing the sonar control unit, perform
"ADDITIONAL SERVICE WHEN REPLACING SONAR CONTROL UNIT". Refer to Work Procedure.
Partially
remove the trunk s ...
Headlight and turn signal switch
Headlight control switch
Type A (if so equipped)
Type B (if so equipped)
Lighting
Rotate the switch to the
position to turn on the front parking lights, tail lights, license plate lights,
and instrument panel illumination. The
indicator will illuminate in the meter.
R ...
Preparation. Preparation
Preparation
Special Service Tools
Special Service
Tools
The actual shape of the tools may differ from those
illustrated here.
Tool number
(TechMate No.)
Tool name
...