Nissan Sentra B18 (2020-2025) Service Manual: Air Cleaner and Air Duct
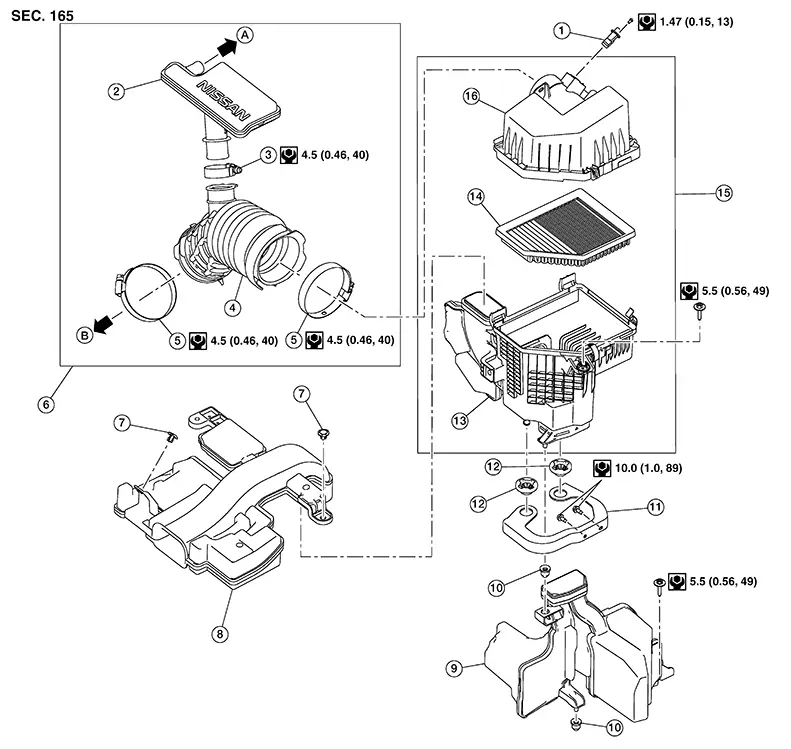
Exploded View
Exploded View
|
1. |
Mass air flow sensor |
2. |
Resonator duct |
3. |
Clamp |
|
4. |
Air duct |
5. |
Clamp |
6. |
Air duct and resonator assembly |
|
7. |
Clip |
8. |
Air inlet duct |
9. |
Resonator |
|
10. |
Mounting rubber |
11. |
Air cleaner bracket |
12. |
Grommet |
|
13. |
Air cleaner case (lower) |
14. |
Air cleaner filter |
15. |
Air cleaner assembly |
|
16. |
Air cleaner case (upper) |
A. |
To blow-by hose. Refer to Exploded View. |
B. |
To electric throttle control actuator. Refer to Exploded View. |
Removal and Installation
Removal and Installation
REMOVAL
Remove the core support cover. Refer to Exploded View.
Disconnect the harness connector from the mass air flow sensor.
Remove harness retainer from air cleaner case (upper).
Remove clips and remove the air inlet duct.
Loosen clamp connecting air duct and resonator assembly to air cleaner assembly.
Remove bolt securing air cleaner assembly.
Remove air cleaner assembly.
Remove the following components after removing the air cleaner assembly (if necessary): Remove mass air flow sensor from air cleaner assembly (if necessary).
CAUTION:
-
Do not shock the mass air flow sensor.
-
Do not disassemble the mass air flow sensor.
-
Do not touch the sensor of the mass air flow sensor.
INSTALLATION
Installation is in the reverse order of removal.
Mass air flow sensor
After replacing mass air flow sensor, perform MIXTURE RATIO SELF-LEARNING VALUE CLEAR. Refer to Work Procedure.
Air Cleaner Assembly
CAUTION:
Check that mounting rubber is positioned in the mounting location and be careful not to allow it to be dislocated when installing air cleaner body.
Air Duct Assembly
-
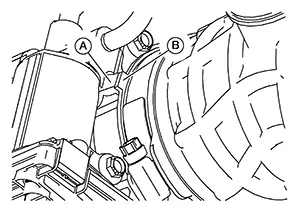
If removed, install air duct and resonator assembly by aligning tab (A) on electric throttle control actuator with tab (B) on air duct and resonator assembly.
CAUTION:
Do not allow foreign materials to adhere to the mounting part of air duct assembly and each mating part.
-
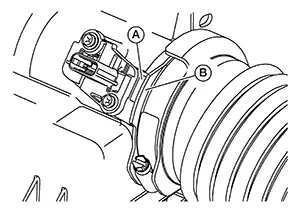
When installing air cleaner assembly, align tab (B) of air duct and resonator assembly with mass air flow sensor boss (A).
Inspection
Inspection
-
Inspect air cleaner assembly and air ducts for cracks or tears.
-
If any damage is found, replace damaged parts.
Other materials:
Bluetooth connections screen
"
"
(back) key
Bluetooth tab
Connections screen
"Add New" key
"
"
(settings) key
"
"
(info) key
"
"
(Bluetooth Audio connection) key
"
"
(Bluetooth Hands-Free Phone
System connection) key
U ...
P2135 Tp Sensor
Dtc Description
DTC Description
DTC DETECTION LOGIC
DTC
CONSULT screen terms
(Trouble diagnosis
content)
DTC detection
condition
...
Refrigerant
Description
Description
CONNECTION OF SERVICE TOOLS AND
EQUIPMENT
1.
Shut-off valve
2.
A/C service valve
...