Nissan Sentra Service Manual: TCM
Exploded View
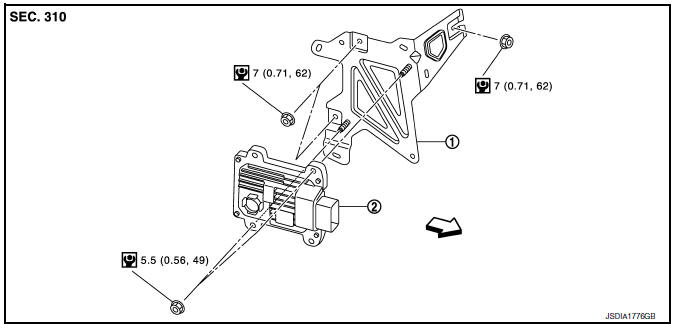
- Br
acket
- TCM
 : Vehicle front
 : NВ·m (kg-m, in-lb)
Removal and Installation
CAUTION:
- When replacing TCM, note the “CVTF DETERIORATION DATE” value displayed on CONSULT “CONFORM CVTF DETERIORTN” in MAINTENANCE BOOKLET, before start the operation.
- Do not impact the TCM when removing or installing TCM.
- Before replacing TCM, perform "ADDITIONAL SERVICE WHEN TCM". Refer to TM-142, "Work Procedure".
- Before replacing TCM and transaxle assembly as a set, perform "ADDITIONAL SERVICE WHEN REPLACING TCM AND TRANSAXLE ASSEMBLY". Refer to TM-144, "Work Procedure".
NOTE:
When replacing TCM and transaxle assembly as a set, replace transaxle assembly first and then replace TCM. Refer to TM-142, "Description".
REMOVAL
- Remove the battery. Refer to PG-50, "Removal and Installation (Battery)".
- Remove the air cleaner case assembly. Refer to EM-25, "Removal and Installation".
- Disconnect the TCM harness connector.
- Remove the TCM.
- Remove the bracket.
INSTALLATION
Installation is the reverse order of removal.
Adjustment
ADJUSTMENT AFTER INSTALLATION
When replaced the TCM, perform “ADDITIONAL SERVICE WHEN REPLACING TCM”. Refer to TM-142, "Description".
 Key interlock cable
Exploded View
Shift selector assembly
Clip
Key interlock cable
Clip
Key cylinder
Removal and Installation
REMOVAL
CAUTION:
Always apply the parking brake before performing remov ...
 AIR Breather hose
Exploded View
Harness bracket
Clip
Air breather hose
Vehicle front
Always replace after every
disassembly.
Removal and Installation
REMOVAL
Remove clips from harness bracke ...
Other materials:
B00A0 OCS System
Description
DTC B00A0 OCCUPANT CLASSIFICATION SYSTEM (OCS)
The OCS control unit is wired to the air bag diagnosis sensor unit. The air
bag diagnosis sensor unit will monitor
the OCS for failures and interruptions in communication between the OCS control
unit and the air bag
diagnosis sensor ...
Low tire pressure warning lamp does not turn oFF
Low Tire Pressure Warning Lamp Stays On When Ignition Switch Is Turned On
DIAGNOSTIC PROCEDURE
1.INSPECT BCM CONNECTOR
Turn ignition switch OFF.
Disconnect BCM connectors.
Check terminals for damage or loose connections.
Is the inspection result normal?
YES >> GO TO 2.
NO > ...
Power supply and ground circuit
WITH INTELLIGENT KEY SYSTEM
WITH INTELLIGENT KEY SYSTEM : Diagnosis Procedure
Regarding Wiring Diagram information, refer to BCS-51, "Wiring Diagram".
1.Check fuses and fusible link
Check that the following fuses and fusible link are not blown.
Is the fuse blown?
Yes >> r ...
