Nissan Sentra B18 (2020-2025) Service Manual: Roof :: Removal and Installation
Glass Lid. Removal and Installation
Removal and Installation
REMOVAL
CAUTION:
-
After installing glass lid, check gap/height adjustments and operation to make sure there is no malfunction.
-
Handle glass lid with care to prevent damage.
Open sunshade and close glass lid.
Remove
inner blind [1 (LH/RH)]. 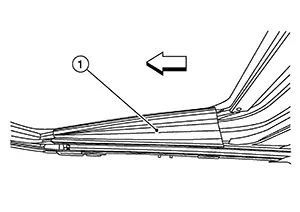 Note:
Note: 
RH shown; LH similar.
 :
Front
:
Front
Remove
glass lid bolts [A (LH/RH)]. 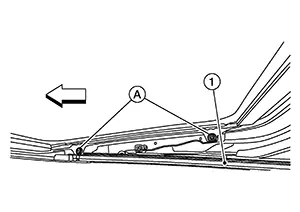 Note:
Note:
RH shown; LH similar.
:
Front
Remove glass lid from moonroof unit assembly (1).
INSTALLATION
Position glass lid to moonroof unit assembly.
Tighten
glass lid bolts. Note:
First tighten the front bolt (LH), then the rear bolt (RH) on the moonroof lid assembly to prevent uneven torque while tightening the remaining the remaining bolts
After installation, check moonroof operation and glass lid alignment. Refer to Adjustment.
Adjustment
Adjustment
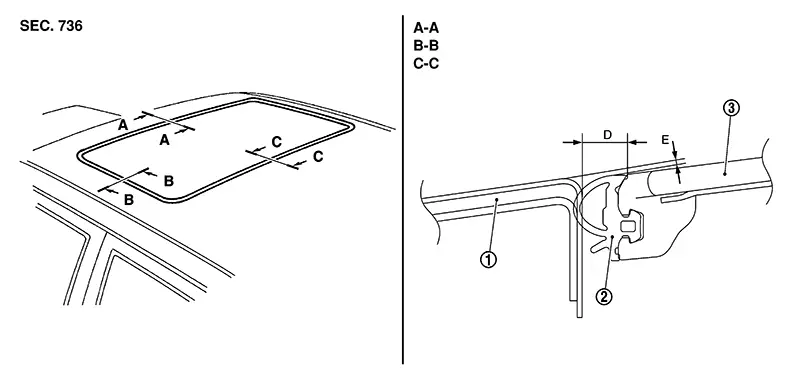
|
1. |
Roof panel |
2. |
Weather-strip |
3. |
Glass lid |
|
Portion |
Gap (D) |
Surface height difference (E) |
|---|---|---|
|
A – A |
4.0 ± 0.8 (0.16 ± 0.03) |
0.8 ± 1.7 (–0.03 ± 0.06) |
|
B – B |
4.0 ± 0.8 (0.16 ± 0.03) |
0.8 ± 1.7 (–0.03 ± 0.06) |
|
C – C |
4.0 ± 0.8 (0.16 ± 0.03) |
0.8 ± 1.7 (–0.03 ± 0.06) |
Loosen the glass lid bolts.
Adjust the clearance of glass lid and roof panel according to the fitting standard dimension.
First tighten the front bolt (LH), then the rear bolt (RH) on the moonroof lid assembly to prevent uneven torque while tightening the remaining bolts.
Tilt glass
lid up and down several times to check that it moves
smoothly. Note:
After adjusting the moonroof unit assembly, perform additional service. Refer to Special Repair Requirement.
Moonroof Motor Assembly. Removal and Installation. Removal and Installation
Removal and Installation
REMOVAL
Close the glass lid.
Remove the front room/map lamp assembly. Refer to Removal and Installation.
Remove the
moonroof motor bolts (A). 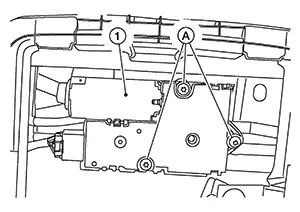
Disconnect the harness connector and remove the moonroof motor assembly (1).
CAUTION:
Do not run the removed moonroof motor assembly as a single unit.
INSTALLATION
CAUTION:
When replacing the moonroof motor assembly, be sure to perform "ADDITIONAL SERVICE WHEN REPLACING MOONROOF MOTOR ASSEMBLY". Refer to Description.
Move moonroof motor assembly laterally little by little so that the gear is completely engaged into the wire on the moonroof unit assembly, and the surfaces become parallel. Install the bolts and tighten.
CAUTION:
Before installing the motor, be sure to place the link and wire assembly in the symmetrical and fully closed position.
Note:
If necessary, insert a suitable tool into the drive key and rotate right or left slightly to assist in complete moonroof motor gear alignment.
Remainder of installation is in the reverse order of removal.
Synchronize moonroof motor assembly with moonroof unit assembly.
Moonroof Unit Assembly. Inspection
Inspection
WIND DEFLECTOR
Open glass lid fully.
Visually check for proper installation, damaged/deteriorated components, or foreign objects within mechanism. Correct as required for smooth operation.
Check for
grease at the wind deflector arm (1) and pivot areas. If necessary,
apply a sufficient amount of grease for non-binding
operation.
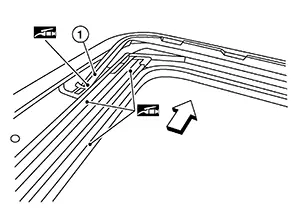
:
Front
Check that
the wind deflector (1) moves freely within the moonroof unit
assembly while manually pressing down and releasing. If a
malfunction is detected, remove the moonroof unit assembly and
visually inspect. If damage is found, replace either wind deflector
(1) or moonroof unit assembly as required. Refer to Removal and Installation (WIND DEFLECTOR) or
Removal and Installation (MOONROOF UNIT
ASSEMBLY). 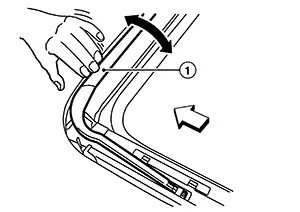
:
Front
LINK AND WIRE ASSEMBLY
Note:
Before replacing a suspect part, make sure it is the source of noise being experienced.
Check link to determine if coating film has peeled off excessively enough that substrate is visible. Check also to determine if link is the source of noise. Replace as necessary.
Visually check to determine if a sufficient amount of grease has been applied to wire or rail groove. If not, add grease as required.
Check wire for any damage or deterioration. If any damage is found, replace moonroof unit assembly. Refer to Removal and Installation.
WEATHER-STRIP
Visually check weather-strip for damage, deterioration, or deformation.
-
Open glass lid partially to inspect front edge of weather-strip.
-
Tilt up glass lid fully to inspect sides and rear edge of weather-strip.
If any area of the weather-strip is found to be damaged, replace the glass lid. Refer to Removal and Installation.
Check for leakage around glass lid.
-
Close moonroof lid assembly.
-
Pour water around surface to determine area of concern.
-
For gaps or misalignment, adjust glass lid to specifications. Refer to Adjustment in this section.
-
For damaged sealing surfaces, either replace glass lid, refer to Removal and Installation or repair the panel, refer to Roof.
-
DRAIN HOSES
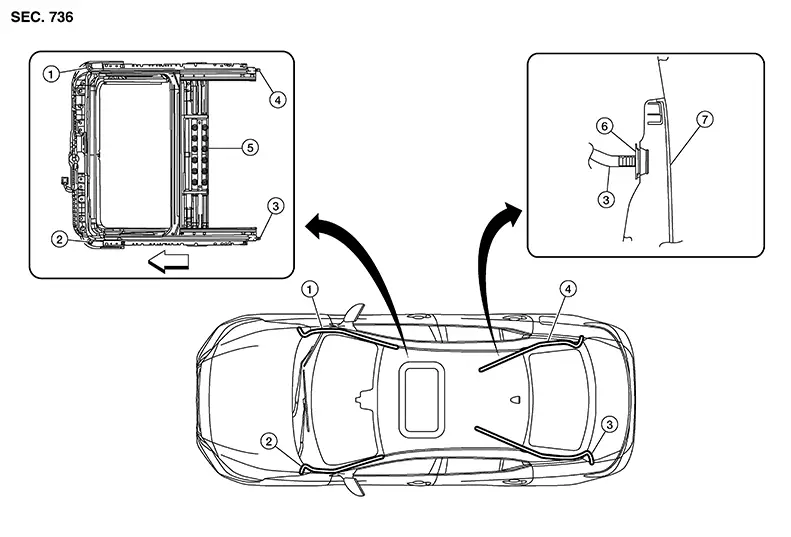
|
1. |
Drain hose front (RH) |
2. |
Drain hose front (LH) |
3. |
Drain hose rear (LH) |
|
4. |
Drain hose rear (RH) |
5. |
Moonroof unit assembly |
6. |
Seal |
|
7. |
Rear bumper fascia |
|
Front |
Remove the headlining. Refer to Removal and Installation.
Visually check drain hoses for:
-
Proper connection at moonroof unit assembly and drain hose.
-
Damage, pinch, cracks or deterioration.
-
Proper fastening and routing on body panels.
Pour water through drain hoses to determine watertight performance.
If damaged or leaking portions in any drain hose is found, replace entire drain hose as necessary.
Exploded View
Exploded View
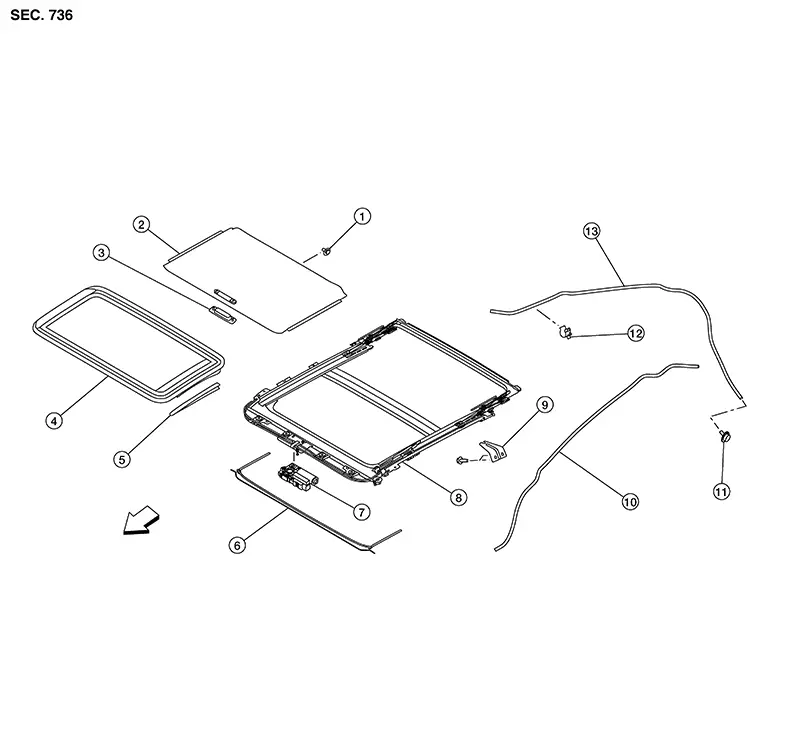
|
1. |
Sunshade stopper |
2. |
Sunshade |
3. |
Sunshade handle |
|
4. |
Glass lid |
5. |
Inner blind (LH/RH) |
6. |
Wind deflector |
|
7. |
Moonroof motor assembly |
8. |
Moonroof unit assembly |
9. |
Rear moonroof bracket (LH/RH) |
|
10. |
Front drain hose (LH/RH) |
11. |
Plug |
12. |
Clip |
|
13. |
Rear drain hose (LH/RH) |
|
Front |
Removal and Installation
Removal and Installation
CAUTION:
-
After installing either moonroof unit assembly or glass lid, check gap/height adjustments and operation to make sure there is no malfunction.
-
Always work with a helper.
-
Handle glass lid with care to prevent damage.
-
When taking moonroof unit assembly out, use shop cloths to protect the headlining, seats and trim from damage.
For easier and more accurate installation, always mark each point before removal.
REMOVAL
CAUTION:
Before servicing moonroof unit assembly, turn the ignition switch off, disconnect both battery terminals and wait at least three minutes.
Close glass lid.
Disconnect the negative and positive battery terminals and wait at least three minutes. Refer to Battery Disconnect.
Remove the headlining. Refer to Removal and Installation.
Disconnect drain hoses.
Disconnect the harness connector from the moonroof motor assembly.
Partially remove the side curtain air bag modules (LH/RH). Refer to Exploded View.
Remove
moonroof side bracket bolts [A (LH/RH)] and the moonroof side
brackets [1 (LH/RH)]. 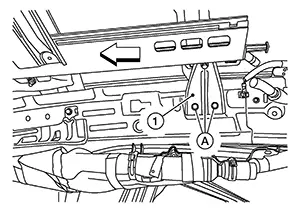 Note:
Note:
RH shown; LH similar.
:
Front
Remove nuts
[A (LH/RH)]. 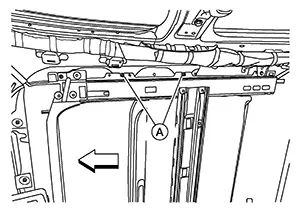 Note:
Note:
RH shown; LH similar.
:
Front
Remove nuts
(A). 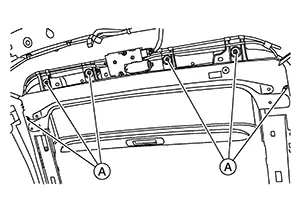
Remove moonroof unit assembly from the passenger compartment while being careful not to damage the seats and trim.
INSTALLATION
CAUTION:
When replacing the moonroof unit assembly, be sure to perform "ADDITIONAL SERVICE WHEN REPLACING CONTROL UNIT". Refer to Special Repair Requirement.
Position moonroof unit assembly over locating pins and loosely install nuts around roof opening.
Install side brackets (LH/RH) and loosely tighten bolts.
Tighten the moonroof unit assembly nuts diagonally.
Tighten the moonroof side bracket (LH/RH) bolts at the Nissan Sentra vehicle side first, then at the moonroof side rail.
Connect harness connector to the moonroof motor assembly.
Connect drain hoses.
Check the glass lid adjustment. Refer to Adjustment.
Install the headlining. Refer to Removal and Installation.
Sunshade. Exploded View
Exploded View
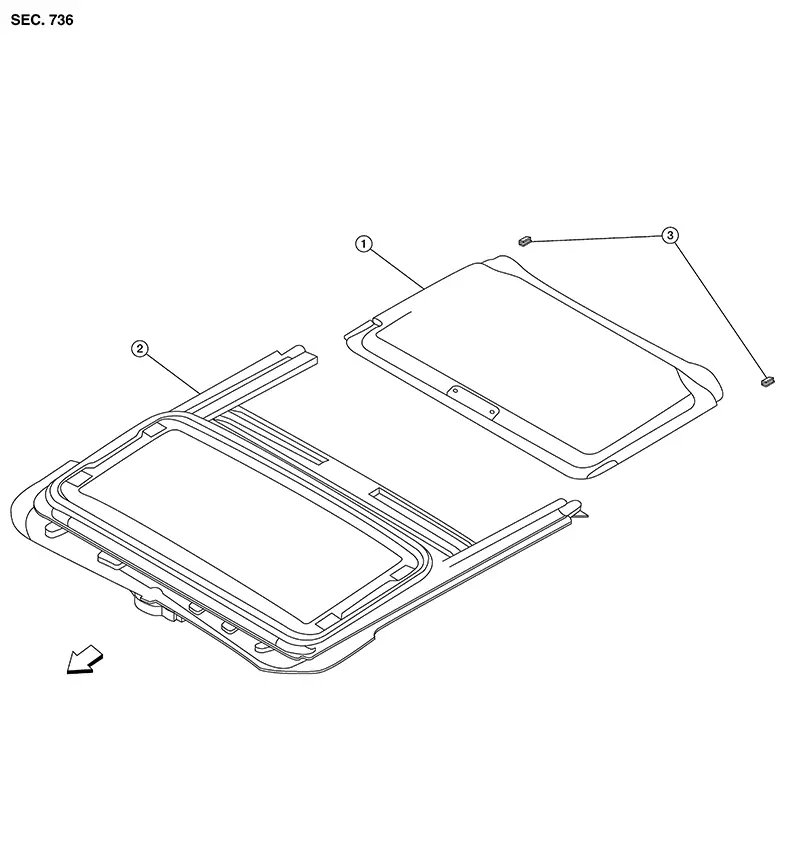
|
1. |
Sunshade |
2. |
Moonroof unit assembly |
3. |
Sunshade stopper (LH/RH) |
|
|
Front |
Removal and Installation
Removal and Installation
REMOVAL
Remove the headlining. Refer to Removal and Installation.
Remove the
sunshade stoppers [1 (LH/RH)] from the moonroof unit assembly side
rails (2).
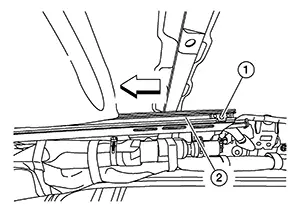
:
Front
Remove sunshade from moonroof unit assembly.
INSTALLATION
Installation is in the reverse order of removal.
Wind Deflector. Exploded View
Exploded View
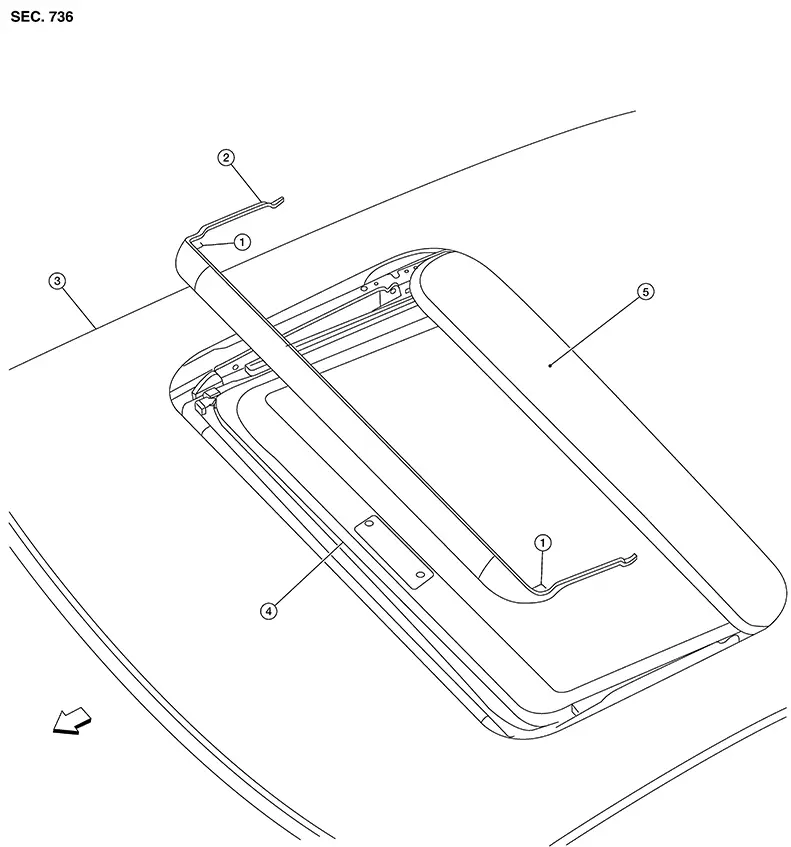
|
1. |
Spring |
2. |
Wind deflector |
3. |
Roof panel |
|
4. |
Sunshade |
5. |
Glass lid |
|
Front |
Removal and Installation
Removal and Installation
REMOVAL
Open the glass lid.
Release
wind deflector (1) from hooks (A). 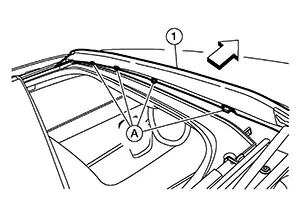
:
Front
Release the springs (LH/RH), then remove the wind deflector.
INSTALLATION
Installation is in the reverse order of removal.
Moonroof Switch Assembly. Removal and Installation. Removal and Installation
Removal and Installation
REMOVAL
Remove the front room/map lamp assembly. Refer to Removal and Installation.
Using a suitable tool, release the pawls and remove the moonroof switch assembly finisher. Refer to Exploded View.
Using a
suitable tool, release the pawls and remove the moonroof switch
assembly (1). 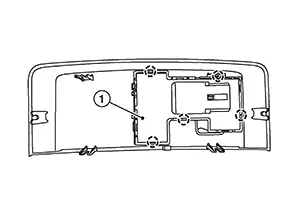
 :
Pawl
:
Pawl
INSTALLATION
Installation is in the reverse order of removal.
Other materials:
Decel G Sensor Calibration
Description
Description
TCM stores calibration data (inherent characteristic value) of
decel G sensor to provide accurate control.
Therefore, it is required to perform calibration of decel G sensor
after the following work is performed.
Removing/ installing ABS actuator ...
Main Line Between Abs and M&a Circuit
Diagnosis Procedure
Diagnosis Procedure
CHECK CONNECTOR
Turn the ignition switch OFF.
Disconnect the battery cable from the
negative terminal.
Check the following terminals and
...
Removal and Installation
Av Control Unit
Exploded View
Exploded View
1.
AV control unit bracket
(LH)
2.
AV control unit
...