Nissan Sentra B18 (2020-2025) Service Manual: Removal and Installation
REMOVAL
Discharge the refrigerant. Refer to Recycle Refrigerant.
Partially remove the front fender protector (RH). Refer to Exploded View.
Remove the front under cover. Refer to Removal and Installation.
Remove the
drive belt from the compressor. Refer to Removal and Installation. Note: 
Complete removal of the drive belt is not necessary.
Remove bolt (A) from high-pressure flexible hose (1) and disconnect high-pressure flexible hose (1) from the compressor (2).
CAUTION:
Cap or wrap the joint of the A/C pipes with suitable material such as vinyl tape to avoid the entry of air.
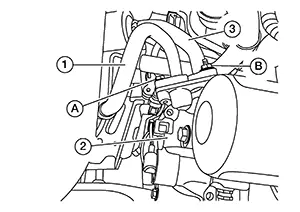
Remove nut (B) from internal heat exchanger (3) and disconnect internal heat exchanger (3) from the compressor (2).
CAUTION:
Cap or wrap the joint of the A/C pipes with suitable material such as vinyl tape to avoid the entry of air.
Disconnect the harness connectors from the compressor.
Remove the compressor bolts and the compressor.
INSTALLATION
Installation is in the reverse order of removal.
CAUTION:
-
Do not reuse the O-rings.
-
Apply A/C compressor oil to the new O-rings for installation.
-
After charging the A/C refrigerant, check for leaks. Refer to Leak Test.
 Exploded View
Exploded View
1.
Compressor
Front
...
 Magnet Clutch
Removal and Installation
Removal and Installation
REMOVAL
Remove
front wheel and tire (RH). Refer to Removal and Installation.
Partially
remove the front fender protector (RH). Ref ...
Other materials:
Work Flow
Work Flow
OVERALL SEQUENCE
Reference 1: Refer to CONSULT Function.
Reference 2: Refer to DTC Index.
Reference 3: Refer to Symptom Table.
DETAILED FLOW
INTERVIEW AND SYMPTOM
CONFIRMATION
Check ...
Exploded View
Exploded View
Exploded View
1.
Stabilizer bar
2.
Stabilizer clamp
3.
...
P188e-00 Electric Oil Pump
Dtc Description
DTC Description
DTC DETECTION LOGIC
DTC
CONSULT screen terms
(Trouble diagnosis
content)
DTC detection
conditi ...
