Nissan Sentra Service Manual: Rear combination lamp
Exploded View
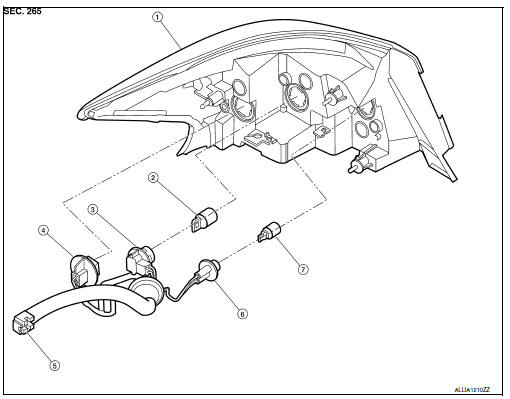
- Rear combination lamp
- Rear turn signal lamp bulb
- Rear turn signal lamp socket
- LED lamp harness connector
- Rear combination lamp harness connector
- Back-up lamp bulb socket
- Back-up lamp bulb
Disassembly and Assembly
DISASSEMBLY
WARNING:
Do not touch bulb while it is lit or right after being turned off. Burning may result.
CAUTION:
- Do not touch glass surface of the bulb with bare hands or allow oil or grease to get on it to prevent damage to bulb.
- Do not leave the bulb out of the lamp reflector for a long time
because dust, moisture, smoke, etc.
may affect the performance of the lamp.
- Remove rear combination lamp. Refer to EXL-126, "Removal and Installation".
- Rotate rear turn signal lamp bulb socket counterclockwise to remove from rear combination lamp.
- Remove the rear turn signal lamp bulb from bulb socket.
- Rotate back-up lamp bulb socket counterclockwise to remove from rear combination lamp.
- Remove the back-up lamp bulb from bulb socket
- Disconnect the harness connector from the LED lamp.
ASSEMBLY
Assembly is in the reverse order of disassembly.
CAUTION:
After installing, be sure to install the bulb sockets securely to ensure watertightness.
Revision:
 Front combination lamp
Exploded View
Large cover (not serviceable)
Small cover (not serviceable)
Front combination lamp
Halogen lamp bulb (high beam)
Turn signal lamp bulb
Turn signal lamp bulb socket
LE ...
 Service data and specifications (SDS)
Bulb specifications
*: Always check with the Parts Department for the latest parts information. ...
Other materials:
Rear parcel shelf finisher
Exploded View
Seat belt finisher (RH)
Rear parcel shelf finisher
Rear seatback finisher (RH)
Top tether strap anchor finisher
(RH)
Top tether strap anchor finisher
(center)
Rear seatback finisher (LH)
Top tether strap anchor finisher
(LH)
Seat belt finisher (LH)
Seat b ...
CSC(concentric slave cylinder)
Exploded View
Transaxle assembly
CSC (Concentric Slave Cylinder)
Removal and Installation
CAUTION:
Do not reuse CSC (Concentric Slave Cylinder). The CSC slides back
to the original position every
time the transaxle assembly is removed. This action may allow dust or
contamin ...
Can communication circuit
Diagnosis procedure
1.Connector inspection
Turn the ignition switch OFF.
Disconnect the battery cable from the negative terminal.
Disconnect all the unit connectors on can communication system.
Check terminals and connectors for damage, bend and loose connection.
Is the inspection resu ...
