Nissan Sentra Service Manual: Rear parcel shelf finisher
Exploded View
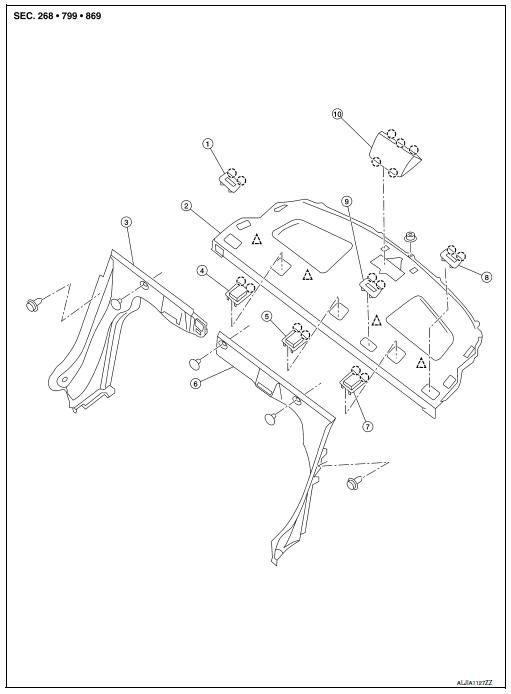
- Seat belt finisher (RH)
- Rear parcel shelf finisher
- Rear seatback finisher (RH)
- Top tether strap anchor finisher (RH)
- Top tether strap anchor finisher (center)
- Rear seatback finisher (LH)
- Top tether strap anchor finisher (LH)
- Seat belt finisher (LH)
- Seat belt finisher (center)
- High-mounted stop lamp
 Pawl
Pawl
 Clip
Clip
Removal and Installation
REMOVAL
- Remove high-mounted stop lamp (if equipped). Refer to EXL-124, "Removal and Installation".
- Remove rear pillar finisher (LH/RH). Refer to INT-29, "REAR PILLAR FINISHER : Removal and Installation".
- Remove top three clips from the rear seatback finishers (LH/RH).
- Remove the rear seat belt lower anchor bolts. Refer to SB-11, "Removal and Installation - Seat Belt Retractor".
- Remove rear parcel shelf finisher.
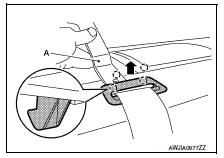
- Release seat belt finisher pawls using a suitable tool (A) and remove all seat belt finishers (LH/RH/center).
 : Pawl
- Route all rear seat belts through rear parcel shelf finisher.
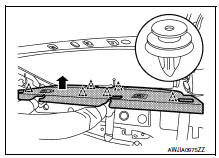
- Release the rear parcel shelf finisher clips as shown.
 Clip
Clip
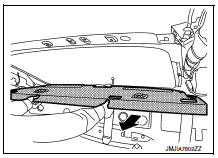
- Pull rear parcel shelf finisher forward and remove.
- Remove top tether strap anchor finishers from rear parcel shelf finisher.
INSTALLATION
Installation is in the reverse order of removal.
Removal and Installation-Top Tether Strap Anchor Finisher
REMOVAL
Release top tether strap anchor finisher pawls and remove the top tether strap anchor finisher.
INSTALLATION
Installation is in the reverse order of removal.
 Body side trim
Exploded View
Rear body side welt
Front body side welt
Tether clip
Front pillar finisher
Metal clip
Dash clip
Dash side finisher
Harness protector
Front kicking plate inner
C ...
 Floor trim
Exploded View
Floor trim
Harness protector
Front floor spacer (RH)
Front floor spacer (LH)
Rear floor spacer (LH)
Rear floor spacer (RH)
Column hole cover
Pawl
Front
Removal ...
Other materials:
When traveling or registering your vehicle in another country
When planning to drive your NISSAN vehicle
in another country, you should first find
out if the fuel available is suitable for your vehicle’s
engine.
Using fuel with an octane rating that is too low
may cause engine damage. All gasoline vehicles
must be operated with unleaded gasoline. The ...
Rear door glass
Removal and Installation
REMOVAL
NOTE:
LH rear door panel shown; RH similar.
Remove the rear door finisher. Refer to INT-19, "Removal and
Installation".
Remove the vapor barrier.
CAUTION:
Use care to not damage or tear vapor barrier during removal.
Remove the rear door ...
Periodic maintenance
Introduction of periodic maintenance
The following tables show the normal maintenance schedule. Depending upon
weather and atmospheric conditions,
varying road surfaces, individual driving habits and vehicle usage, additional
or more frequent maintenance
may be required.
Periodic maintenan ...
