Nissan Sentra Service Manual: Floor trim
Exploded View
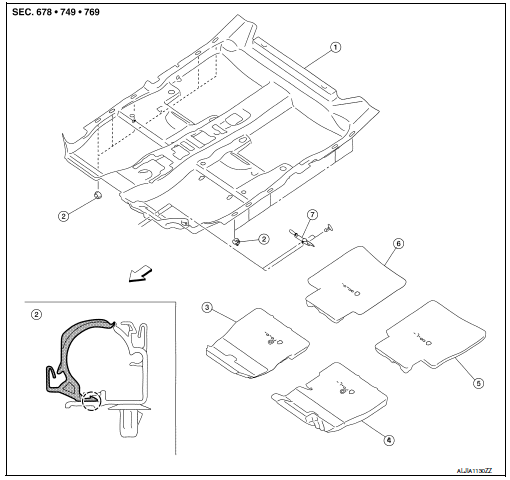
- Floor trim
- Harness protector
- Front floor spacer (RH)
- Front floor spacer (LH)
- Rear floor spacer (LH)
- Rear floor spacer (RH)
- Column hole cover
 Pawl
Pawl
 Front
Front
Removal and Installation
REMOVAL
- Remove front seat assemblies. Refer to the following.
- Refer to SE-18, "DRIVER SIDE : Removal and Installation - Seat Assembly" (Driver Seat).
- Refer to SE-20, "PASSENGER SIDE : Removal and Installation - Seat Assembly" (Passenger Seat).
- Remove rear seat cushion assembly. Refer to SE-23, "Removal and Installation - Seat Cushion Assembly".
- Remove dash side finishers (LH/RH). Refer to INT-26, "DASH SIDE FINISHER : Removal and Installation".
- Remove center pillar lower finishers (LH/RH). Refer to INT-27, "CENTER PILLAR LOWER FINISHER : Removal and Installation".
- Remove rear pillar lower finishers (LH/RH). Refer to INT-30, "REAR PILLAR FINISHER : Removal and Installation - Rear Pillar Lower Finisher".
- Remove lap pre-tensioner anchor bolt. Refer to SB-8, "Removal and Installation".
- Remove center console assembly. Refer to IP-17, "Removal and Installation".
- Remove console rear bracket. Refer to IP-17, "Exploded View".
- Remove rear floor duct. Refer to VTL-7, "REAR FLOOR DUCT : Removal and Installation - Rear Floor Duct".
- Remove shift selector assembly. Refer to TM-253, "Removal and Installation".
- Remove diagnosis sensor unit. Refer to SR-28, "Removal and Installation".
- Remove parking brake lever assembly. Refer to PB-7, "Removal and Installation".
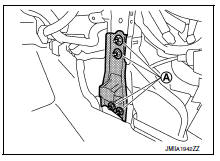
- Remove nut (A) and then remove instrument stay.
- Disconnect drain hose.

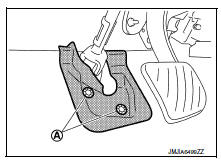
- Remove clips (A) and the column hole cover.
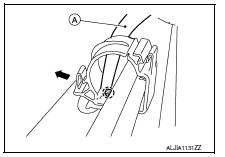
- Release pawl using a suitable tool (A) and open the harness protector.
 Pawl
Pawl
- Remove floor trim.
INSTALLATION
Installation is in the reverse order of removal.
 Rear parcel shelf finisher
Exploded View
Seat belt finisher (RH)
Rear parcel shelf finisher
Rear seatback finisher (RH)
Top tether strap anchor finisher
(RH)
Top tether strap anchor finisher
(center)
Rear ...
 Headlining
Exploded View
STANDARD ROOF
Headlining
Assist grip
Map lamp bracket
Sun visor (RH)
Sun visor cover
Sun visor holder
Map lamp
Sun visor (LH)
Interior room lamp
Assist grip cap ...
Other materials:
Warning lights
Anti-lock
Braking
System (ABS) warning light
When the ignition switch is placed in the ON
position, the Anti-lock Braking System (ABS)
warning light illuminates and then turns off. This
indicates the ABS is operational.
If the ABS warning light illuminates while the
engine is running or ...
L terminal circuit (open)
Description
The “L” terminal circuit controls the charge warning lamp. The charge warning
lamp turns ON when the ignition
switch is set to ON or START. When the generator is providing sufficient voltage
with the engine running,
the charge warning lamp turns OFF. If the charge warnin ...
Thermostat and thermostat housing
Exploded View
Thermostat housing
Gasket
Rubber ring
Thermostat
Water inlet
Clamp
Radiator hose (upper)
To radiator
WARNING:
Do not remove the radiator cap when the engine is hot. Serious burns
could occur from high-pressure
engine coolant escaping from the radiator. ...
