Nissan Sentra Service Manual: Headlining
Exploded View
STANDARD ROOF

- Headlining
- Assist grip
- Map lamp bracket
- Sun visor (RH)
- Sun visor cover
- Sun visor holder
- Map lamp
- Sun visor (LH)
- Interior room lamp
- Assist grip cap
- Headlining clip
- Metal clip
 Pawl
Pawl
 Metal clip
Sunroof
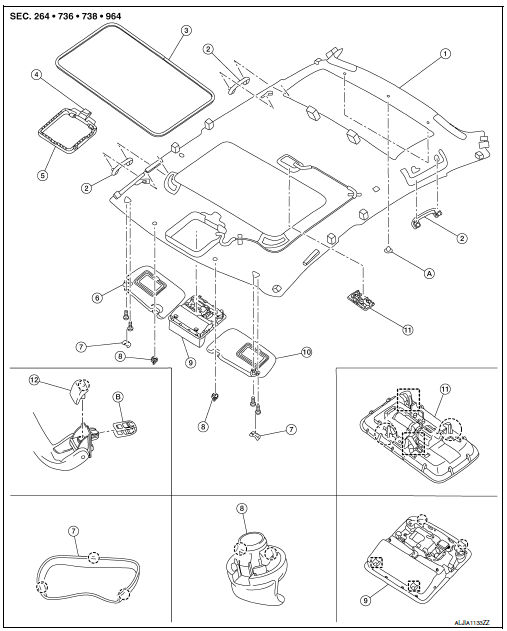
- Headlining
- Assist grip
- Sunroof welt
- Dual lock fastener
- Map lamp bracket
- Sun visor (RH)
- Sun visor cover
- Sun visor holder
- Map lamp
- Sun visor (LH)
- Interior room lamp
- Assist grip cap
- Headlining clip
- Metal clip
 Pawl
Pawl
 Metal clip
Removal and Installation
REMOVAL
- Remove front pillar finishers (LH/RH). Refer to INT-24, "FRONT PILLAR FINISHER : Removal and Installation".
- Remove front seat assemblies. Refer to the following.
- Refer to SE-18, "DRIVER SIDE : Removal and Installation - Seat Assembly" (Driver Seat).
- Refer to SE-20, "PASSENGER SIDE : Removal and Installation - Seat Assembly" (Passenger Seat).
- Remove center pillar upper finishers (LH/RH). Refer to INT-28, "CENTER PILLAR UPPER FINISHER : Removal and Installation".
- Remove rear seat back. Refer to SE-23, "Removal and Installation - 60:40 Split Seatback".
- Remove rear pillar finishers (LH/RH). Refer to INT-29, "REAR PILLAR FINISHER : Removal and Installation".
- Remove center console assembly. Refer to IP-17, "Removal and Installation".
- Remove shift selector assembly. Refer to TM-253, "Removal and Installation".
- Remove all assist grips.
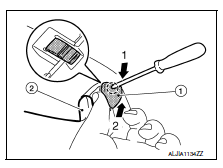
- Release pawl of assist grip cap (1) using a suitable tool (A).
Slide assist grip cap forward and remove as shown.
 Pawl
Pawl
- Slide assist grip (2) forward and remove.
- Remove metal clips from body panel.
- Remove room lamp. Refer to INL-55, "Removal and Installation".
- Remove map lamp. Refer to INL-52, "Removal and Installation".
- Remove sunroof welt (if equipped).
- Remove sun visor.
- Release sun visor cover pawls using a suitable tool (A), then remove sun visor cover.
 : Pawl
- Remove screws and the sun visors (LH/RH).
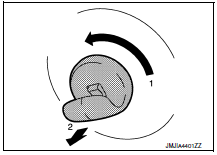
- Remove all sun visor holders.
Rotate 90ąÆ┬░ and remove as shown.
- Remove headlining clips.
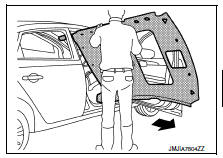
- Remove headlining from roof panel as shown. Adjust the position of headlining so that it can be removed through passenger side door.
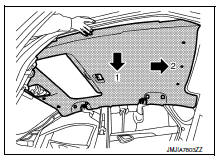
- Remove headlining as shown.
CAUTION:
- Two people are required for removal in order to prevent damage.
- Do not bend headlining when removing.
- Be careful not to scratch or damage any part of the body while removing the headliner.
INSTALLATION
Installation is in the reverse order of removal.
CAUTION:
- When installing headlining, start by installing both sun visor holders and the headlining clips in order to keep the headlining in position.
- Do not bend headlining when installing.
- Be careful that the surface is not wrinkled when installing.
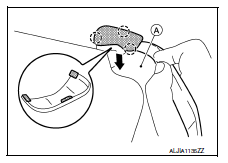
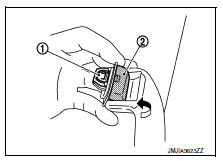
- When installing assist grip, install metal clip (1) to assist grip clip (2), then install to the body panel.
 Floor trim
Exploded View
Floor trim
Harness protector
Front floor spacer (RH)
Front floor spacer (LH)
Rear floor spacer (LH)
Rear floor spacer (RH)
Column hole cover
Pawl
Front
Removal ...
 Trunk room trim
Exploded View
Trunk floor trim
Trunk front floor spacer (LH)
Trunk side finisher (LH)
Reflector box assembly*
Trunk rear plate
Trunk side finisher (RH)
Trunk front floor spacer (RH ...
Other materials:
Basic inspection
Diagnosis and repair work flow
Work flow
Overall sequence
Detailed flow
1.Get information for symptom
Get the detailed information from the customer about the symptom (the
condition and the environment when
the incident/malfunction occurred) using the ą▓ąéčÜdiagnostic work sheetą▓ąéč£. ( ...
Push starting
CAUTION
Do not push start this vehicle. The
three-way catalyst may be damaged.
Continuously Variable Transmission
(CVT) models and Manual Transmission
(MT) cannot be push-started or towstarted.
Attempting to do so may cause
transmission damage
For manual transmission (MT) models,
...
FM/AM/SAT radio with compact disc (CD) player (Type A) (if so equipped)
For all operation precautions, see ŌĆ£Audio operation
precautionsŌĆØ in this section.
Audio main operation
VOL (volume) knob / PWR (power) button:
Place the ignition switch in the ACC or ON
position and press the VOL (volume) knob /PWR
(power) button while the system is off to call up
the mod ...
