Nissan Sentra Service Manual: Body side trim
Exploded View
- Rear body side welt
- Front body side welt
- Tether clip
- Front pillar finisher
- Metal clip
- Dash clip
- Dash side finisher
- Harness protector
- Front kicking plate inner
- Center pillar lower finisher
- Rear kicking plate inner
- Cap
- Center pillar upper finisher
- Rear pillar lower finisher
- Rear pillar finisher
 Clip
Clip
 Pawl
Pawl
 Metal clip
 Front
Front
Front pillar finisher
FRONT PILLAR FINISHER : Removal and Installation
REMOVAL
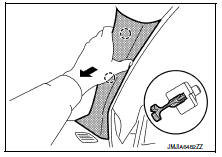
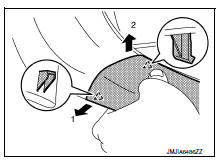
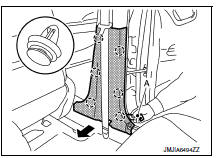
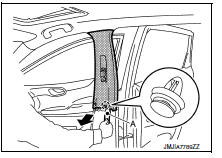
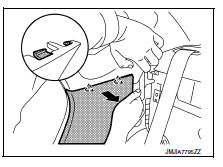
- Partially remove the front body side welt along the front pillar finisher.
- Remove front pillar finisher.
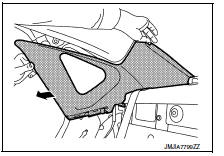
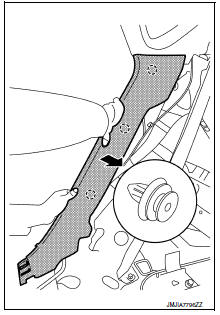
- Pull front pillar finisher to gain access to the front pillar finisher tether clips.
 Tether clip
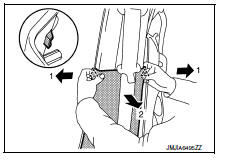
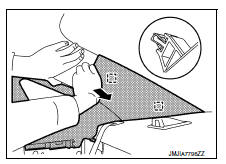
- Cut each tether clip to release front pillar finisher.
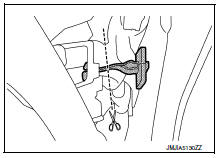
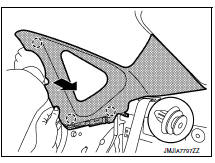
- Release pawls and remove front pillar finisher.
 Pawl
Pawl
- Remove front pillar finisher tether clips from body panel.
INSTALLATION
Installation is in the reverse order of removal.
CAUTION:
- Always replace tether clips with new ones after every removal.
- When installing, check that tether clips are accurately aligned with the holes on body panel, then press in.
Kicking plate inner
KICKING PLATE INNER : Removal and Installation
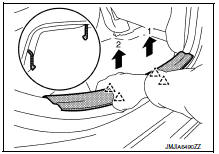
FRONT
Removal
- Move front seat to the full forward position.
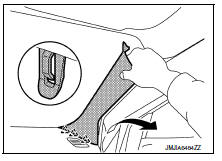
- Lift up front end lower of front kicking plate inner while pulling toward inside of the vehicle and release front kicking plate inner pawls as shown.
 Pawl
Pawl
- Begin at the front and release front kicking plate inner pawls as shown.
 Pawl
Pawl
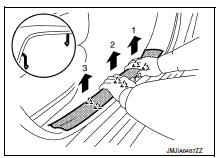
- Lift up rear end lower of front kicking plate inner while pulling toward inside of the vehicle and release front kicking plate inner pawls as shown, then remove front kicking plate inner.
 : Pawl
Installation
Installation is in the reverse order of removal.
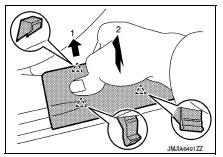
Rear
Removal
- Lift up front end lower of rear kicking plate inner while pulling toward inside of the vehicle and release rear kicking plate inner pawls as shown.
 : Pawl
- Begin at the front and release rear kicking plate inner pawls as shown.
 : Pawl
- Lift up rear end lower of rear kicking plate inner while pulling toward inside of the vehicle and release rear kicking plate inner pawls as shown then remove rear kicking plate inner.
 : Pawl
Installation
Installation is in the reverse order of removal.
Dash side finisher
DASH SIDE FINISHER : Removal and Installation
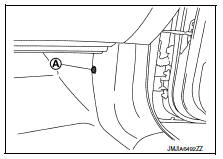
REMOVAL
- Remove front kicking plate inner. Refer to INT-24, "KICKING PLATE INNER : Removal and Installation".
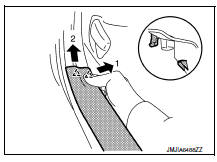
- Remove dash side finisher
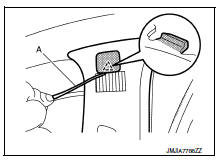
- Remove dash side finisher clip (A).
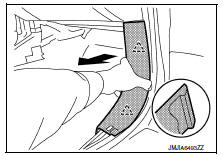
- Pull back dash side finisher as shown to release dash side finisher pawls and remove.
 Pawl
Pawl
INSTALLATION
Installation is in the reverse order of removal.
Body side welt
BODY SIDE WELT : Removal and Installation
FRONT
Removal
- Remove dash side finisher. Refer to INT-26, "DASH SIDE FINISHER : Removal and Installation".
- Remove front body side welt.
CAUTION:
Use care not to stretch out welt if it is to be reused.
Installation
Installation is in the reverse order of removal.
REAR
Removal
- Remove rear kicking plate inner. Refer to INT-24, "KICKING PLATE INNER : Removal and Installation".
- Remove rear body side welt.
CAUTION:
Use care not to stretch out welt if it is to be reused.
Installation
Installation is in the reverse order of removal.
Center pillar lower finisher
CENTER PILLAR LOWER FINISHER : Removal and Installation
CAUTION:
- When removing, always use a remover tool that is made of plastic to prevent damage to the parts.
- Do not damage the body panel.
REMOVAL
- Move front seat to the full forward position.
- Remove front and rear body side welts. Refer to INT-27, "BODY SIDE WELT : Removal and Installation".
- Remove center pillar lower finisher.
- Release center pillar lower finisher clips using a suitable tool (A).
 Clip
Clip
- Release center pillar lower finisher pawls as shown and remove.
 : Pawl
INSTALLATION
Installation is in the reverse order of removal.
CAUTION:
When installing, check that clips are accurately aligned with the holes on body panel, then press in.
Center pillar upper finisher
CENTER PILLAR UPPER FINISHER : Removal and Installation
REMOVAL
- Remove center pillar lower finisher. Refer to INT-27, "CENTER PILLAR LOWER FINISHER : Removal and Installation".
- Remove front seat belt D-ring anchor. Refer to SB-8, "Removal and Installation".
- Remove center pillar upper finisher.
- Apply protective tape (A) to protect the component from damage as shown.
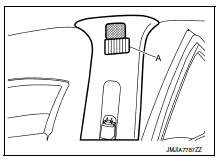
- Release center pillar upper finisher cap pawl using a suitable tool (A) and remove.
 Pawl
Pawl
- Remove the center pillar upper finisher bolt.
- Release center pillar upper finisher lower clip using a suitable tool (A) as shown and remove.
 : Clip
INSTALLATION
Installation is in the reverse order of removal.
CAUTION:
When installing, check that clips are accurately aligned with the holes on body panel, then press in.
Rear pillar finisher
REAR PILLAR FINISHER : Removal and Installation
REMOVAL
- Remove rear pillar lower finisher. Refer to INT-30, "REAR PILLAR FINISHER : Removal and Installation - Rear Pillar Lower Finisher".
- Remove rear pillar finisher
- Release the clips as shown.
 : Clip
- Release the metal clips as shown.
 Metal clip
- Pull rear pillar finisher forward and remove.
INSTALLATION
Installation is in the reverse order of removal.
CAUTION:
When installing, check that all clips are accurately aligned with the holes on body panel, then press in.
REAR PILLAR FINISHER : Removal and Installation - Rear Pillar Lower Finisher
REMOVAL
- Remove the rear seat bolster. Refer to SE-24, "Removal and Installation - Rear Seat Bolster".
- Remove the rear kicking plate inner. Refer to INT-24, "KICKING PLATE INNER : Removal and Installation".
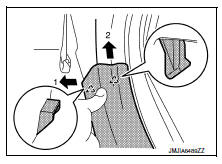
- Remove the rear pillar lower finisher.
- Release pawls at the upper portion of the rear pillar lower finisher as shown.
 : Pawl
- Release clips and remove the rear pillar lower finisher as shown.
 : Clip
INSTALLATION
Installation is in the reverse order of removal.
CAUTION:
When installing, check that clips and pawls are accurately aligned with the holes on body panel, then press in.
 Rear door finisher
Exploded View
Rear door panel
Rear door finisher
Inside door handle escutcheon
Rear power window switch finisher
Grommet
Clip
Pawl
Front
Removal and Installation
CAUTION: ...
 Rear parcel shelf finisher
Exploded View
Seat belt finisher (RH)
Rear parcel shelf finisher
Rear seatback finisher (RH)
Top tether strap anchor finisher
(RH)
Top tether strap anchor finisher
(center)
Rear ...
Other materials:
Service data and specifications (SDS)
General Specifications
Clutch Pedal
Clutch Disc
Clutch Cover
...
Bcm branch line circuit
Diagnosis procedure
1.Check connector
Turn the ignition switch off.
Disconnect the battery cable from the negative terminal.
Check the terminals and connectors of the bcm for damage, bend and loose
connection (unit side and
connector side).
Is the inspection result normal?
Yes > ...
Dtc/circuit diagnosis
U1000 can comm circuit
Description
Refer to LAN-7, "CAN COMMUNICATION SYSTEM : System Description".
Dtc logic
DTC DETECTION LOGIC
CONSULT Display
DTC Detection Condition
Possible Cause
CAN COMM CIRCUIT
[U1000]
When IPDM E/R cannot communicate with CAN com ...
