Nissan Sentra B18 (2020-2025) Service Manual: Periodic Maintenance
Headlamp Aiming Adjustment
Aiming Adjustment
Aiming Adjustment
PREPARATION BEFORE ADJUSTING
Before performing aiming adjustment, check the following:
-
Ensure all tires are inflated to correct pressure.
-
Place Nissan Sentra vehicle and screen on level surface.
-
Ensure there is no load in vehicle other than the driver (or equivalent weight placed in driver's position).
-
Coolant and engine oil filled to correct level, and fuel tank full.
-
Remove cargo and/or luggage to maintain an unloaded Nissan Sentra vehicle condition.
-
Confirm spare tire, jack and tools are properly stowed.
-
Carefully wipe off any dirt from headlamp lens.
CAUTION:
Do not use organic solvent (thinner, gasoline etc.)
-
Place a driver or equivalent weight of 68.5 kg (150 lb) on the driver seat.
-
By hand, bounce the front and rear of the Nissan Sentra vehicle to settle the suspension and eliminate any static load.
-
Place the front tires in the straight ahead position.
-
Aim each headlamp individually and ensure other headlamp beam pattern is blocked from screen.

-
For headlamp aiming details, refer to regulations in your area.
-
By regulation, no means for horizontal aim adjustment is provided from the factory; only vertical aim is adjustable.
-
Use adjusting screw to perform aiming adjustment.
-
Perform headlamp aiming if:
-
The Nissan Sentra vehicle front body has been repaired.
-
The front combination lamp has been removed or replaced.
-
Any outfitting has been installed.
-
The Nissan Sentra vehicle’s standard load condition has been substantially increased.
-
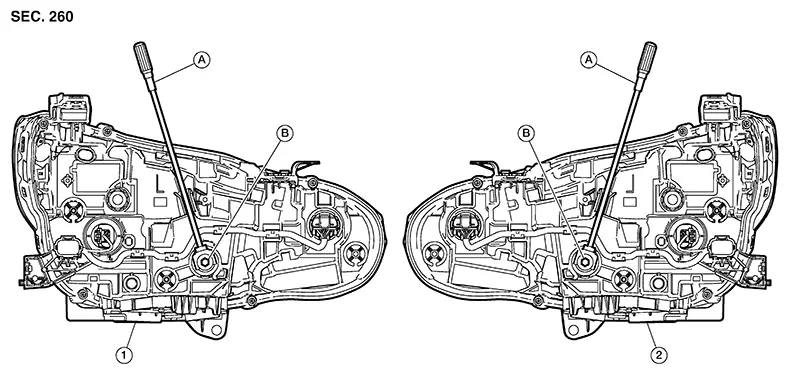
|
1. |
Front combination lamp (LH) |
2. |
Front combination lamp (LH) |
A. |
Suitable tool |
|
B. |
Adjusting screw |
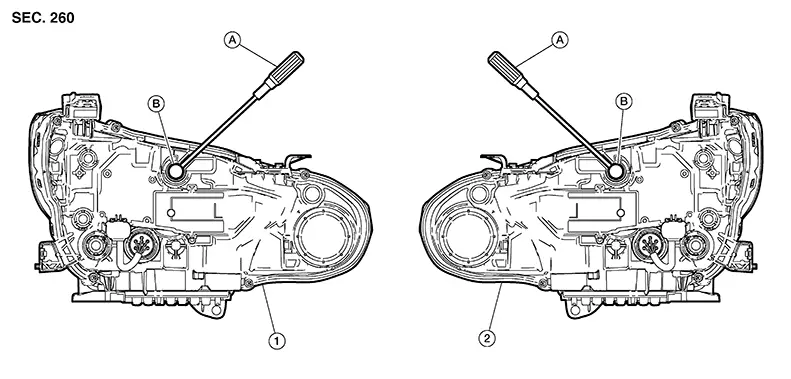
|
1. |
Front combination lamp (LH) |
2. |
Front combination lamp (LH) |
A. |
Suitable tool |
|
B. |
Adjusting screw |
Aiming Adjustment procedure
Position
the screen. Note:
-
Stop the Nissan Sentra vehicle facing the screen.
-
Place the screen on a plain road vertically.
Face the screen with the Nissan Sentra vehicle. Maintain 7.62m (25 ft) between the headlamp bulb center and the screen.
Start the engine. Turn the headlamp (LO) ON.
CAUTION:
Do not cover the lens surface with tape, etc. The lens is made of resin.
Note:
-
Aim each headlamp individually and ensure other headlamp beam pattern is blocked from screen.
-
For horizontal aiming, adjust headlamp until beam pattern is at horizontal center point.
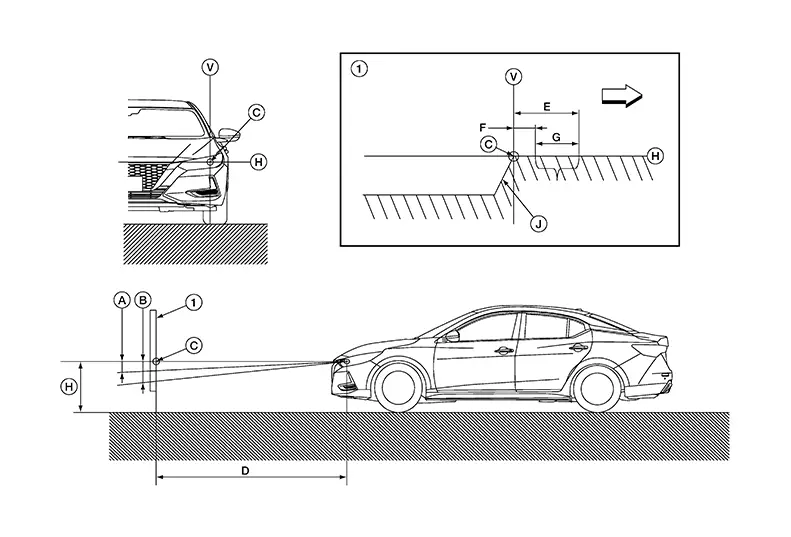
|
1. |
Adjustment screen |
A. |
Highest cutoff line height |
B. |
Lowest cutoff line height |
|
C. |
Headlamp bulb center (H-V point) |
D. |
Distance of headlamp aiming screen from Nissan Sentra vehicle 7.62 m (25 ft) |
E. |
Maximum aim evaluation distance from vertical center on aiming screen 399 mm (3°R) |
|
F. |
Minimum aim evaluation distance from vertical center on aiming screen 133 mm (1°R) |
G. |
Aim evaluation area |
H. |
Horizontal aiming evaluation line |
|
V. |
Vertical aiming evaluation line |
|
Right |

|
A (Highest cutoff line height) |
–13.3 mm (0.5 in) |
0.1° up |
|
B (Lowest cutoff line height) |
13.3 mm (0.5 in) |
0.1° down |
|
A (Highest cutoff line height) |
Left: |
– 6.6 mm (0.3 in) |
0.05° up |
|
Right: |
– 39.9 mm (1.6 in) |
0.3° up |
|
|
B (Lowest cutoff line height) |
Left: |
19.9 mm (0.8 in) |
0.15° down |
|
Right: |
– 13.3 mm (0.5 in) |
0.1° up |
-
Basic illuminating area for adjustment should be within the range shown on the aiming chart. Adjust headlamps accordingly.
Front Fog Lamp
Aiming Adjustment
Aiming Adjustment
PREPARATION BEFORE ADJUSTING
The fog lamp is a sealed-beam type that uses a non-replaceable LED bulb. Before performing aiming adjustment procedure, check the following:
-
Ensure all tires are inflated to correct pressure.
-
Place Nissan Sentra vehicle and screen on level surface.
-
Ensure there is no load in vehicle other than the driver (or equivalent weight placed in driver's position).
-
Coolant and engine oil filled to correct level, and fuel tank full.
-
Remove cargo and/or luggage to maintain an unloaded Nissan Sentra vehicle condition.
-
Confirm spare tire, jack and tools are properly stowed.
-
Carefully wipe off any dirt from lens.
CAUTION:
Do not use organic solvent (thinner, gasoline etc.)
-
Place a driver or equivalent weight of 68.5 kg (150 lb) on the driver seat.
-
By hand, bounce the front and rear of the Nissan Sentra vehicle to settle the suspension and eliminate any static load.
-
Place the front tires in the straight ahead position.
-
Aim each headlamp individually and ensure other headlamp beam pattern is blocked from screen.
-
For fog lamp aiming details, refer to regulations in your area.
-
By regulation, no means for horizontal aim adjustment is provided from the factory; only vertical aim is adjustable.
-
Use adjusting screw to perform aiming adjustment.
-
Perform fog lamp aiming if:
-
The Nissan Sentra vehicle front body has been repaired.
-
The front fog lamp has been removed or replaced.
-
Any outfitting has been installed.
-
The Nissan Sentra vehicle’s standard load condition has been substantially increased.
-
Aiming Adjustment Procedure
Place the
screen.
Note:
-
Stop the Nissan Sentra vehicle facing the wall.
-
Place the board on a plain road vertically.
Face the Nissan Sentra vehicle with the screen. Maintain 7.62 m (25.0 ft) between the front fog lamp center and the screen.
Start the
engine. Turn the front fog lamp ON.
Note:
Shut off the headlamp light with the board to prevent from illuminating the adjustment screen.
CAUTION:
Do not cover the lens surface with a tape etc. The lens is made of resin.
Adjust
aiming by turning the adjusting screw (A).
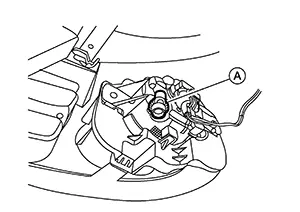
Adjust the
cutoff line height (A) with the aiming adjustment screw so that the
distance (X) between the horizontal center line of front fog lamp
(H) and (A) becomes 100 mm (4 in).
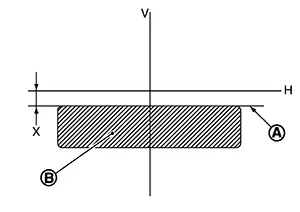
|
A |
: Cutoff line |
|
B |
: High illuminance area |
|
H |
: Horizontal center line of front fog lamp |
|
V |
: Vertical center line of front fog lamp |
|
X |
: Cutoff line height |
Other materials:
Types of tires
WARNING
When changing or replacing tires on your Nissan Sentra, always ensure
that all four tires are of the same type (Summer, All Season, or Snow) and the
same construction. A NISSAN dealer can assist you in selecting the correct tire
type, size, speed rating, and availability suitabl ...
C1f4f-82 Bcm Can Circuit 1
Dtc Description
DTC Description
DTC DETECTION LOGIC
DTC
CONSULT screen terms
(Trouble diagnosis
content)
DTC detection
conditi ...
Diagnosis System (intelligent Key Unit)
Consult Function (hands Free Module)
CONSULT Function
(HANDS FREE MODULE)
Intelligent Key unit
Refer to CONSULT Function
(HANDS FREE MODULE).
...