Nissan Sentra B18 (2020-2025) Service Manual: Interior Lighting System :: Removal and Installation
Front Room/map Lamp Assembly. Exploded View
Exploded View
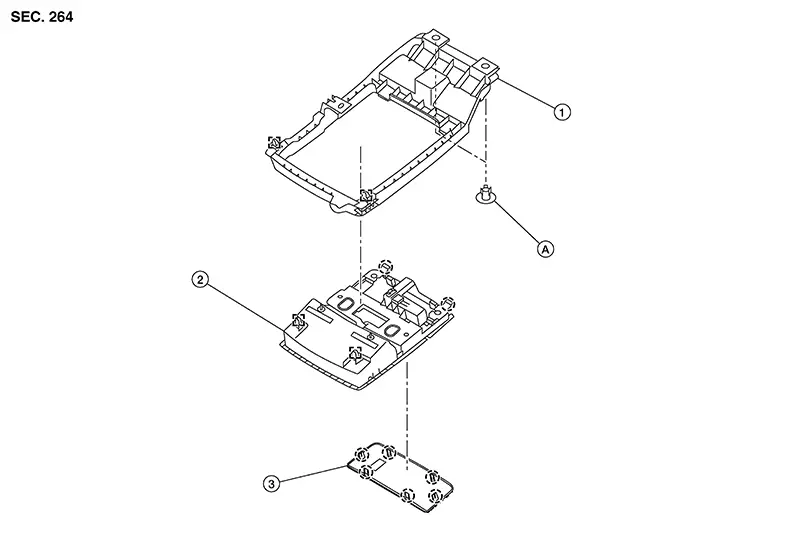
|
1. |
Front room/map lamp assembly bracket |
2. |
Front room/map lamp assembly |
3. |
Switch finisher |
|
A. |
Clip |
|
Pawl |
|
Metal clip |
Removal and Installation
Removal and Installation
REMOVAL
Lower front
edge of map lamp (1) down from the headlining by releasing the
metal clips, then slide forward to clear pawls at rear.
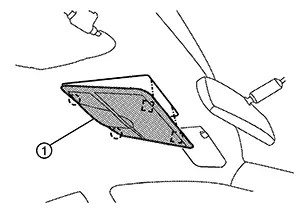
 : Metal clip
 :
Pawl
:
Pawl
Disconnect the harness connectors from the map lamp and remove.
INSTALLATION
Installation is in the reverse order of removal.
Bulb Replacement
Bulb Replacement
Warning:
Do not touch the glass surface of a bulb while it is lit or right after being turned OFF to prevent burns.
CAUTION:
-
Do not touch the glass of bulb directly by hand. Keep grease and other oily substances away from bulb surface.
-
Do not leave bulb out of lamp reflector for a long time because dust, moisture, smoke, etc. may affect the performance of lamp.
-
Do not attempt to separate the lamp from the front room/map lamp assembly or damage to the components may occur.
Using a
suitable tool, release the pawls and remove lens (2) from the front
room/map lamp assembly (1). 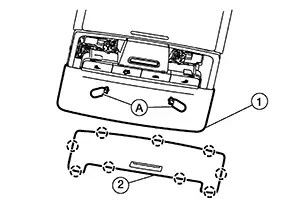
: Pawl
Grasp the bulb (A) and pull straight out from its socket to remove.
Install bulb to front room/map lamp assembly.
Install the front room/map lamp assembly lens.
Vanity Mirror Lamp. Removal and Installation
Removal and Installation
CAUTION:
Do not attempt to separate the vanity mirror lamp from the headlining or damage to the components may occur.
The vanity mirror lamp is serviced as part of an assembly to the headlining. Refer to Removal and Installation.
Bulb or Lens Replacement
Bulb or Lens Replacement
Warning:
Do not touch bulb while it is lit or right after being turned OFF. Burning may result.
CAUTION:
-
Do not attempt to separate the vanity mirror lamp from the sun visor or damage to the components may occur.
-
Do not touch glass surface of the bulb with bare hands or allow oil or grease to get on it to prevent damage to bulb.
Release the
pawl on the vanity mirror lamp lens (1) using a suitable tool
(A). 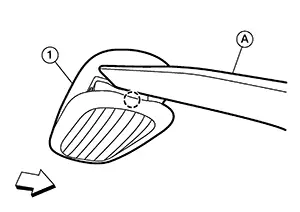
|
|
: Pawl |
|
|
: Front |
Grasp bulb
(A) and remove from vanity mirror lamp lens (1). 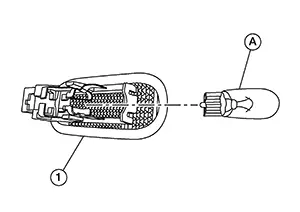
Install bulb to vanity mirror lamp.
Install the vanity mirror lamp lens.
Rear Personal Lamp. Removal and Installation
Removal and Installation
The rear personal lamp is serviced as part of an assembly to the headlining. Refer to Removal and Installation.
Bulb or Lens Replacement
Bulb or Lens Replacement
Warning:
Do not touch the glass surface of a bulb while it is lit or right after being turned OFF to prevent burns.
CAUTION:
-
Do not touch the glass of bulb directly by hand. Keep grease and other oily substances away from bulb surface.
-
Do not leave bulb out of lamp reflector for a long time because dust, moisture, smoke, etc. may affect the performance of lamp.
-
Do not attempt to separate the rear personal lamp from the headlining or damage may occur.
Using a
suitable tool, release the pawls and remove lens (2) from the rear
personal lamp (1). 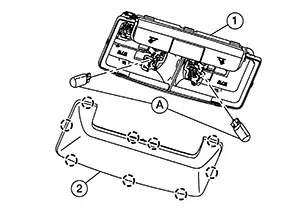
: Pawl
Grasp the bulb (A) and pull straight out from its socket to remove.
Install rear personal lamp bulb to rear personal lamp.
Install the rear personal lamp lens.
Trunk Room Lamp. Removal and Installation
Removal and Installation
REMOVAL
Warning:
Do not touch bulb while it is lit or right after being turned OFF. Burning may result.
CAUTION:
Do not touch glass surface of the bulb with bare hands or allow oil or grease to get on it to prevent damage to bulb.
Release
pawl (B) to open the lens. 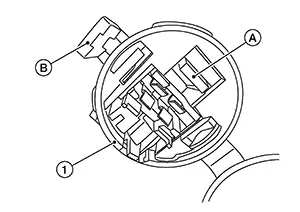
 :
Front
:
Front
Remove the trunk room bulb.
Release pawl (A), then pull trunk room lamp (1) down to remove.
Disconnect
the harness connector (C) from the trunk room lamp (1) and
remove. 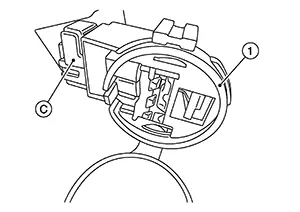
INSTALLATION
Installation is in the reverse order of removal.
Bulb Replacement
Bulb Replacement
Warning:
Do not touch bulb while it is lit or right after being turned OFF. Burning may result.
CAUTION:
Do not touch glass surface of the bulb with bare hands or allow oil or grease to get on it to prevent damage to bulb.
Release the tab to open the lens.
Remove bulb from trunk room lamp.
Install bulb to trunk room lamp.
Close lens.
Illumination Control Switch. Removal and Installation. Removal and Installation
Removal and Installation
REMOVAL
Remove instrument lower panel LH. Refer to Removal and Installation.
Remove the
illumination control switch (1) from the instrument lower panel LH
(A) using a suitable tool.
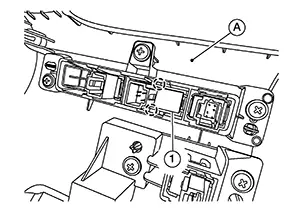
|
|
: Pawl |
INSTALLATION
Installation is in the reverse order of removal.
Other materials:
Abs Warning Lamp
Component Function Check
Component Function Check
CHECK ABS WARNING LAMP FUNCTION
Check that ABS warning lamp in combination meter
turns ON for 1 second after ignition switch is placed ON.
CAUTION:
Never start th ...
Magnet Clutch
Component Function Check
Component Function Check
CHECK MAGNET CLUTCH OPERATION
Perform auto active test of IPDM E/R. Refer to CONSULT Function (IPDM E/R).
Does it operate normally?
YES >>
Inspection End.
NO > ...
B20d2-11 Parking Lamp Pwr Sply Circ
Dtc Description
DTC Description
DTC DETECTION LOGIC
DTC No.
CONSULT screen items
(Trouble diagnosis content)
DTC detection condition
...