Nissan Sentra Service Manual: Front combination lamp
Exploded view
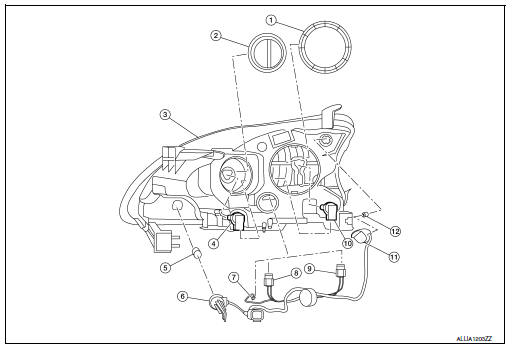
- Large cover (not serviceable)
- Small cover (not serviceable)
- Front combination lamp
- Halogen lamp bulb (high beam)
- Turn signal lamp bulb
- Turn signal lamp bulb socket
- LED harness connector
- Halogen lamp bulb (high beam) harness connector
- Halogen lamp bulb (low beam) harness connector
- Halogen lamp bulb (low beam)
- Side marker lamp bulb socket
- Side marker lamp bulb
Removal and installation
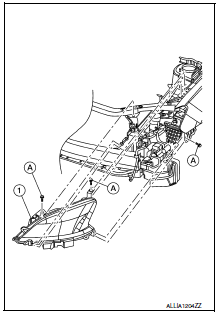
REMOVAL
- Remove the front bumper fascia. Refer to EXT-17, "Removal and Installation".
- Remove the front combination lamp bolts (A).
- Pull the front combination lamp (1) forward.
- Disconnect the harness connectors from the front combination lamp (1).
INSTALLATION
Installation is in the reverse order of removal.
After installation, perform headlamp aiming adjustment. Refer to EXL-115, "Aiming Adjustment".
Bulb replacement
WARNING:
Do not touch bulb by hand while it is lit or right after being turned off. Burning may result.
CAUTION:
- Do not touch glass surface of the bulb with bare hands or allow oil or grease to get on it to prevent damage to bulb.
- Do not leave the bulb out of the lamp reflector for a long time
because dust, moisture, smoke, etc.
may affect the performance of the lamp.
HEADLAMP HIGH BEAM
Removal
- Remove the core support cover. Refer to EXT-23, "Exploded View".
- Rotate the plastic cover counterclockwise and remove.
- Rotate the headlamp high beam lamp counterclockwise and remove.
- Disconnect the harness connector from the headlamp high beam lamp.
Installation
Installation is in the reverse order of removal.
CAUTION:
After installing, be sure to install the cover securely to ensure watertightness.
HEADLAMP LOW BEAM
Removal
- Remove the core support cover. Refer to EXT-23, "Exploded View".
- Rotate the plastic cover counterclockwise and remove.
- Rotate the headlamp low beam sockets counterclockwise and remove.
- Disconnect the harness connector from the headlamp low beam lamp.
Installation
Installation is in the reverse order of removal.
CAUTION:
After installing, be sure to install the cover securely to ensure watertightness.
SIDE MARKER LAMP
Removal
- Remove the core support cover. Refer to EXT-23, "Exploded View".
- Rotate the side marker lamp bulb socket counterclockwise and remove.
- Remove the side marker bulb from the side marker bulb socket.
Installation
Installation is in the reverse order of removal.
CAUTION:
After installing, be sure to install the bulb socket securely to ensure watertightness.
TURN SIGNAL LAMP
Removal
- Remove the core support cover. Refer to EXT-23, "Exploded View".
- Rotate the turn signal lamp bulb socket counterclockwise and remove.
- Remove the turn signal bulb from the turn signal bulb socket.
Installation
Installation is in the reverse order of removal.
CAUTION:
After installing, be sure to install the bulb socket securely to ensure watertightness.
Park Lamp
The park lamp LED bulb is integrated into the front combination lamp and is serviced as an assembly. Refer to EXL-119, "Removal and Installation".

 Front fog lamp
Removal and Installation
FOG LAMP
Removal
Position the fender protector aside. Refer to EXT-28, "FENDER PROTECTOR
: Removal and Installation
- Front Fender Protector".
Disconnec ...
Other materials:
Component parts
Meter system
METER SYSTEM : Component Parts Location
ABS actuator and electric unit (control
unit)
Combination meter
CVT shift selector (with CVT)
(O/D OFF switch)
Air bag diagnosis sensor unit
(view with center console assembly removed)
Parking brake switch
(view with ...
Precautions on seat belt usage
If you are wearing your seat belt properly adjusted
and you are sitting upright and well back in
your seat with both feet on the floor, your chances
of being injured or killed in an accident and/or the
severity of injury may be greatly reduced.
NISSAN strongly encourages you and all of yo ...
Wiper and washer system symptoms
Symptom table
Caution:
Perform the self-diagnosis with consult before performing the diagnosis
by symptom. Perform the
diagnosis by dtc if dtc is detected.
...
