Nissan Sentra B18 (2020-2025) Owner's Manual: Flat tire
Tire Pressure Monitoring System (TPMS)
This Nissan Sentra is equipped with a Tire Pressure Monitoring System (TPMS) designed to monitor the air pressure in all four road tires, excluding the spare tire. When the low tire pressure warning light illuminates and the message "Tire Pressure Low – Add Air" appears in the vehicle information display, one or more tires are significantly under-inflated.
If the Nissan Sentra is driven with low tire pressure, the TPMS activates and alerts the driver via the warning light. The system operates only when the vehicle is traveling at speeds above approximately 16 mph (25 km/h).
WARNING
- Radio waves may interfere with certain electronic medical devices. Drivers or passengers who use a pacemaker should consult the medical equipment manufacturer regarding possible effects before driving the vehicle.
- If the low tire pressure warning light comes on while driving, avoid
sudden steering inputs or hard braking. Reduce vehicle speed, move safely off
the road, and stop the Nissan Sentra as soon as possible.
Driving with under-inflated tires can permanently damage the tires and significantly increase the risk of tire failure.
Serious vehicle damage may occur and could lead to a collision resulting in serious personal injury.
Check the air pressure in all four tires. Adjust the pressure to the recommended COLD tire pressure listed on the Tire and Loading Information label to turn off the warning light.
If the warning light remains illuminated after adjustment, a tire may be flat or the TPMS may be malfunctioning.
In the event of a flat tire, replace it with the spare tire as soon as possible. If all tires appear properly inflated, have the vehicle inspected by a qualified technician. It is recommended that you visit a NISSAN dealer for service.
- When a wheel without a TPMS sensor, such as the spare tire, is installed,
the system will not operate. The low tire pressure warning light will flash
for approximately one minute and then remain illuminated.
Have the original tire reinstalled and the TPMS system reset as soon as possible. It is recommended that you visit a NISSAN dealer.
- Installing tires that differ from those specified by NISSAN may affect proper TPMS operation.
- Do not inject liquid or aerosol tire sealants into the tires, as this may damage the TPMS sensors and cause system malfunction.
Changing a flat tire
If a flat tire occurs, follow the steps below carefully to safely change the tire on your Nissan Sentra.
Stopping the vehicle
1. Carefully move the vehicle off the road and away from traffic.
2. Turn on the hazard warning flashers.
3. Park on a firm, level surface and firmly apply the parking brake. Shift a manual transmission into R (Reverse), or place the CVT selector in P (Park).
4. Turn the engine off.
5. Raise the hood to increase vehicle visibility and signal that assistance may be required.
6. Have all passengers exit the vehicle and wait in a safe location well away from traffic.
WARNING
- Ensure the parking brake is fully engaged and the transmission is properly positioned in R (Reverse) or P (Park).
- Never attempt to change a tire on a slope, icy surface, or slippery area.
This is extremely dangerous.
- Do not change a tire if traffic is close to the vehicle. Wait for professional roadside assistance.
- Wheel blocks
- Flat tire
Blocking wheels
Place suitable wheel blocks at both the front and rear of the wheel diagonally opposite the flat tire. This helps prevent the Nissan Sentra from moving while it is raised with the jack.
WARNING
Always block the wheels securely. Failure to do so may allow the vehicle to move and result in serious personal injury.
Getting the spare tire and tools
1. Open the trunk and lift the trunk floor covering.
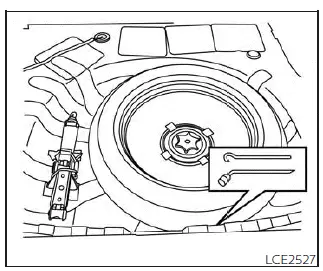
2. The jack is located beside the spare tire. Remove the rubber retaining strap and lift the jack out carefully.
3. The jack rod and lug wrench are stored inside the tool bag positioned between the spare tire and the metal trunk structure.
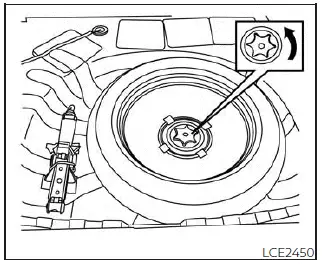
4. Turn the spare tire retaining clamp counterclockwise and remove it to release the spare tire.
CAUTION
Avoid contact with exposed sheet metal around the spare tire area. Sharp edges may cause personal injury.
Removing wheel cover (if so equipped)
CAUTION
Do not use your hands to pry off wheel caps or wheel covers. Doing so may result in personal injury or damage to the wheel cover.
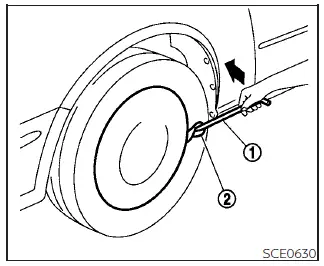
To remove the wheel cover on your Nissan Sentra, use the jack rod 1 as shown in the illustration.
Place a protective cloth 2 between the wheel and the jack rod to help prevent scratching or damaging the wheel surface and the wheel cover.
Use care and steady pressure to avoid scratching the wheel finish or deforming the wheel cover.
Jacking up vehicle and removing the damaged tire
WARNING
- Never work under the vehicle while it is supported only by the jack. If it is necessary to work underneath the vehicle, support it securely with approved safety stands.
- Use only the jack supplied with your Nissan Sentra to lift the vehicle. Do not use this jack on other vehicles, as it is designed specifically for emergency tire changes on this model.
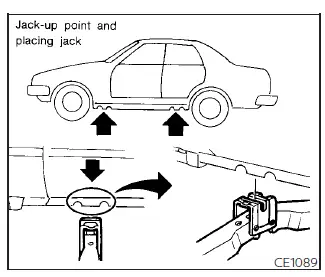
- Always use the designated jack-up points. Never place the jack under any other part of the vehicle.
- Never raise the vehicle higher than necessary to remove the tire.
- Never place blocks or supports on or under the jack.
- Do not start or run the engine while the vehicle is supported by the jack. The vehicle may move unexpectedly, especially on models equipped with limited-slip differentials.
- Do not allow passengers to remain in the vehicle while it is supported by the jack.
- Never run the engine with one or more wheels off the ground. This could cause the vehicle to move and lead to serious injury.
Always consult the illustrations to confirm the correct jack placement and lifting points for your specific Nissan Sentra model and jack type.
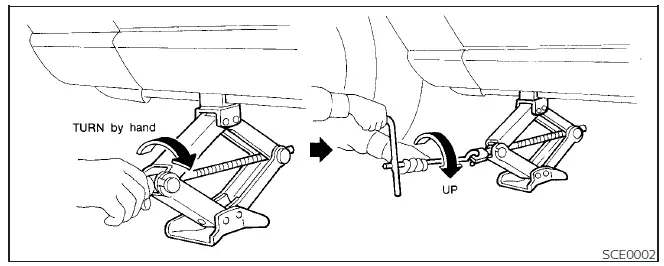
Carefully read the caution label attached to the jack body and follow the instructions below.
1. Loosen each wheel nut one or two turns by rotating them counterclockwise using the wheel nut wrench. Do not remove the wheel nuts until the tire is raised off the ground.
2. Position the jack directly under the designated jack-up point so that the top of the jack contacts the vehicle correctly.
Align the jack head between the two notches at the front or rear jack-up point as illustrated, ensuring the groove of the jack head fits securely.
The jack must always be placed on firm, level ground.
3. Firmly hold the jack lever and rod with both hands and slowly raise the Nissan Sentra until the tire clears the ground. Remove the wheel nuts completely and carefully remove the damaged tire.
Installing the spare tire
The spare tire is intended for emergency use only.
1. Clean any mud, dirt, or debris from the mounting surfaces of the wheel hub and wheel.
2. Carefully install the spare tire onto the hub and tighten the wheel nuts by hand until snug.
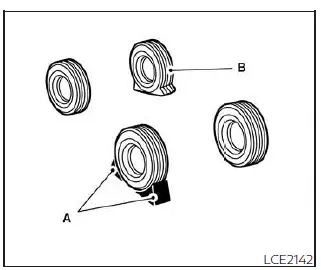
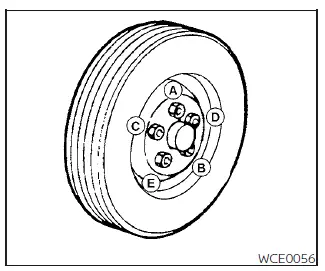
3. Using the wheel nut wrench, tighten the wheel nuts evenly in an alternating pattern (A, B, C, D, E) until all nuts are secure.
4. Slowly lower the vehicle until the tire touches the ground. Then tighten the wheel nuts fully in the same sequence (A, B, C, D, E). Lower the vehicle completely.
WARNING
- Incorrect wheel nuts or improperly tightened wheel nuts may cause the wheel to loosen or detach while driving, which could result in a serious accident.
- Do not apply oil or grease to the wheel studs or nuts. This can cause the nuts to loosen.
- Retighten the wheel nuts after driving 600 miles (1,000 km), including after a flat tire replacement.
As soon as possible, tighten the wheel nuts to the specified torque using a torque wrench.
Wheel nut tightening torque: 83 ft-lb (113 N·m)
The wheel nuts must always be maintained at the specified torque. It is recommended that wheel nut torque be checked at each scheduled maintenance interval.
Adjust the tire pressure to the specified COLD tire pressure.
COLD pressure: Tire pressure measured after the vehicle has been parked for at least 3 hours or driven less than 1 mile (1.6 km).
Recommended COLD tire pressures are listed on the Tire and Loading Information Label.
After driving more than 1 mile (1.6 km), the displayed tire pressure may be higher than the COLD pressure value.
This increase is caused by tire temperature rise and does not indicate a system malfunction.
5. Securely store the flat tire in the trunk.

6. Return the jack to its storage location and secure it using the rubber strap.
7. Place the trunk floor carpeting back over the stored tire.
8. Close the trunk securely.
WARNING
- Always ensure the spare tire, jack, and tools are properly secured. Unsecured items can become dangerous projectiles during sudden stops or collisions.
- The spare tire is designed for temporary emergency use only. Drive cautiously and replace it with a standard tire as soon as possible.
Other materials:
U1600 Front Left Door Speaker Out
Dtc Description
DTC Description
DTC DETECTION LOGIC
DTC No.
CONSULT screen terms
(Trouble diagnosis
content)
DTC detection condition
...
Unit Removal and Installation. Transaxle Assembly
Transaxle Assembly
Exploded View
Exploded View
1.
CVT fluid charging pipe cap
2.
CVT fluid charging pipe
...
B2231-16 Battery Voltage
Dtc Description
DTC Description
DTC DETECTION LOGIC
DTC No.
CONSULT screen terms
(Trouble diagnosis
content)
DTC detected condition
...