Nissan Sentra Service Manual: Component parts
Component parts location
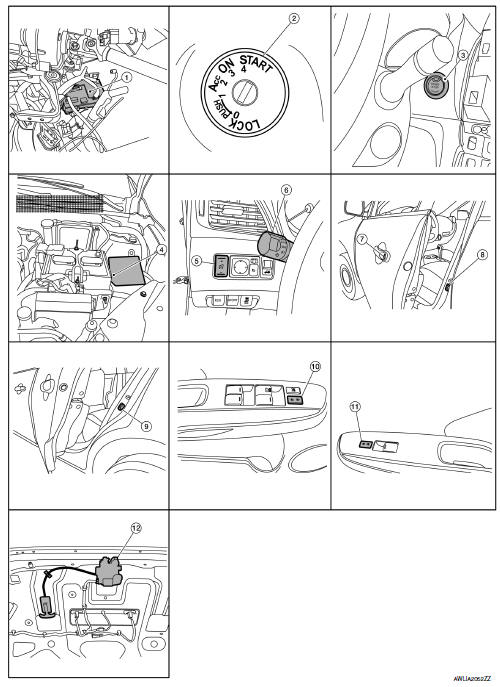
- BCM (view with instrument panel removed)
- Key switch (without Intelligent Key)
- Push-button ignition switch (with Intelligent Key)
- IPDM E/R
- Illumination control switch
- Combination switch (lighting and turn signal switch)
- Front door lock LH (key cylinder switch)
- Front door switch LH (RH similar)
- Rear door switch LH (RH similar)
- Main power window and door lock/unlock switch
- Power window and door lock/unlock switch RH
- Trunk lid opener assembly
Component description
| Part name | Description |
| BCM | Provides power and ground and controls timer functions for the interior room lamp, map lamp and trunk room lamp. |
| IPDM E/R | Provides power and ground and controls timer functions for the interior room lamp, map lamp and trunk room lamp |
| Push-button ignition switch (with Intelligent Key) | Provides ignition switch status to the BCM. |
| Key switch (without Intelligent Key) | Provides key in ignition switch status to the BCM. |
| Door switches | Provides door OPEN/CLOSED status to the BCM. |
| Main power window and door lock/unlock switch | Provides door lock/unlock switch LH status to the BCM. |
| Power window and door lock/unlock switch RH | Provides door lock/unlock switch RH status to the BCM. |
| Front door lock assembly LH (key cylinder switch) | Provides door lock/unlock switch LH status to the BCM. |
| Trunk lid opener assembly | Provides trunk lid OPEN/CLOSED status to the BCM. |

 System
Interior room lamp control system
INTERIOR ROOM LAMP CONTROL SYSTEM : System Diagram
WITH INTELLIGENT KEY
WITHOUT INTELLIGENT KEY
INTERIOR ROOM LAMP CONTROL SYSTEM : System Description
OU ...
Other materials:
Structure and operation
TRANSAXLE
TRANSAXLE : Cross-Sectional View
Converter housing
Oil pump
Counter drive gear
Control valve
Oil pan
Primary pulley
Steel belt
Secondary pulley
Planetary gear (auxiliary gearbox)
Side cover
Transaxle case
Differential case
Final gear
Reduction gear
Cou ...
Steering gear and linkage
Inspection
INSPECTION AFTER DISASSEMBLY
BOOT
Check boot for cracks. Replace if any damage is found.
STEERING GEAR ASSEMBLY HOUSING
Check steering gear assembly housing for damage and
scratches. Replace if there are any abnormal conditions.
OUTER SOCKET AND INNER SOCKET
B ...
P2122, P2123 APP Sensor
DTC Logic
DTC DETECTION LOGIC
NOTE:
If DTC P2122 or P2123 is displayed with DTC P0643, first perform the
trouble diagnosis for DTC P0643.
Refer to EC-353, "DTC Logic".
DTC No.
CONSULT screen terms
(Trouble diagnosis content)
DTC detecting condition
Possible caus ...
