Nissan Sentra Owners Manual: Changing a flat tire
If you have a flat tire, follow the instructions below:
Stopping the vehicle
- Safely move the vehicle off the road and away from traffic.
- Turn on the hazard warning flashers.
- Park on a level surface and apply the parking brake. Shift the manual transmission into R (Reverse), or the CVT into P (Park).
- Turn off the engine.
- Raise the hood to warn other traffic and to signal professional road assistance personnel that you need assistance.
- Have all passengers get out of the vehicle and stand in a safe place, away from traffic and clear of the vehicle.
WARNING
|
Blocking wheels

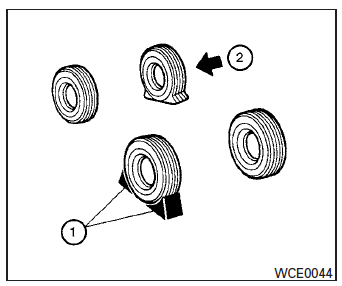
Place suitable blocks 1 at both the front and back of the wheel diagonally opposite the flat tire 2 to prevent the vehicle from moving when it is jacked up.
| WARNING Be sure to block the wheel as the vehicle may move and result in personal injury. |

Getting the spare tire and tools

- Open the trunk. Lift the trunk floor carpeting and spare tire cover A . Remove the jack and the spare tire as indicated.
- To remove the jack, take off the strap and lift out. If necessary, remove the spare tire first to easily access the jack strap.
Removing the wheel cover (if so equipped)

CAUTION
Do not use your hands to pry off wheel caps or wheel covers. Doing so could result in personal injury.
To remove the wheel cover, use the jack rod 1 as illustrated.
Apply cloth 2 between the wheel and jack rod to prevent damaging the wheel and wheel cover.
Use caution not to scratch the wheel cover or wheel surface.
Jacking up vehicle and removing the damaged tire

Jacking up vehicle and removing the damaged tire
WARNING
|

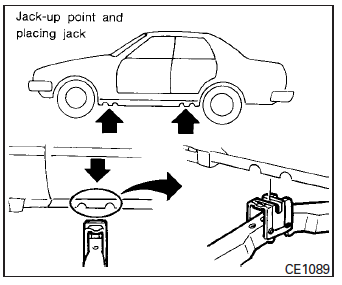
Always refer to the proper illustrations for the correct placement and jack-up points for your specific vehicle model and jack type.
Carefully read the caution label attached to the jack body and the following instructions.
- Loosen each wheel nut one or two turns by turning counterclockwise with the wheel nut wrench. Do not remove the wheel nuts until the tire is off the ground.
- Place the jack directly under the jack-up
point as illustrated so the top of the jack
contacts the vehicle at the jack-up point.
Align the jack head between the two notches in the front or the rear as shown.
Also fit the groove of the jack head between the notches as shown.
The jack should be used on firm and level ground.
- To lift the vehicle, securely hold the jack lever and rod with both hands. Carefully raise the vehicle until the tire clears the ground. Remove the wheel nuts, and then remove the tire.
Installing the spare tire

The spare tire is designed for emergency use. See specific instructions under the heading “Wheels and tires” in the “Maintenance and do-it-yourself” section of this manual.
- Clean any mud or dirt from the surface between the wheel and hub.
- Carefully put the spare tire on and tighten the wheel nuts finger tight.
- With the wheel nut wrench, tighten wheel nuts alternately and evenly as illustrated until they are tight.
- Lower the vehicle slowly until the tire touches the ground. Then, with the wheel nut wrench, tighten the wheel nuts securely in the sequence illustrated ( A , B , C , D , E ). Lower the vehicle completely.
WARNING
|
As soon as possible, tighten the wheel nuts to the specified torque with a torque wrench.
Wheel nut tightening torque: 83 ft-lb (113 N·m)
The wheel nuts must be kept tightened to specification at all times. It is recommended that wheel nuts be tightened to specification at each lubrication interval.
Adjust tire pressure to the COLD pressure.
COLD pressure: After vehicle has been parked for three hours or more or driven less than 1 mile (1.6 km).
COLD tire pressures are shown on the Tire and Loading Information Label.
- Securely store the flat tire in the vehicle.

- Install the jack in its storage area and tighten the jack strap .
- Place the spare tire cover and the trunk floor carpeting over the damaged tire.
- Close the trunk.
WARNING
|
 Tire Pressure Monitoring System (TPMS)
This vehicle is equipped with the Tire Pressure
Monitoring System (TPMS). It monitors tire pressure
of all tires except the spare. When the low
tire pressure warning light is lit, and the CHECK
TI ...
 Jump starting
To start your engine with a booster battery, the
instructions and precautions below must be followed.
WARNING
If done incorrectly, jump starting can
lead to a battery explosion, resul ...
Other materials:
Cowl top
Exploded view
Cowl top seal
Cowl top grille cap
Cowl top cover
Cowl top extension
Cowl top extension insulator
Clip
EPT seal [t: 3.0 mm (0.12 in)
Cowl top cover cap
EPT seal [t: 5.0 mm (0.20 in)]
Pawl
Clip
Front
Removal and installation
COWL TOP COVER
Removal
Rem ...
Symptom diagnosis
CVT CONTROL SYSTEM
Symptom Table
The diagnosis item number indicates the order of check. Start checking in the
order from 1.
...
System description
Component parts
Component parts location
Instrument lower finisher
Component description
Eco mode switch
The ECO mode switch is installed to the instrument lower finisher.
When the eco mode indicator lamp on the combination meter is
off and the eco mode switch is pressed, t ...
