Nissan Sentra Owners Manual: Jump starting
To start your engine with a booster battery, the instructions and precautions below must be followed.
WARNING
|
- Turn the ignition switch to the “LOCK” position.
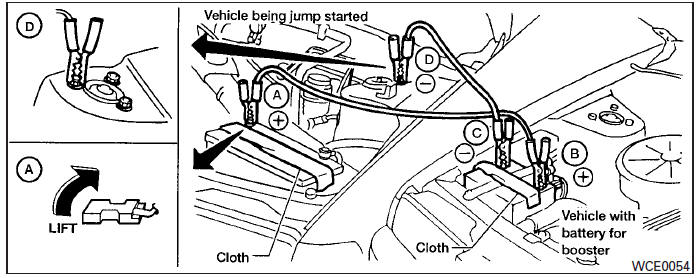
- Remove the vent caps on the battery (if so equipped). Cover the battery with an old cloth to reduce explosion hazard.
- Connect the jumper cables in the sequence illustrated ( A , B , C , D ).
CAUTION
- Always connect positive ( ) to positive ( ) and negative ( ) to body ground (for example, strut mounting bolt, engine lift bracket, etc.) — not to the battery.
- Make sure the jumper cables do not touch moving parts in the engine compartment and that the cable clamps do not contact any other metal.
- Start the engine of the booster vehicle and let it run for a few minutes.
- Keep the engine speed of the booster vehicle at about 2,000 rpm and start the engine of the vehicle being jump started.
CAUTION
Do not keep the starter motor engaged for more than 10 seconds. If the engine does not start right away, place the ignition switch in the OFF position and wait 3 to 4 seconds before trying again.
- After starting the engine, carefully disconnect the negative cable and then the positive cable.
- Replace the vent caps (if so equipped). Be sure to dispose of the cloth used to cover the vent holes as it may be contaminated with corrosive acid.
 Changing a flat tire
If you have a flat tire, follow the instructions below:
Stopping the vehicle
Safely move the vehicle off the road and
away from traffic.
Turn on the hazard warning flashers.
Park on a level ...
 Push starting
CAUTION
Do not push start this vehicle. The
three-way catalyst may be damaged.
Continuously Variable Transmission
(CVT) models and Manual Transmission
(MT) cannot be push-started or towsta ...
Other materials:
Changing engine oil filter
Park the vehicle on a level surface and apply
the parking brake.
Turn the engine off.
Place a large drain pan under the oil filter C .
Loosen the oil filter with an oil filter wrench
by turning it counterclockwise. Then remove
the oil filter by turning it by hand.
CAUTION
Be c ...
P0967 Pressure control solenoid B
DTC Logic
DTC DETECTION LOGIC
DTC
CONSULT screen terms
(Trouble diagnosis content)
DTC detection condition
Possible causes
P0967
PC SOLENOID B
(Pressure Control Solenoid B
Control Circuit High)
The primary pressure solenoid valve current is
200 mA or les ...
Cooler pipe and hose
Exploded view
High-pressure service port
High-pressure pipe
Expansion valve
Low-pressure service port
Low-pressure flexible hose
Compressor
Refrigerant pressure sensor
Condenser and liquid tank assembly
High-pressure flexible hose
Low-pressure flexible hose
Low-pressure f ...
