Nissan Sentra Service Manual: Air cleaner filter
Exploded View
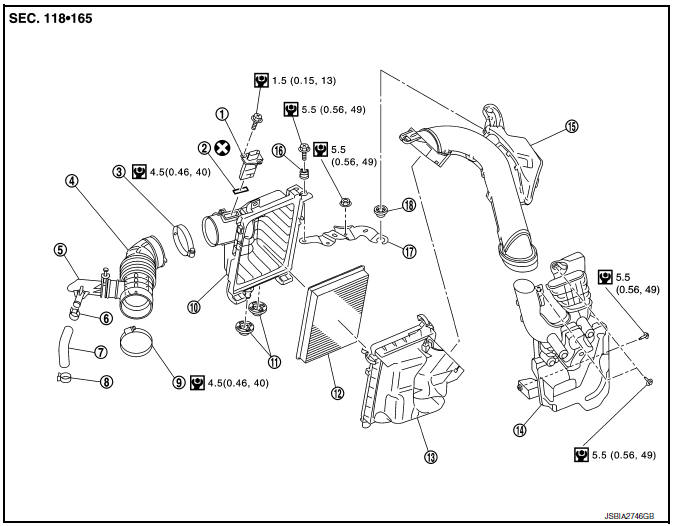
- Mass air flow sensor
- Mass air flow gasket
- Clamp
- Air duct (suction side)
- Resonator
- Clamp
- PCV hose
- Clamp
- Clamp
- Air cleaner cover
- Mounting rubber
- Air cleaner filter
- Air cleaner body
- Air duct inlet (lower)
- Air duct inlet (upper)
- Grommet
- Bracket
- Grommet
Removal and Installation
REMOVAL
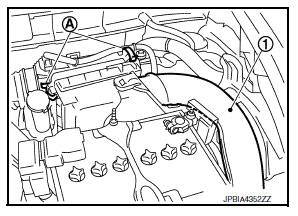
- Remove air duct inlet (upper) (1).
- Unhook the tabs (A) of both ends of the air cleaner cover.
- Remove the air cleaner filter (1) and air cleaner body (2) from the air cleaner cover.
- Remove the air cleaner filter from the air cleaner body.
INSTALLATION
Installation is in the reverse order of removal.
- Tabs shall be fixed after inserting air cleaner body protrusion to air cleaner case notch hole.
- Make sure that whether air cleaner body has been firmly installed by shaking it.
Inspection
INSPECTION AFTER REMOVAL
Examine the air cleaner filter for stains, clogging, or damage.
- Remove dirt and foreign objects (such as dead leaves) on air cleaner filter surface and inside air cleaner cover and air cleaner body.
- If clogging or damage is observed, replace the air cleaner filter.
CAUTION:
Do not clean the viscous paper type air cleaner filter by blowing as there is risk of deterioration of its performance.
 Drive belt
Exploded View
Alternator
Drive belt auto-tensioner
Crankshaft pulley
A/C compressor
Water pump
Drive belt
Possible use range
New drive belt range
Indicator
Removal and ...
 Camshaft valve clearance
Inspection and Adjustment
INSPECTION
Perform inspection after removal, installation or replacement of camshaft or
valve-related parts, or if there are
unusual engine conditions regarding valve cl ...
Other materials:
Door sash tape
Exploded view
Front door sash upper tape
Front door assembly
Rear door assembly
Front door sash rear tape
Rear door sash front tape
Rear door sash rear tape
Rear door sash upper tape
Front door sash tape
FRONT DOOR SASH TAPE : Removal and Installation
REMOVAL
Heat door sash ...
Front drive shaft boot
Exploded View
(LH)
Circular clip
Dust shield
Slide joint housing
Snap ring
Spider assembly
Boot band
Boot
Shaft
Damper band
Dynamic damper
Circular clip
Joint sub-assembly
Wheel side
(RH) 6M/T
Joint sub-assembly
Circular clip
Boot band
Boot
Shaft
Dam ...
Diagnosis system (bcm) (with intelligent key system)
Common item
COMMON ITEM : CONSULT Function (BCM - COMMON ITEM)
APPLICATION ITEM
CONSULT performs the following functions via CAN communication with BCM.
Direct Diagnostic Mode
Description
ECU identification
The BCM part number is displayed.
Self Diagnostic Result
...
