Nissan Sentra Service Manual: Door sash tape
Exploded view
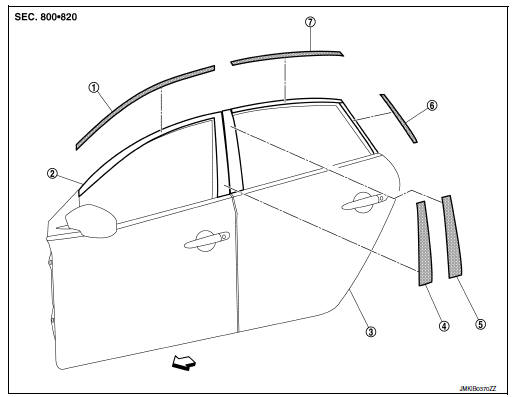
- Front door sash upper tape
- Front door assembly
- Rear door assembly
- Front door sash rear tape
- Rear door sash front tape
- Rear door sash rear tape
- Rear door sash upper tape
Front door sash tape
FRONT DOOR SASH TAPE : Removal and Installation
REMOVAL
Heat door sash tape surface using a heat gun and peel door sash tape.
CAUTION:
Do not damage painted surface of door.
INSTALLATION
NOTE:
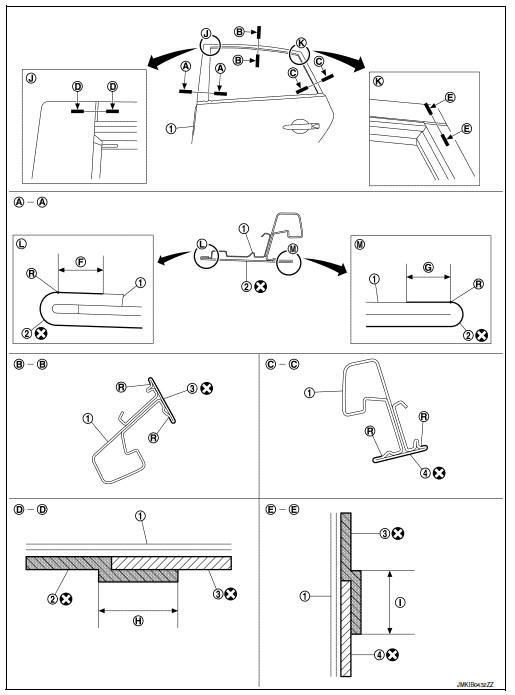
For installation position of door sash tape, refer to the position as shown.
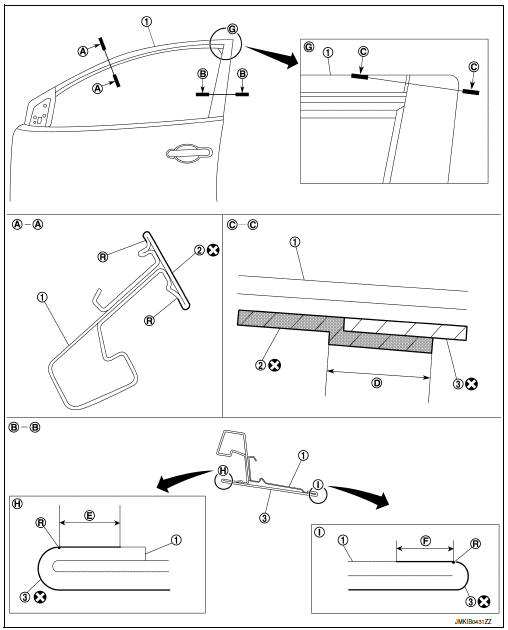
- Front door assembly
- Front door sash tape
- Front door sash rear tape
R. R end
D : 1.0 – 3.0 mm (0.04 – 0.12 in)
E : 3.5 mm (0.14 in)
F : 3.5 mm (0.14 in)
CAUTION:
- Degrease front door assembly surface for sash tape.
- Grit or dust on surface of sash tape may spoil exterior appearance if not removed. Clean the surface and check that no grit or dust remains before starting the operation.
- Do not reuse blackout tape.
- Affix door sash tape align blackout tape upper portion to rear door outer upper end.
- Affix door sash tape (2) to door panel (3) by applying pressure using a squeegee (A) while peeling off release coated paper (1).
NOTE:
- Peel release coated paper at distance of 10 – 20 mm (0.39 – 0.79 in) ahead (B) of squeegee and affix blackout paper.
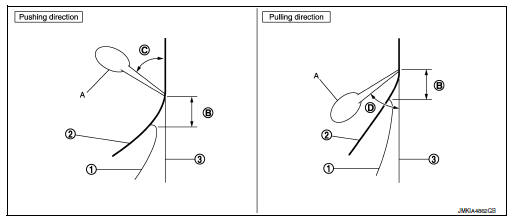
- To prevent any bubbles from forming, slightly lift the portion not yet affixed using a squeegee, so that portion dose not contact with panel surface. Apply pressure and affix at a low and constant speed using squeegee tilted at 40 – 50° angle (pushing direction) (C) 30 – 45° angle (pulling direction) (D).
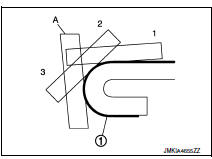
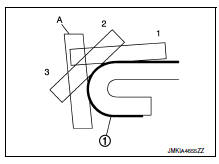
- For small radius portion of hemming part, gradually apply pressure and affix door sash tape 1 using squeegee (A) in 1 → 3 steps.
CAUTION:
Do not wash the vehicle with in 24 hours so as to keep adhesive dry.
Rear door sash tape
REAR DOOR SASH TAPE : Removal and Installation
REMOVAL
Heat door sash tape surface using a heat gun and peel door sash tape.
CAUTION:
Do not damage painted surface of door.
INSTALLATION
NOTE:
For installation position of door sash tape, refer to the position as shown.
- Rear door assembly
- Rear door sash rear tape
- Rear door sash tape
- Rear door sash rear tape
R. R end
F 3.0 mm (0.12 in)
G 3.5 mm (0.14 in)
H 1.0 – 3.0 mm (0.04 – 0.12 in)
I 1.0 – 3.0 mm (0.04 – 0.12 in)
CAUTION:
- Degrease rear door assembly surface for door sash tape.
- Grit or dust on surface of door sash tape may spoil exterior appearance if not removed. Clean the surface and check that no grit or dust remains before starting the operation.
- Do not reuse door sash tape.
- Affix door sash tape align door sash tape upper portion to rear door outer upper end.
- Affix door sash tape (2) to door panel (3) by applying pressure using a squeegee (A) while peeling off release coated paper (1).
NOTE:
- Peel release coated paper at distance of 10 – 20 mm (0.39 – 0.79 in) ahead (B) of squeegee and affix blackout paper.
- To prevent any bubbles from forming, slightly lift the portion, not yet affixed using squeegee, so that portion dose not contact with panel surface. Apply pressure and affix at a low and constant speed using squeegee tilted at 40 – 50° angle (pushing direction) (C) 30 – 45° angle (pulling direction) (D).

- For small radius portion of hemming part, gradually apply pressure and affix door sash tape (1) using squeegee (A) in 1 → 3 steps.
CAUTION:
Do not wash the vehicle with in 24 hours so as to keep adhesive dry.
 Drip molding
Exploded view
Drip molding
Clip
Removal and installation
REMOVAL
Release drip molding clips, then remove drip molding.
INSTALLATION
Installation is in the reverse order of removal. ...
 Door outside molding
Exploded view
Front door assembly
Grommet
Front door outside molding
Rear door outside molding
Rear door assembly
Door glass
Clip
Front door outside molding
FRONT DOOR OUT ...
Other materials:
Fuel efficient driving tips
Follow these easy-to-use Fuel Efficient Driving
Tips to help you achieve the most fuel economy
from your vehicle.
Use Smooth Accelerator and Brake
Pedal Application
Avoid rapid starts and stops
Use smooth, gentle accelerator and
brake application whenever possible
Maintain consta ...
Basic inspection
Diagnosis and repair workflow
Work flow
Overall sequence
Detailed flow
1.Obtain information about symptom
Interview the customer to obtain as much information as possible about the
conditions and environment under
which the malfunction occurred.
>> GO TO 2.
2.Check symptom
...
Rear parcel shelf finisher
Exploded View
Seat belt finisher (RH)
Rear parcel shelf finisher
Rear seatback finisher (RH)
Top tether strap anchor finisher
(RH)
Top tether strap anchor finisher
(center)
Rear seatback finisher (LH)
Top tether strap anchor finisher
(LH)
Seat belt finisher (LH)
Seat b ...
