Nissan Sentra Service Manual: Work Flow
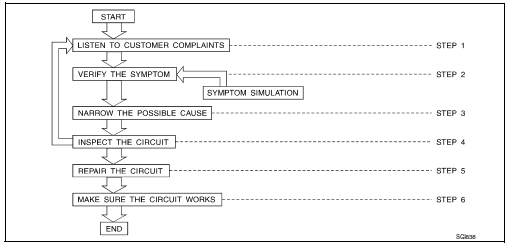
| STEP | DESCRIPTION | |
| STEP 1 | Get detailed information about the conditions and the
environment when the incident occurred.
The following are key pieces of information required to make a good analysis: |
|
| WHAT | Vehicle Model, Engine, Transmission/Transaxle and the System (i.e. Radio). | |
| WHEN | Date, Time of Day, Weather Conditions, Frequency. | |
| WHERE | Road Conditions, Altitude and Traffic Situation. | |
| HOW | System Symptoms, Operating Conditions (Other Components
Interaction).
Service History and if any After Market Accessories have been installed. |
|
| STEP 2 | Operate the system, road test if necessary.
Verify the parameter of the incident. If the problem cannot be duplicated, refer to “Incident Simulation Tests”. |
|
| STEP 3 | Get the proper diagnosis materials together including:
Identify where to begin diagnosis based upon your knowledge of the system operation and the customer comments. |
|
| STEP 4 | Inspect the system for mechanical binding, loose
connectors or wiring damage.
Determine which circuits and components are involved and diagnose using the Power Supply Routing and Harness Layouts. |
|
| STEP 5 | Repair or replace the incident circuit or component. | |
| STEP 6 | Operate the system in all modes. Verify the system works properly under all conditions. Make sure you have not inadvertently created a new incident during your diagnosis or repair steps. | |

 Control Units and Electrical Parts
PRECAUTIONS
Never reverse polarity of battery terminals.
Install only parts specified for a vehicle.
Before replacing the control unit, check the input and output and
functions of the compo ...
Other materials:
C1606 EPS Motor
DTC Logic
DTC DETECTION LOGIC
Dtc
Display item
Malfunction detected condition
Possible cause
C1606
EPS MOTOR
When the motor driver malfunction of EPS control
unit or EPS motor malfunction is detected.
Harness or connector
EPS motor
Eps control ...
Outside mirrors
The outside mirror remote control will operate
only when the ignition switch is in the ACC or ON
position.
Move the small switch 1 to select the right or left
mirror. Adjust each mirror to the desired position
using the large switch 2 .
WARNING
Objects viewed in the outside mi ...
P0420 Three way catalyst function
DTC Logic
DTC DETECTION LOGIC
The ECM monitors the switching frequency ratio of air fuel ratio (A/F)
sensor 1 and heated oxygen sensor 2.
A three way catalyst (manifold) with high oxygen storage capacity
will indicate a low switching frequency of heated oxygen sensor 2.
As oxygen storage c ...
