Nissan Sentra Service Manual: Wheel sensor
Front wheel sensor
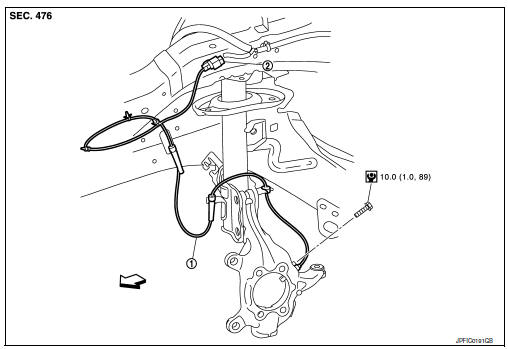
FRONT WHEEL SENSOR : Exploded View
-
Front wheel sensor
-
Front wheel sensor harness connector
 Front
Front
FRONT WHEEL SENSOR : Removal and Installation
CAUTION:
-
Be careful not to damage wheel sensor edge and sensor rotor teeth.
-
When removing the front or rear wheel hub, first remove the wheel sensor from the wheel hub. Failure to do so may result in damage to the wheel sensor wires, making the sensor inoperative.
-
Pull out the wheel sensor, being careful to turn it as little as possible. Do not pull on the wheel sensor harness.
-
Before installation, check if foreign objects such as iron fragments are adhered to the pick-up part of the sensor or to the inside of the hole in the wheel hub for the wheel sensor, or if a foreign object is caught in the surface of the mating surface for the sensor rotor. Clean as necessary and then install the wheel sensor.
REMOVAL
-
Remove the front wheels and tires using power tool. Refer to WT-47, "Adjustment".
-
Remove the fender protector (front). Refer to EXT-28, "FENDER PROTECTOR : Removal and Installation - Front Fender Protector".
-
Disconnect front wheel sensor harness connector.
-
Disconnect front wheel sensor harness from brackets.
-
Remove front wheel sensor bolt.
-
Remove front wheel sensor.
INSTALLATION
Installation is in the reverse order of removal.
CAUTION:
-
During installation, make sure there is no foreign material such as iron chips on and in the mounting hole of the wheel sensor. Make sure no foreign material has been caught in the sensor rotor. Remove and foreign material and clean the mount.
-
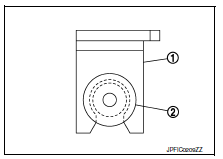
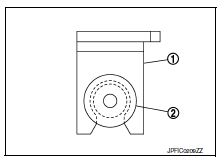
Do not twist front wheel sensor harness when installing front wheel sensor. Check that grommet (2) is fully inserted to bracket (1). Check that front wheel sensor harness is not twisted after installation.
Rear wheel sensor
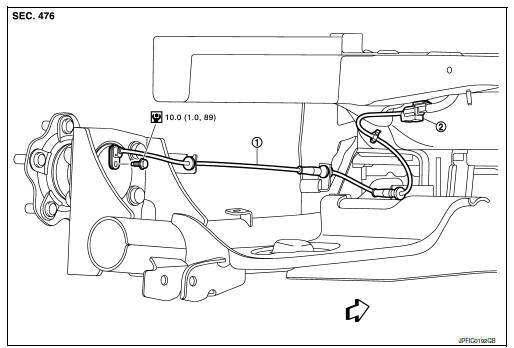
REAR WHEEL SENSOR : Exploded View
-
Rear wheel sensor
-
Rear wheel sensor harness connector
 Front
Front
REAR WHEEL SENSOR : Removal and Installation
CAUTION:
-
Be careful not to damage wheel sensor edge and sensor rotor teeth.
-
When removing the front or rear wheel hub, first remove the wheel sensor from the wheel hub. Failure to do so may result in damage to the wheel sensor wires, making the sensor inoperative.
-
Pull out the wheel sensor, being careful to turn it as little as possible. Do not pull on the wheel sensor harness.
-
Before installation, check if foreign objects such as iron fragments are adhered to the pick-up part of the sensor or to the inside of the hole in the wheel hub for the wheel sensor, or if a foreign object is caught in the surface of the mating surface for the sensor rotor. Clean as necessary and then install the wheel sensor.
REMOVAL
-
Remove rear wheel sensor harness connector.
-
Remove rear wheel sensor bolt.
-
Remove rear wheel sensor harness from the brackets.
INSTALLATION
Installation is in the reverse order of removal.
CAUTION:
-
During installation, make sure there is no foreign material such as iron chips on and in the mounting hole of the wheel sensor. Make sure no foreign material has been caught in the sensor rotor. Remove and foreign material and clean the mount.
-
Do not twist front wheel sensor harness when installing front wheel sensor. Check that grommet (2) is fully inserted to bracket (1). Check that front wheel sensor harness is not twisted after installation.

 Sensor rotor
Front sensor rotor
FRONT SENSOR ROTOR : Removal and Installation
The front wheel sensor rotor is an integral part of the wheel
hub and bearing assembly and cannot be disassembled.
Refer to FAX- ...
Other materials:
P1226 TP Sensor
DTC Logic
DTC DETECTION LOGIC
DTC No.
CONSULT screen terms
(Trouble diagnosis content)
DTC detecting condition
Possible cause
P1226
CTP LEARNING-B1
(CTP LEARNING-B1)
Closed throttle position learning is not performed
successfully, repeatedly.
Electric thr ...
Liquid Gasket
REMOVAL OF LIQUID GASKET SEALING
After removing the bolts and nuts, separate the mating surface and
remove the liquid gasket using Tool (A).
Tool Number : KV10111100 (J-37228)
CAUTION:
Be careful not to damage the mating surfaces.
In areas where the cutter is difficult to use, use ...
A-bag branch line circuit
Diagnosis procedure
Warning:
Always observe the following items for preventing accidental
activation.
Before servicing, turn ignition switch off, disconnect battery
negative terminal, and wait 3 minutes
or more. (To discharge backup capacitor.)
Never use unspecified tester or other me ...
