Nissan Sentra Owners Manual: Steering wheel switch for audio control (if so equipped)
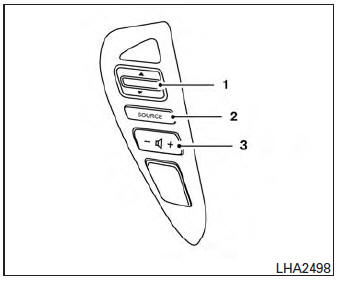
- Tuning switch
- Power on and SOURCE select switch
- Volume control button
The audio system can be operated using the controls on the steering wheel.
POWER on switch
With the ignition switch in the ACC or ON position, push the SOURCE switch to turn the audio system on.
SOURCE select switch
Push the source select switch to change the mode in the following sequence: AM → FM1 → FM2 → XM1 (satellite radio, if so equipped)→XM2 (satellite radio, if so equipped) →XM3 (satellite radio, if so equipped)→CD*→ USB/iPodÂź* (if so equipped)→BluetoothÂź Audio* → AUX* → AM.
* These modes are only available when compatible media storage is inserted into the device or connected to the system.
Volume control switch
Push the volume control switch to increase or decrease the volume.
 Tuning switch
While the display is showing a map or audio screen, tilt the Tuning switch upward or downward to select a station, track, CD or folder. For most audio sources, tilting the switch up/down for more than 1.5 seconds provides a different function than a tilting up/down for less than 1.5 seconds.
AM and FM:
- Tilt up/down for less than 1.5 seconds to increase or decrease the preset station.
- Tilt up/down for more than 1.5 seconds to seek up or down to the next station.
XM/SXM (if so equipped):
- Tilt up/down for less than 1.5 seconds to increase or decrease the preset station.
- Tilt up/down for more than 1.5 seconds to go to the next or previous category.
iPodÂź (if so equipped):
- Tilt up/down for less than 1.5 seconds to increase or decrease the track number.
- Tilt up/down for more than 1.5 seconds to fast forward or rewind the current track.
CD:
- Tilt up/down for less than 1.5 seconds to increase or decrease the track number.
- Tilt up/down for more than 1.5 seconds to increase or decrease the folder number (if playing compressed audio files) or to fast forward or rewind the current track.
USB (if so equipped):
- Tilt up/down for less than 1.5 seconds to increase or decrease the track number.
- Tilt up/down for more than 1.5 seconds to fast forward or rewind the current track.
BluetoothÂź Audio (if so equipped):
- Tilt up/down for less than 1.5 seconds to skip ahead or back to the next song.
- Tilt up/down for more than 1.5 seconds to reverse or fast forward the current track.
PandoraÂź Audio (if so equipped):
- Tilt up for less than 1.5 seconds to input âthumbs upâ for the current song.
- Tilt down for less than 1.5 seconds to input âthumbs downâ for the current song.
- Tilt up for more than 1.5 seconds to skip to the next song (if the maximum of six skips per station per hour has not been exceeded).
 CD care and cleaning
Handle a CD by its edges. Do not bend the
disc. Never touch the surface of the disc.
Always place the discs in the storage case
when they are not being used.
To clean a disc, wipe the ...
 Antenna
Window antenna
The antenna pattern is printed inside the rear
window.
CAUTION
Do not place metalized film near the
rear window glass or attach any metal
parts to it. This may cause poor rec ...
Other materials:
ECU diagnosis information
Diagnosis sensor unit
DTC Index
DIAGNOSTIC CODE CHART
NOTE:
Follow the procedures in numerical order when repairing malfunctioning
parts. Confirm whether malfunction is
eliminated using air bag warning lamp or CONSULT each time repair is finished.
If malfunction is still
observed, proceed ...
Environmental factors influence the rate of corrosion
Moisture
Accumulation of sand, dirt and water on the vehicle
body underside can accelerate corrosion.
Wet floor coverings will not dry completely inside
the vehicle and should be removed for drying to
avoid floor panel corrosion.
Relative humidity
Corrosion will be accelerated in areas of h ...
SPORT mode switch
Adjusts the throttle sensitivity and transmission
points (CVT only) to enhance performance. Press
the SPORT button on the instrument panel to
activate. The SPORT mode indicator light (on the
speedometer) will illuminate. The SPORT mode
indicator light will remain lit while the mode is
acti ...
