Nissan Sentra B18 (2020-2025) Service Manual: Roof :: Basic Inspection
Diagnosis and Repair Work Flow. Work Flow. Work Flow
Work Flow
OVERALL SEQUENCE
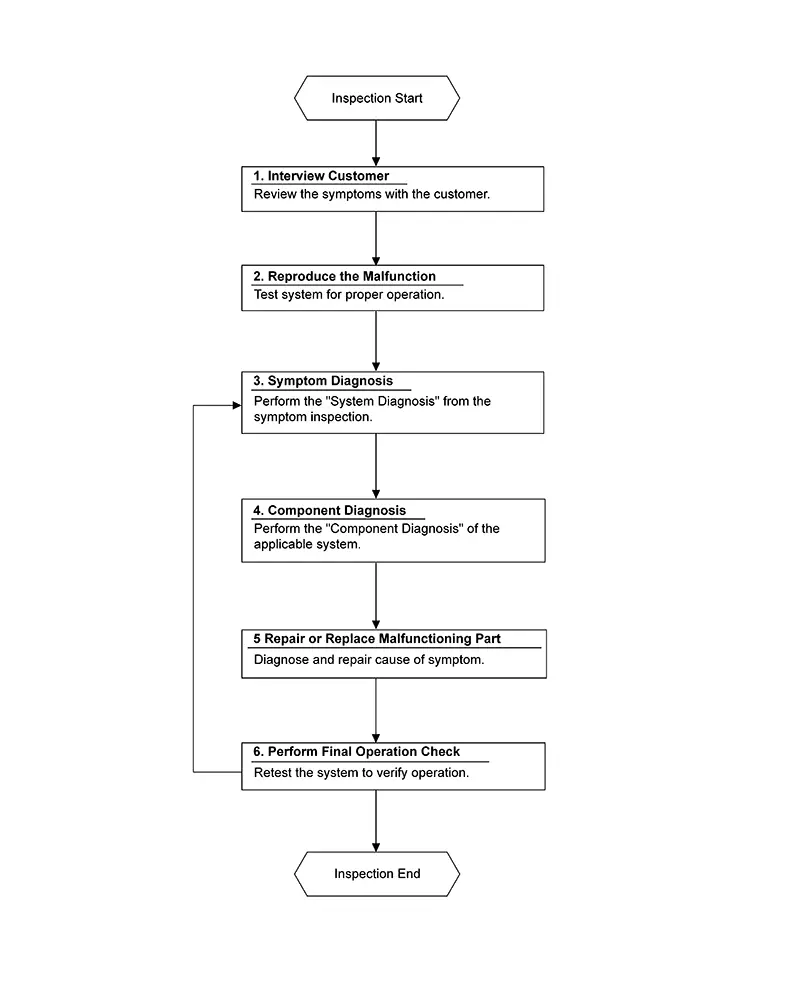
DETAILED FLOW
-
INTERVIEW CUSTOMER
-
Interview the customer to obtain as much information as possible about the conditions and environment under which the malfunction occurred.
GO TO 2.
-
-
REPRODUCE THE MALFUNCTION
-
Check the malfunction on the Nissan Sentra vehicle that the customer describes.
Inspect the relation of the symptoms and the condition when the symptoms occur.
GO TO 3.
-
-
SYMPTOM DIAGNOSIS
-
Use Symptom diagnosis from the symptom inspection result in step 2 and then identify where to start performing the diagnosis based on possible causes and symptoms.
GO TO 4.
-
-
COMPONENT DIAGNOSIS
-
Perform the diagnosis with Component diagnosis of the applicable system.
GO TO 5.
-
-
REPAIR OR REPLACE MALFUNCTIONING PART
-
Repair or replace the specified malfunctioning parts.
GO TO 6.
-
-
PERFORM FINAL OPERATION CHECK
-
Check that malfunctions are not reproduced when obtaining the malfunction information from the customer, referring to the symptom inspection result in step 2.
Are the malfunctions corrected?
YES >>Inspection End.
NO >>GO TO 3.
-
Inspection and Adjustment. Additional Service When Replacing Moonroof Motor Assembly
Work Procedure
Work Procedure
-
Please observe the following instructions at confirming the moonroof operation.
Note:
Do not disconnect the electronic power while the moonroof is operating or within 5 seconds after the moonroof stops (to wipe-out the memory of lid position and operating friction.)
-
Initialization of system should be conducted after the following conditions:
-
When the moonroof motor is changed.
-
When the moonroof does not operate normally. (Incomplete initialization conditions)
-
Additional Service When Replacing Control Unit
Special Repair Requirement
Special Repair Requirement
INITIALIZATION PROCEDURE
Moonroof
If the moonroof does not open or close automatically, use the following procedure to return moonroof operation to normal:
-
Ignition switch ON.
Note:
It is best if engine is running during initialization.
-
Fully close the moonroof glass by pressing the moonroof switch in the close position.
Note:
If required, bump the moonroof switch repeatedly until the moonroof is completely closed (not in the tilt-up position).
-
Operate the moonroof glass to the tilt/vent position.
-
Press and hold the close switch until the moonroof glass operates through several small movements (10 - 20 seconds).
-
Once the moonroof has been motionless for 5 seconds, release the close switch and quickly (within less than a second) press and hold the close switch again. The moonroof glass will cycle to full open and back to close. Hold the close switch until the moonroof glass has completed its movement, then release the close switch.
-
Verify moonroof operation by moving the moonroof glass to the vent, open and closed positions.
Note:
Repeat this procedure if the moonroof still does not operate normally. It may be necessary to repeat the procedure up to 5 times. After 5 tries, if the moonroof still does not operate normally, clear the memory by holding the moonroof switch in the open position for 15 seconds. Then, close the moonroof and repeat the initialization procedure.
ANTI-PINCH FUNCTION
Moonroof
-
Fully open the moonroof to the full open position.
-
Place a piece of wood at the fully closed position.
-
Close the moonroof completely with auto-slide close function.
-
Moonroof should make contact and then tilt up in reverse for 5.91 in. (150mm) (approx.).
CAUTION:
-
Do not test the anti-pinch function with your hands or other part of body parts because they may be pinched.
-
Depending on environment and driving conditions, if a similar impact or load is applied to the moonroof it may lower.
-
Test the auto-slide operation before inspection when the system initialization is performed.
-
Perform the initialization procedure when the auto-slide operation or anti-pinch function does not operate normally.
Other materials:
Component Parts
Exterior Lighting System
Component Parts Location
Component Parts
Location
A.
View of instrument panel
B.
M/T transmi ...
System
Body Control System
System Description
System Description
OUTLINE
The BCM controls the various electrical components.
It inputs the information required for control via CAN communication
and the signal received from each switch and sensor.
The BCM ...
Tcm Branch Line Circuit (vehicle Can Communication 1 Circuit)
Diagnosis Procedure
Diagnosis Procedure
CHECK CONNECTOR
Turn the ignition switch OFF.
Disconnect the battery cable from the
negative terminal.
Check the following terminals and
...