Nissan Sentra B18 (2020-2025) Service Manual: Rocker Cover
Exploded View
Exploded View
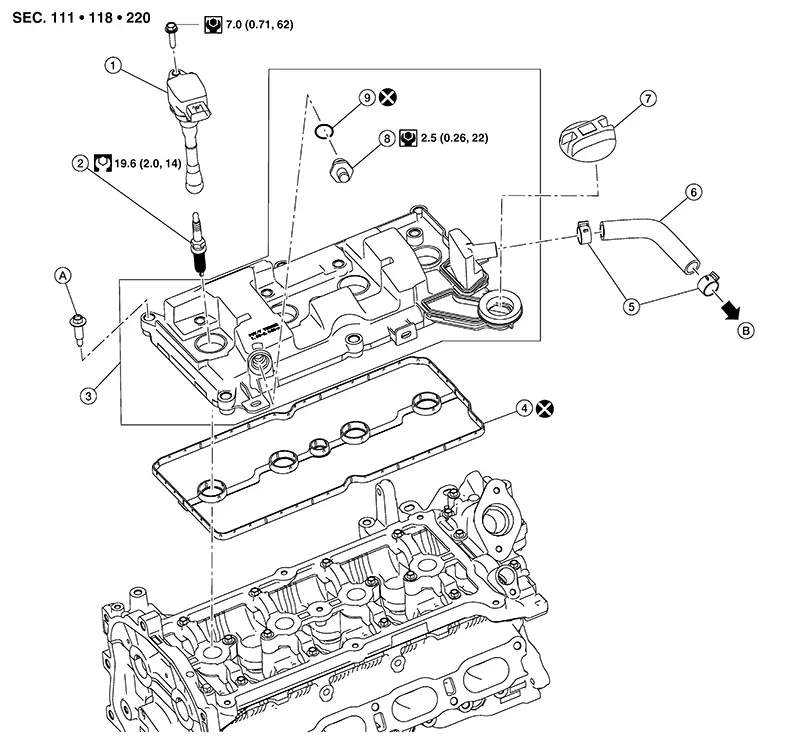
|
1. |
Ignition coil |
2. |
Spark plug |
3. |
Rocker cover assembly |
|
4. |
Rocker cover gasket |
5. |
Clamp |
6. |
Blow-by hose |
|
7. |
Oil filler cap |
8. |
PCV valve |
9. |
O-ring |
|
A. |
Refer to Removal and Installation. |
B. |
To resonator duct. Refer to Exploded View. |
Removal and Installation
Removal and Installation
REMOVAL
Remove the EGR volume control valve. Refer to Removal and Installation.
Remove vacuum hose A from intake manifold. Refer to Exploded View.
Remove
harness retainer (A) from vacuum tube (1).
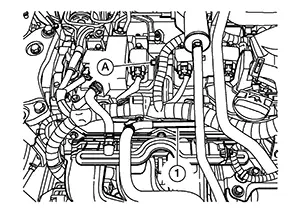
Remove bolts securing the vacuum tube. Refer to Exploded View.
Remove the vacuum tube, vacuum hose A and vacuum hose B towards the passenger side.
Remove the EVAP hose from the EVAP canister purge volume control solenoid valve.
Remove bolts securing the vacuum delay valve bracket and reposition the vacuum delay valve, vacuum delay valve bracket and EVAP hose.
Remove the PCV hose from the rocker cover. Refer to Exploded View.
Remove the blow-by hose from the rocker cover.
Disconnect the harness connectors from the ignition coils.
Remove the ignition coils.
CAUTION:
-
Do not drop or shock ignition coil.
-
Do not disassemble ignition coil.
Remove engine harness retainers from rocker cover.
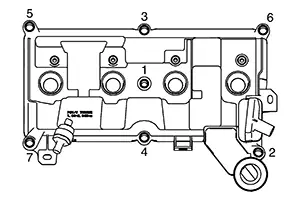
Loosen
rocker cover bolts in reverse of the sequence shown and remove
rocker cover.
Remove rocker cover gasket from rocker cover.
CAUTION:
Do not reuse rocker cover gasket.
Remove the PCV valve from the rocker cover (if necessary):
CAUTION:
Do not reuse O-ring.
INSTALLATION
CAUTION:
Do not reuse O-ring.
Install the rocker cover gasket to rocker cover.
CAUTION:
Do not reuse rocker cover gasket.
Note:
Make sure rocker cover gasket is installed into groove in rocker cover.
Install the rocker cover and
tighten the bolts to the specified torque in the sequence
shown.
|
Step 1 |
: 1.96 N·m (0.20 kg-m, 17 in-lb) |
|
Step 2 |
: 8.33 N·m (0.85 kg-m, 74 in-lb) |
Installation of the remaining components is in the reverse order of removal.
Other materials:
Preparation. Preparation
Preparation
Special Service Tool
Special Service Tool
The actual shape of the tools may differ from those
illustrated here.
Tool number
(TechMate No.)
Tool name
...
Removal and Installation
Av Control Unit
Exploded View
Exploded View
1.
AV control unit bracket
(LH)
2.
AV control unit
...
Headlight and turn signal switch
Headlight control switch
Type A (if so equipped)
Type B (if so equipped)
Lighting
Rotate the switch to the
position to turn on the front parking lights, tail lights, license plate lights,
and instrument panel illumination. The
indicator will illuminate in the meter.
R ...