Nissan Sentra B18 (2020-2025) Service Manual: Removal and Installation
REMOVAL
Remove the emblem from the panel heating with a heat gun.
CAUTION:
Do not damage the painted surface of the panel when removing the emblem.
INSTALLATION
Note:
-
Do not reuse the emblem.
-
Ensure Nissan Sentra vehicle surface temperature is between 25ÂşC (77ÂşF) to 50ÂşC (122ÂşF).
-
The following figure shows the fixing position of the emblem.
-
The central position of the left and right of emblem D should be measured between the left and right end portions of the trunk lid assembly. Then attach the emblem at the center of the trunk lid assembly.
Remove grease, dust, etc. from the emblem and Nissan Sentra vehicle surface.
Install the emblem to the vehicle surface.
Using a roller, or suitable tool, apply even pressure to firmly affix the emblem to Nissan Sentra vehicle surface.
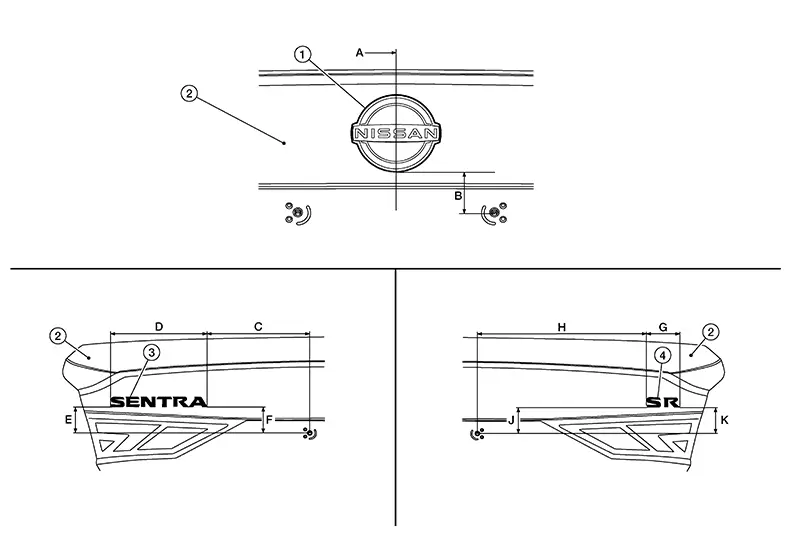
|
1. |
Emblem C |
2. |
Trunk lid assembly |
3. |
Emblem A |
|
4. |
Emblem B (if equipped) |
||||
|
A |
: 0.0 (0.0) |
B |
: 48.6 (1.9) |
C |
: 250.3 (9.9) |
D |
: 213.3 (8.4) |
|
E |
: 60.4 (2.4) |
F |
: 63.5 (2.5) |
G |
: 68.7 (2.7) |
H |
: 396.6 (15.6) |
|
J |
: 61.9 (2.4) |
K |
: 60.5 (2.4) |
||||
 Exploded View
Exploded View
1.
Emblem A
2.
...

Other materials:
Wiring diagram
Engine control system
Wiring Diagram
...
Rear suspension beam
Exploded View
Rear suspension beam
Rear suspension arm bracket
Front
Removal and Installation
NOTE:
When removing components such as hoses, tubes, lines, etc., cap or plug
openings to prevent fluid from spilling.
REMOVAL
Remove the rear wheels and tires using power tool. Ref ...
Vanity mirror lamp
Removal and installation
Caution:
Do not attempt to separate the vanity mirror lamp from the sun visor or
damage to the components
may occur.
Note:
The vanity mirror lamp is replaced as part of the sun visor. Refer to
int-40, "removal and installation".
Bulb or lens replacement
...
