Nissan Sentra B18 (2020-2025) Service Manual: Removal and Installation
Ecm
Ecm : Exploded View
ECM : Exploded View
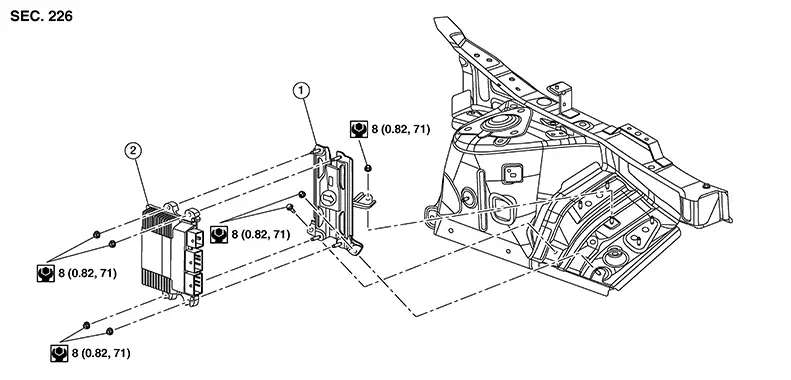
|
1. |
Bracket |
2. |
ECM |
Ecm : Removal & Installation
ECM : Removal & Installation
CAUTION:
-
Perform "ADDITIONAL SERVICE WHEN REPLACING ECM". Refer to Work Procedure.
-
When replacing the ECM, a new ECM must be used. The functions controlled by the ECM do not operate properly if a ECM fromanother Nissan Sentra vehicle is used.
REMOVAL
Remove the battery tray. Refer to Removal and Installation (Battery Tray).
Disconnect the harness connectors from the ECM. Refer to Harness Connector (lever locking type).
Remove nuts and ECM from ECM bracket.
INSTALLATION
Installation is in the reverse order of removal.
CAUTION:
Perform "ADDITIONAL SERVICE WHEN REPLACING ECM". Refer to Work Procedure.
Electric Intake Valve Timing Control Module
Electric Intake Valve Timing Control Module : Exploded View
ELECTRIC INTAKE VALVE TIMING CONTROL MODULE : Exploded View
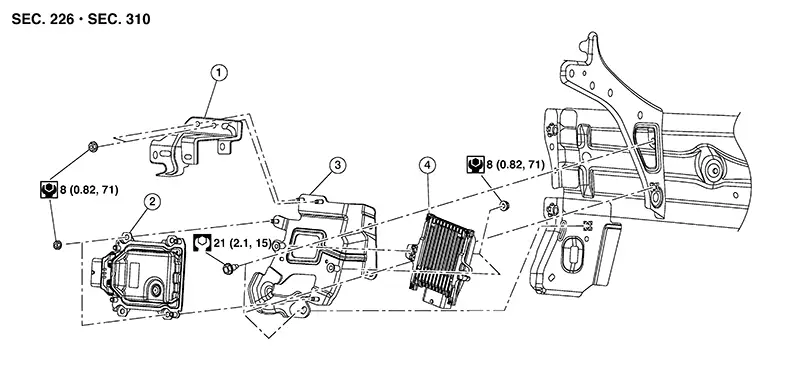
|
1. |
TCM upper bracket (if equipped) |
2. |
TCM (if equipped) |
3. |
TCM bracket |
|
4. |
Electric intake valve timing control module |
Electric Intake Valve Timing Control Module : Removal & Inst
ELECTRIC INTAKE VALVE TIMING CONTROL MODULE : Removal & Inst
CAUTION:
If replacing perform "ELECTRIC INTAKE VALVE TIMING CONTROL LEARNING". Refer to Work Procedure.
REMOVAL
Disconnect the battery. Refer to Battery Disconnect.
Remove front wheel and tire (LH) using power tool. Refer to Removal and Installation.
Partially remove front fender protector (LH). Refer to Exploded View.
Disconnect harness connectors (A),
and release harness retainers. 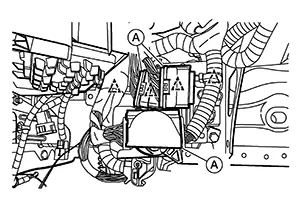
|
|
: Clip |

Disconnect the harness connectors
(A) from the TCM [1 (if equipped)], and electric intake valve timing
control module (2). Refer to Harness Connector (lever locking type). 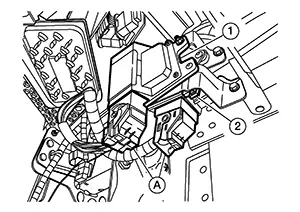
Remove bolts (A) , and remove TCM
Bracket (1). 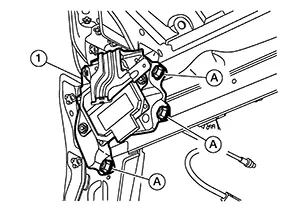
Remove nuts (A), and remove electric
intake valve timing control module (1). 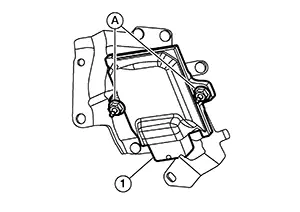
INSTALLATION
Installation is in the reverse order of removal.
CAUTION:
If replacing perform "ELECTRIC INTAKE VALVE TIMING CONTROL LEARNING". Refer to Work Procedure.
Start/stop Off Switch
Removal and Installation
Removal and Installation
REMOVAL
Remove shift selector finisher. Refer to Removal and Installation.
Remove screws (A) then release pawls
and remove start/stop off switch. 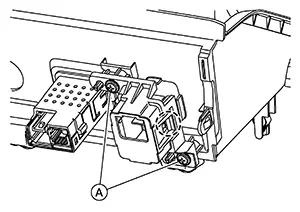
INSTALLATION
Installation is in the reverse order of removal.
Other materials:
B2083-23 Request Sw (fr)
Dtc Description
DTC Description
DTC DETECTION LOGIC
DTC No.
CONSULT screen terms
(Trouble diagnosis
content)
DTC Detection Condition
...
Wiper & Washer. Service Data and Specifications (sds). Service Data and Specifications (sds). Specifications
Service Data and Specifications (sds). Specifications
Specifications
Specifications
WITH WASHER LEVEL SWITCH
Windshield washer fluid
capacity
4.2
(4 1/2 US qt, 3 3/4 Imp qt)
...
B20ce-15 Hl (hi) Lh Pwr Sply Circ
Dtc Description
DTC Description
DTC DETECTION LOGIC
DTC No.
CONSULT screen items
(Trouble diagnosis content)
DTC detection condition
...