Nissan Sentra B18 (2020-2025) Service Manual: Periodic Maintenance
Idle Speed
Idle Speed : Periodic Maintenance
IDLE SPEED : Periodic Maintenance
 With
CONSULT
With
CONSULT
Check idle speed in “DATA MONITOR� mode of “ENGINE� using CONSULT.
 Without CONSULT
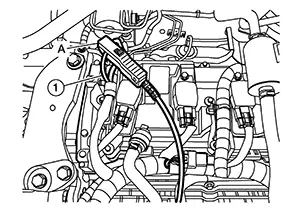
Attach induction type (current detection type)
rev counter (A) to loop wire  as shown and check idle speed.
Ignition Timing
Ignition Timing : Periodic Maintenance
IGNITION TIMING : Periodic Maintenance
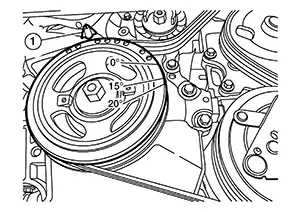
Attach timing light to wire loop as shown.
Check ignition timing.
: Timing indicator
Evaporative Emission System
Evaporative Emission System : Inspection
EVAPORATIVE EMISSION SYSTEM : Inspection
-
CHECK EVAP CANISTER
-
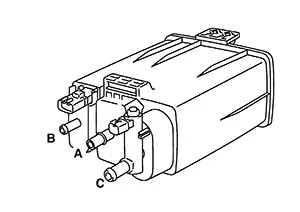
Block port (B).
-
Blow air into port (A) and check that it flows freely out of port (C).
-
Release blocked port (B).
-
Apply vacuum pressure to port (B) and check that vacuum pressure exists at the ports (A) and (C).
-
Block port (A) and (B).
-
Apply pressure to port (C) and check that there is no leakage.
INSPECTION END
-
Evap Canister
Evap Canister : Periodic Maintenance
EVAP CANISTER : Periodic Maintenance
CAUTION:
-
Do not use compressed air or a high pressure pump.
-
Do not exceed 4.12 kPa (0.042 kg/cm2, 0.6 psi) of pressure in EVAP system.

-
Do not start engine.
-
Improper installation of EVAP service port adapter [commercial service tool: (NI-41413-OBD)] to the EVAP service port may cause a leak.
WITH CONSULT
Install EVAP service port adapter
[commercial service tool: (NI-41413-OBD)] and pressure pump to EVAP
service port. 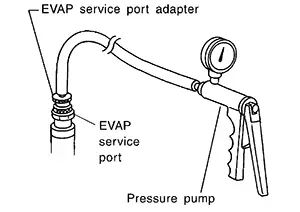 Note:
Note:
If vacuum delay valve does not have EVAP service port, remove vacuum delay valve and install EVAP service port [commercial service tool: (Part No. 149393S500)] instead.
Turn ignition switch ON.
Select the “EVAP SYSTEM CLOSE� of “WORK SUPPORT� mode with CONSULT.
Touch “START�. A bar graph (Pressure indicating display) will appear on the screen.
Apply positive pressure to the EVAP system until the pressure indicator reaches the middle of the bar graph.
Remove EVAP service port adapter [commercial service tool: (NI-41413-OBD)] and hose with pressure pump.
Locate the leak using a leak detector
(commercial service tool). Refer to System Description. 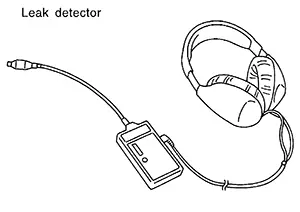
WITHOUT CONSULT
Install EVAP service port adapter
[commercial service tool: (NI-41413-OBD)] and pressure pump to EVAP
service port. Note:
If vacuum delay valve does not have EVAP service port, remove vacuum delay valve and install EVAP service port [commercial service tool: (Part No. 149393S500)] instead.
Apply battery voltage between the terminals of EVAP canister vent control valve to make a closed EVAP system.
To locate the leak, deliver positive pressure to the EVAP system until pressure gauge points reach 1.38 to 2.76 kPa (0.014 to 0.028 kg/cm2, 0.2 to 0.4 psi).
Remove EVAP service port adapter [commercial service tool: (NI-41413-OBD)] and hose with pressure pump.
Locate the leak using a leak detector
(commercial service tool). Refer to System Description.
Positive Crankcase Ventilation
Positive Crankcase Ventilation : Periodic Maintenance
POSITIVE CRANKCASE VENTILATION : Periodic Maintenance
Start engine and let it idle.
Replace PCV valve from the rocker cover. Refer to Removal and Installation.
Connect PCV valve to PCV hose.
Block and unblock the air hole of PCV
valve and check if a hissing noise can be heard from the air
hole. 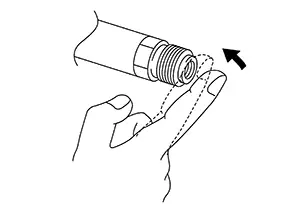
Is the inspection result normal?
YES >> INSPECTION END
NO >> Replace PCV valve. Refer to Removal and Installation.
Other materials:
Removal and Installation
Av Control Unit
Exploded View
Exploded View
1.
Audio unit bracket (LH)
2.
Audio unit
3.
...
Low Tire Pressure Warning Lamp Does Not Turn Off
Symptom Description
Symptom Description
The low tire pressure warning lamp does not turn
OFF after several seconds is passed after the engine starts.
Diagnosis Procedure
Diagnosis Procedure
CHECK TIRE PRESSURE
Ignition switch ...
Magnet Clutch
Component Function Check
Component Function Check
CHECK MAGNET CLUTCH OPERATION
Perform auto active test of IPDM E/R. Refer to CONSULT Function (IPDM E/R).
Does it operate normally?
YES >>
Inspection End.
NO > ...