Nissan Sentra B18 (2020-2025) Service Manual: Radiator
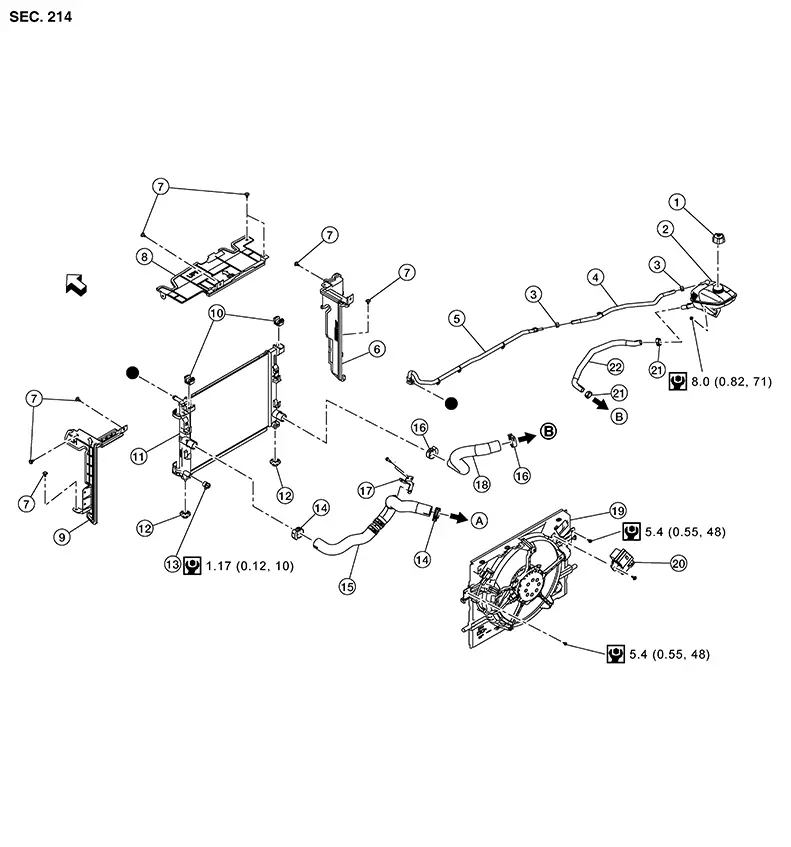
Exploded View
Exploded View
|
1. |
Reservoir tank cap |
2. |
Reservoir tank |
3. |
Clamp |
|
4. |
Reservoir tank hose A |
5. |
Reservoir tank hose B |
6. |
Air guide (RH) |
|
7. |
Clip |
8. |
Air guide (upper) |
9. |
Air guide (LH) |
|
10. |
Mounting rubber (upper) |
11. |
Radiator assembly |
12. |
Mounting rubber (lower) |
|
13. |
Radiator drain plug |
14. |
Clamp |
15. |
Radiator hose (upper) |
|
16. |
Clamp |
17. |
Bracket |
18. |
Radiator hose (lower) |
|
19. |
Cooling fan assembly |
20. |
Cooling fan control module |
21. |
Clamp |
|
22. |
Water hose |
A. |
To water outlet. Refer to Exploded View. |
B. |
To water inlet. Refer to Exploded View. |
|
|
: Front |
 : Indicates that the part is connected
at points with the same symbol in the actual Nissan Sentra vehicle.
: Indicates that the part is connected
at points with the same symbol in the actual Nissan Sentra vehicle.
Removal and Installation
Removal and Installation
REMOVAL
Warning:
-
Do not remove radiator cap or reservoir tank cap when engine is hot. Serious burns may occur from high-pressure engine coolant escaping from engine cooling system.
-
When removing the radiator cap or reservoir tank cap, wrap a thick cloth around the cap and slowly turn it a quarter turn to allow built-up pressure to escape. Then carefully remove the cap by turning it all the way.

When removing components such as hoses, tubes/lines, etc., cap or plug openings to prevent fluid from spilling.
Disconnect the battery. Refer to Battery Disconnect.
Remove the cooling fan assembly. Refer to Removal and Installation.
Remove the front bumper fascia. Refer to Removal and Installation.
Remove clips and remove the air guide (LH), air guide (RH) and air guide (upper).
Release pawls and reposition condenser. Refer to Exploded View.
Remove the hood lock bolts and reposition the hood lock. Refer to Exploded View.
Remove the radiator hose (upper) from the radiator.
Remove the reservoir tank hose B from the radiator.
Remove radiator pin locator and remove the radiator.
CAUTION:
Be careful to not damage radiator core or condenser core when removing.
INSTALLATION
Installation is in the reverse order of removal.
Radiator Hose
-
When inserting the radiator hose (1), insert the hose until it contacts the stopper (2), when a stopper is present. When a stopper is not present, insert hose by the specified dimension (C).
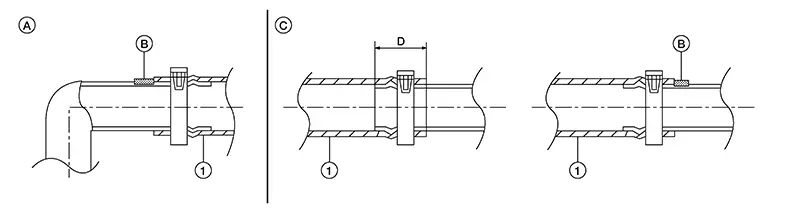
|
A. |
Radiator side |
B. |
Engine side |
C. |
33 mm (1.30 in) |
-
Refer to the following table when installing hose clamps.
Radiator hose
Hose end
Direction of paint mark
Orientation of hose clamp tabs*
Radiator hose (upper)
Radiator side
Nissan Sentra Vehicle left
Vehicle left
Engine side
Nissan Sentra Vehicle left
Vehicle left
Radiator hose (lower)
Radiator side
Nissan Sentra Vehicle right
Vehicle right
Engine side
Nissan Sentra Vehicle front
Vehicle front
-
The orientation of the hose clamp tabs must be within the specified range (B) of the specified position (A).
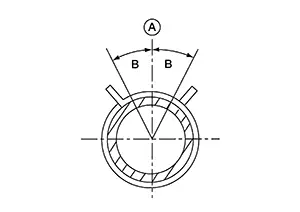
Range (B)
: 30°
-
When installing hose clamp (1), make sure that the hose clamp is installed within the specified dimension (A) from the end of the hose (2).
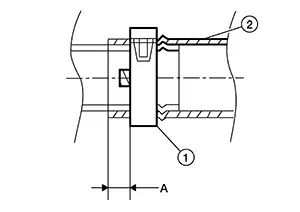
Dimension (A)
: 3 - 7 mm (0.12 - 0.28 in)
Inspection
Inspection
INSPECTION AFTER INSTALLATION
After installation, check engine coolant systems for leaks. Refer to Inspection.
Start and warm up the engine. Check and make sure there are no engine coolant leaks.
Other materials:
Component Parts
Display Audio Without Bose with 8" Color Display
Component Parts Location
Component Parts Location
No.
Component
Function
...
Camera Aiming Adjustment
Work Procedure
Work Procedure
Always adjust the camera aiming after removing and
installing or replacing the front camera unit.
Always adjust the camera aiming after removing and
installing or replacing the windshield glass.
CAUTION:
...
U2140-87 Can Comm Err (ecm)
Dtc Description
DTC Description
DESCRIPTION
CAN (Controller Area Network) is a serial communication
line for real time applications. It is an on-Nissan Sentra vehicle multiplex communication
line with high data communication speed and excellent error detection
ability. Modern Nissan ...