Nissan Sentra B18 (2020-2025) Service Manual: Periodic Maintenance
Engine Oil
Inspection
Inspection
ENGINE OIL LEVEL
Note:
Before starting engine, put Nissan Sentra vehicle horizontally and check the engine oil level. If engine is already started, stop it and allow 10 minutes before checking.
Pull out oil level gauge and wipe it clean.
Insert oil
level gauge and check that the engine oil level is within the range
(A) shown.
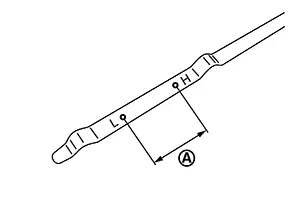
If it is out of range, add oil as necessary until the oil level gauge indicates the correct level.
ENGINE OIL APPEARANCE
-
Check engine oil for white milky appearance or excessive contamination.
-
If engine oil becomes white, it is highly probable that it is contaminated with engine coolant. Repair or replace damaged parts.
ENGINE OIL LEAKS
Check for engine oil leaks around the following area:
-
Oil pan (upper and lower)
-
Oil pan drain plug
-
Engine oil pressure sensor
-
Engine oil temperature sensor
-
Oil filter
-
Oil cooler
-
Exhaust valve timing control solenoid valve
-
Front cover
-
VTC cover
-
Mating surface between cylinder block and cylinder head
-
Mating surface between cylinder head and camshaft bracket
-
Mating surface between camshaft bracket and rocker cover
-
Mating surface between camshaft bracket and high pressure fuel pump
-
Crankshaft oil seals (front and rear)
OIL PRESSURE CHECK
Warning:
-
Be careful not to get burned, as engine oil may be hot.
-
When checking engine oil pressure, shift position should be “Parking position�, and apply parking brake securely.
Check engine oil level.
Remove the front under cover. Refer to Removal and Installation.
Disconnect the harness connector
from the engine oil pressure sensor (1), and remove the engine oil
pressure sensor using a suitable tool.
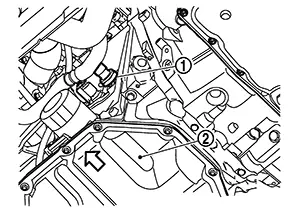
CAUTION:
Do not drop or shock engine oil pressure sensor.
|
(2) |
: Oil pan (lower) |
|
|
: Nissan Sentra Vehicle front |

Install suitable tools
(A/B).
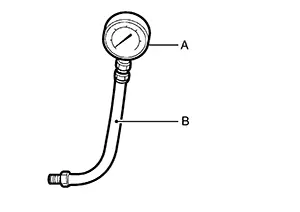
Start engine and warm it up to normal operating temperature.
Check oil pressure with engine
running under no-load.
Note:
When engine oil temperature is low, engine oil pressure becomes high.
|
Engine oil pressure |
: Refer to Engine Oil Pressure. |
If difference is extreme, check oil passage and oil pump for oil leaks.
After the inspections, install engine oil pressure sensor as follows: Remove old liquid gasket adhering to engine oil pressure sensor and engine. Apply liquid gasket and tighten engine oil pressure sensor to specification.
Use Genuine Silicone RTV Sealant or equivalent. Refer to Recommended Chemical Products and Sealants.
Note:
Wait at least 30 minutes after engine oil pressure is installed before starting engine.
|
Tightening torque |
: Refer to Exploded View. |
Draining
Draining
Warning:
-
Be careful not to get burned, as engine oil may be hot.
-
Prolonged and repeated contact with used engine oil may cause skin cancer. Try to avoid direct skin contact with used engine oil. If skin contact is made, wash thoroughly with soap or hand cleaner as soon as possible.
Warm up the engine, and check for engine oil leaks from engine components. Refer to Inspection.
Stop the engine and wait for 10 minutes.
Loosen oil filler cap.
Remove front under cover. Refer to Removal and Installation.
Remove drain plug and then drain engine oil.
Refilling
Refilling
Install drain plug with new drain plug washer.
CAUTION:
-
Do not reuse drain plug washer.
-
Be sure to clean drain plug and install with new drain plug washer.
|
Tightening torque |
: Refer to Exploded View. |
|
Refill with new engine oil.
CAUTION:
-
The refill capacity depends on the engine oil temperature and drain time. Use these specifications for reference only.
-
Always use oil level gauge to determine the proper amount of engine oil in the engine.
|
Engine oil specification and capacity |
: Refer to Fluid and Lubricants. |
Warm up engine and check area around drain plug and oil filter for engine oil leaks.
Install front under cover. Refer to Removal and Installation.
Stop engine and wait for 10 minutes.
Check the engine oil level. Refer to Inspection.
Oil Filter
Removal and Installation
Removal and Installation
REMOVAL
Remove the front under cover. Refer to Removal and Installation.
Using
suitable tool (A), remove the oil filter (1). 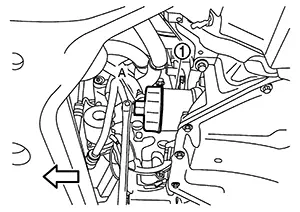
CAUTION:
-
Oil filter is provided with relief valve.
-
Be careful not to get burned when engine and engine oil may be hot.
-
When removing, prepare a shop cloth to absorb any engine oil leaks or spills.
-
Completely wipe off any engine oil that adheres to engine and Nissan Sentra vehicle.
It is recommended to use a Genuine NISSAN oil filter or equivalent. The use of parts that do not meet or exceed NISSAN specifications may cause damage to the Nissan Sentra vehicle, and have an effect on warranty coverage. Always check with the Parts Department for the latest parts information.
|
|
: Nissan Sentra Vehicle front |
INSTALLATION
Remove foreign materials adhering to the oil filter installation surface.
Apply new
engine oil to the oil seal contact surface of new oil
filter.
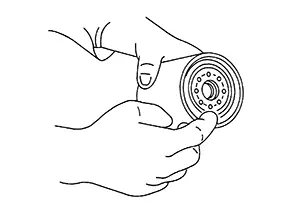
Screw oil
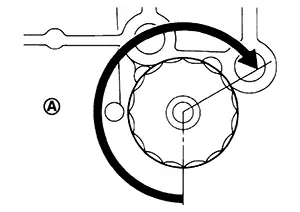
filter manually until it touches the installation surface, then
tighten it by 2/3 turn (A). Or tighten to specification.
|
Oil filter |
: 17.7 N·m (1.8 kg-m, 13 ft-lb) |
Install the front under cover. Refer to Removal and Installation.
Inspection
Inspection
Check the engine oil level. Refer to Inspection.
Start the engine, and check there is no leaks of engine oil.
Stop the engine and wait for 10 minutes.
Check the engine oil level and adjust the level. Refer to Inspection.
Other materials:
Dtc/circuit Diagnosis. Position Switch
Position Switch
Back-Up Lamp Switch
Component Inspection
Component Inspection
CHECK BACK-UP LAMP SWITCH
Disconnect position switch harness connector.
Refer to Removal and Installation.
...
Dtc/circuit Diagnosis
C1b80-54 Control Module
Dtc Description
DTC Description
DTC DETECTION LOGIC
DTC No.
CONSULT screen terms
(Trouble diagnosis
content)
...
P0078 Evt Control Solenoid Valve
Dtc Description
DTC Description
DTC DETECTION LOGIC
DTC
CONSULT screen terms
(Trouble diagnosis
content)
DTC detection
condition
...