Nissan Sentra B18 (2020-2025) Service Manual: Parking Brake Control
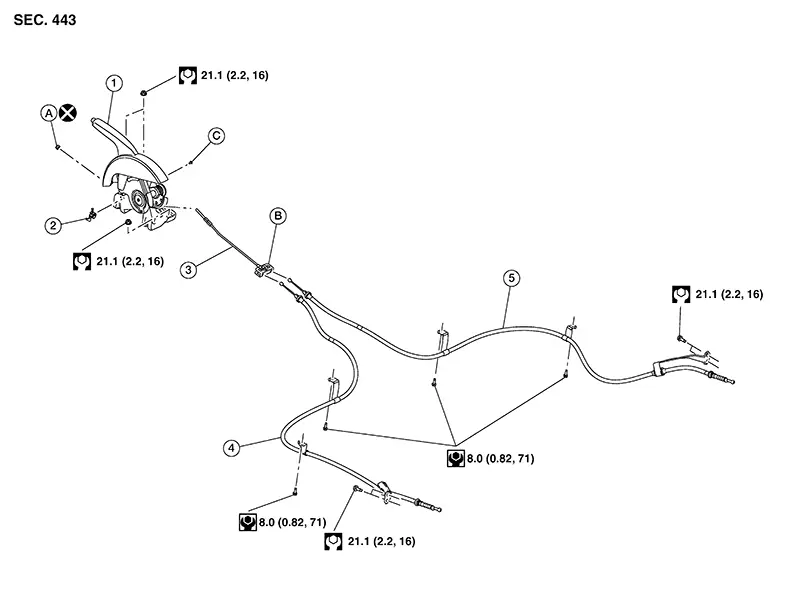
Exploded View
|
1. |
Parking brake lever assembly |
2. |
Parking brake switch |
3. |
Front parking brake cable |
|
4. |
Rear parking brake cable (LH) |
5. |
Rear parking brake cable (RH) |
A. |
Adjusting nut |
|
B. |
Equalizer |
C. |
Screw |
Removal and Installation
REMOVAL
Remove the cup holder finisher. Refer to Exploded View.
Loosen the
adjusting nut (A). 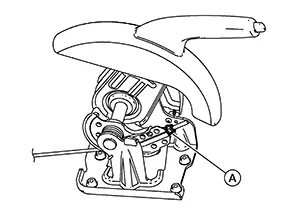
CAUTION:
Do not reuse the adjusting nut if the nut is removed.
Note:
It is not necessary to remove the front parking brake cable from the parking brake lever assembly.
Pull the
equalizer (A) in the rearward direction and then in the upward
direction in order to separate the rear parking brake cables [LH/RH
(2)] from the front parking brake cable (1). 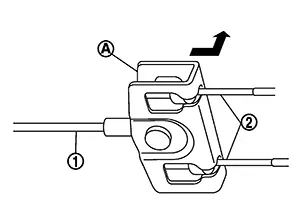
CAUTION:
To prevent damage to parts, do not bend the parking brake cables.
Remove the nuts from the parking brake lever assembly. Refer to Exploded View.
Disconnect the harness connector from the parking brake switch.
Remove the parking brake lever assembly.
INSTALLATION
Installation is in the reverse order of removal.
-
Perform the adjustment. Refer to Adjustment.
-
Perform the inspection. Refer to Inspection.
CAUTION:
Do not reuse the adjusting nut if the nut is removed.

 Parking Brake Front Cable
Removal and Installation
Removal and Installation
REMOVAL
Remove the
cup holder finisher. Refer to Exploded View.
Remove the
adjusting nut (A).
CAUTION:
Do not reuse t ...
Other materials:
Diagnosis Procedure
Diagnosis Procedure
CHECK REAR WINDOW DEFOGGER POWER
SUPPLY AND GROUND CIRCUIT
Check rear window defogger power supply and
ground circuit.
Refer to Refer to Component Function Check.
Is the inspection result ...
Confirmation Procedure
Confirmation Procedure
DTC CONFIRMATION PROCEDURE
CONSULT
Ignition switch ON.
Ignition switch OFF and wait at least 30
seconds.
...
System
Engine Control System
System Description
System Description
SYSTEM DIAGRAM
SYSTEM DESCRIPTION
The adopted system enables comprehensive engine control.
ECM (engine control module) performs various controls such as fuel
injection control, ignition timing cont ...
