Nissan Sentra B18 (2020-2025) Service Manual: On Board Refueling Vapor Recovery (orvr)
Component Function Check
Component Function Check
-
CHECK ORVR FUNCTION
Check whether the following symptoms are present.
-
Fuel odor from EVAP canister is strong.
-
Cannot refuel/Fuel odor from the fuel filler opening is strong while refueling.
Are any symptoms present?
YES >>Refer to Diagnosis Procedure.
NO >>INSPECTION END
-
Diagnosis Procedure
Diagnosis Procedure
-
INSPECTION START
Check whether the following symptoms are present.
A: Fuel odor from EVAP canister is strong.
B: Cannot refuel/Fuel odor from the fuel filler opening is strong while refueling.
Which symptom is present?
A>>GO TO 2.
B>>GO TO 7.
-
CHECK EVAP CANISTER
-
Remove EVAP canister with EVAP canister vent control valve and EVAP control system pressure sensor attached.
-
Weigh the EVAP canister with EVAP canister vent control valve and EVAP control system pressure sensor attached.
The weight should be less than 2.1 kg (4.6 lb).
Is the inspection result normal?
YES >>GO TO 3.
NO >>GO TO 4.
-
-
CHECK IF EVAP CANISTER IS SATURATED WITH WATER
Check if water will drain from EVAP canister
 .
. : EVAP canister vent control
valve
: EVAP canister vent control
valve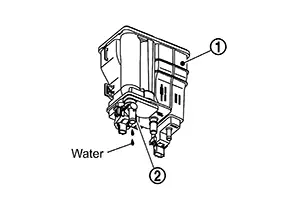
Does water drain from the EVAP canister?
YES >>GO TO 4.
NO >>GO TO 6.
-
REPLACE EVAP CANISTER
Replace EVAP canister with a new one. Refer to Removal and Installation.
>>GO TO 5.
-
DETECT MALFUNCTIONING PART
Check the EVAP hose between EVAP canister and Nissan Sentra vehicle frame for clogging or poor connection.
>>Repair or replace EVAP hose.
-
CHECK REFUELING EVAP VAPOR CUT VALVE
Check refueling EVAP vapor cut valve. Refer to Component Inspection.
Is the inspection result normal?
YES >>INSPECTION END
NO >>Replace refueling EVAP vapor cut valve with fuel tank. Refer to Removal and Installation.
-
CHECK EVAP CANISTER
-
Remove EVAP canister with EVAP canister vent control valve and EVAP control system pressure sensor attached.
-
Weigh the EVAP canister with EVAP canister vent control valve and EVAP control system pressure sensor attached.
The weight should be less than 2.1 kg (4.6 lb).
Is the inspection result normal?
YES >>GO TO 8.
NO >>GO TO 9.
-
-
CHECK IF EVAP CANISTER IS SATURATED WITH WATER
Check if water will drain from EVAP canister
.: EVAP canister vent control
valve
Does water drain from the EVAP canister?
YES >>GO TO 9.
NO >>GO TO 11.
-
REPLACE EVAP CANISTER
Replace EVAP canister with a new one. Refer to Removal and Installation.
>>GO TO 10.
-
DETECT MALFUNCTIONING PART
Check the EVAP hose between EVAP canister and Nissan Sentra vehicle frame for clogging or poor connection.
>>Repair or replace EVAP hose.
-
CHECK VENT HOSES AND VENT TUBES
Check hoses and tubes between EVAP canister and refueling control valve for clogging, kinks, looseness and improper connection.
Is the inspection result normal?
YES >>GO TO 12.
NO >>Repair or replace hoses and tubes.
-
CHECK FILLER NECK TUBE
Check recirculation line for clogging, dents and cracks.
Is the inspection result normal?
YES >>GO TO 13.
NO >>Replace filler neck tube.
-
CHECK REFUELING EVAP VAPOR CUT VALVE
Check refueling EVAP vapor cut valve. Refer to Component Inspection.
Is the inspection result normal?
YES >>GO TO 14.
NO >>Replace refueling EVAP vapor cut valve with fuel tank.
-
CHECK FUEL FILLER TUBE
Check filler neck tube and hose connected to the fuel tank for clogging, dents and cracks.
Is the inspection result normal?
YES >>GO TO 15.
NO >>Replace fuel filler tube.
-
CHECK ONE-WAY FUEL VALVE-1
Check one-way valve for clogging.
Is the inspection result normal?
YES >>GO TO 16.
NO >>Repair or replace one-way fuel valve with fuel tank.
-
CHECK ONE-WAY FUEL VALVE-2
-
Make sure that fuel is drained from the tank.
-
Remove fuel filler tube and hose.
-
Check one-way fuel valve for operation as follows.
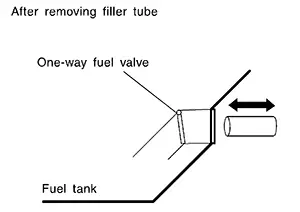
When a stick is inserted, the valve should open, when removing stick it should close.
Do not drop any material into the tank.
Is the inspection result normal?
YES >>INSPECTION END
NO >>Replace fuel filler tube or replace one-way fuel valve with fuel tank.
-
Component Inspection
Component Inspection
-
INSPECTION START
Do you have CONSULT?
YES >>GO TO 2.
NO >>GO TO 3.
-
CHECK REFUELING EVAP VAPOR CUT VALVE
 With CONSULT
-
Turn ignition switch OFF.
-
Remove fuel tank.
-
Drain fuel from the tank as follows:
-
Remove fuel feed hose located on the fuel gauge retainer.
-
Connect a spare fuel hose, one side to fuel gauge retainer where the hose was removed and the other side to a fuel container.
-
Drain fuel using ŌĆ£FUEL PUMP CONTROL MODULEŌĆØ in ŌĆ£ACTIVE TESTŌĆØ mode of ŌĆ£ENGINEŌĆØ using CONSULT.
-
-
Check refueling EVAP vapor cut valve for being stuck to close as follows.
Blow air into the refueling EVAP vapor cut valve (from the end of EVAP/ORVR line hose), and check that the air flows freely into the tank.
-
Check refueling EVAP vapor cut valve for being stuck to open as follows.
-
Connect vacuum pump to hose end.
-
Remove fuel gauge retainer with fuel gauge unit.
Always replace O-ring with new one.
-
Turn fuel tank upside down.
-
Apply vacuum pressure to hose end [ŌłÆ13.3 kPa (ŌłÆ0.136 kg/cm2, ŌłÆ1.93 psi)] with fuel gauge retainer remaining open and check that the pressure is applicable.
-
Is the inspection result normal?
YES >>INSPECTION END
NO >>Replace refueling EVAP vapor cut valve with fuel tank. Refer to Removal and Installation.
-
-
CHECK REFUELING EVAP VAPOR CUT VALVE
 Without CONSULT
-
Turn ignition switch OFF.
-
Remove fuel tank. Refer to Removal and Installation.
-
Drain fuel from the tank as follows:
-
Remove fuel gauge retainer.
-
Drain fuel from the tank using a handy pump into a fuel container.
-
-
Check refueling EVAP vapor cut valve for being stuck to close as follows.
Blow air into the refueling EVAP vapor cut valve (from the end of EVAP/ORVR line hose), and check that the air flows freely into the tank.
-
Check refueling EVAP vapor cut valve for being stuck to open as follows.
-
Connect vacuum pump to hose end.
-
Remove fuel gauge retainer with fuel gauge unit.
Always replace O-ring with new one.
-
Turn fuel tank upside down.
-
Apply vacuum pressure to hose end [ŌłÆ13.3 kPa (ŌłÆ0.136 kg/cm2, ŌłÆ1.93 psi)] with fuel gauge retainer remaining open and check that the pressure is applicable.
-
Is the inspection result normal?
YES >>INSPECTION END
NO >>Replace refueling EVAP vapor cut valve with fuel tank. Refer to Removal and Installation.
-
Other materials:
U1300 Av Communication Circuit
Dtc Description
DTC Description
DTC DETECTION LOGIC
DTC No.
CONSULT screen terms
(Trouble diagnosis
content)
DTC detection condition
...
Active Grille Shutter
Component Inspection
Component Inspection
CHECK ACTIVE GRILLE SHUTTER
With CONSULT
Start the engine.
Select ŌĆ£ACTIVE GRILLE
SHUTTERŌĆØ in ŌĆ£ACTIVE TESTŌĆØ mode of
ŌĆ£ENGINEŌĆØ using CONSULT.
...
Operation
Automatic Speed Control Device (ascd)
Switch Name and Function
Switch Name and Function
SWITCHES AND INDICATORS
On the combination
meter
...