Nissan Sentra B18 (2020-2025) Service Manual: Inspection
WIND DEFLECTOR
Open glass lid fully.
Visually check for proper installation, damaged/deteriorated components, or foreign objects within mechanism. Correct as required for smooth operation.
Check for
grease at the wind deflector arm (1) and pivot areas. If necessary,
apply a sufficient amount of grease for non-binding
operation.
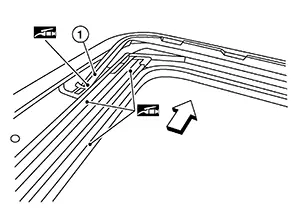
![]() :
Front
:
Front
Check that
the wind deflector (1) moves freely within the moonroof unit
assembly while manually pressing down and releasing. If a
malfunction is detected, remove the moonroof unit assembly and
visually inspect. If damage is found, replace either wind deflector
(1) or moonroof unit assembly as required. Refer to Removal and Installation (WIND DEFLECTOR) or
Removal and Installation (MOONROOF UNIT
ASSEMBLY). 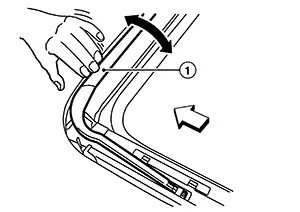
![]() :
Front
:
Front
LINK AND WIRE ASSEMBLY
Note:
Before replacing a suspect part, make sure it is the source of noise being experienced.
Check link to determine if coating film has peeled off excessively enough that substrate is visible. Check also to determine if link is the source of noise. Replace as necessary.
Visually check to determine if a sufficient amount of grease has been applied to wire or rail groove. If not, add grease as required.
Check wire for any damage or deterioration. If any damage is found, replace moonroof unit assembly. Refer to Removal and Installation.
WEATHER-STRIP
Visually check weather-strip for damage, deterioration, or deformation.
-
Open glass lid partially to inspect front edge of weather-strip.
-
Tilt up glass lid fully to inspect sides and rear edge of weather-strip.
If any area of the weather-strip is found to be damaged, replace the glass lid. Refer to Removal and Installation.
Check for leakage around glass lid.
-
Close moonroof lid assembly.
-
Pour water around surface to determine area of concern.
-
For gaps or misalignment, adjust glass lid to specifications. Refer to Adjustment in this section.
-
For damaged sealing surfaces, either replace glass lid, refer to Removal and Installation or repair the panel, refer to Roof.
-
DRAIN HOSES
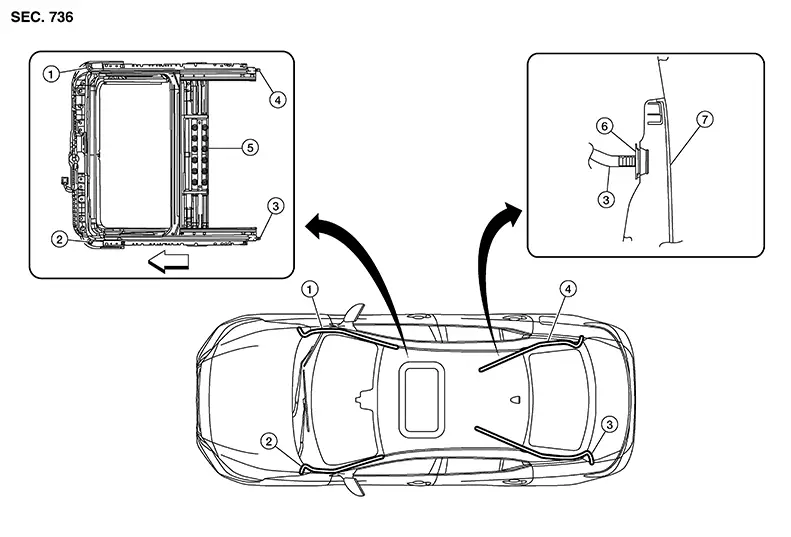
|
1. |
Drain hose front (RH) |
2. |
Drain hose front (LH) |
3. |
Drain hose rear (LH) |
|
4. |
Drain hose rear (RH) |
5. |
Moonroof unit assembly |
6. |
Seal |
|
7. |
Rear bumper fascia |
|
Front |
Remove the headlining. Refer to Removal and Installation.
Visually check drain hoses for:
-
Proper connection at moonroof unit assembly and drain hose.
-
Damage, pinch, cracks or deterioration.
-
Proper fastening and routing on body panels.
Pour water through drain hoses to determine watertight performance.
If damaged or leaking portions in any drain hose is found, replace entire drain hose as necessary.

 Exploded View
Exploded View
1.
Sunshade stopper
2.
...
Other materials:
Power outlet
Center Console
Console Box (if so equipped)
The power outlets are for powering electrical
accessories such as cellular telephones. They
are rated at 12 volt, 120W (10A) maximum.
The power outlets are powered only when the
ignition switch is in the ACC or ON position.
CAUTION
The ...
U1321-55 Configuration Unfinished
Dtc Description
DTC Description
DTC DETECTION LOGIC
DTC No.
CONSULT screen terms
(Trouble diagnosis
content)
DTC detection condition
...
P0452 Evap Control System Pressure Sensor
Dtc Description
DTC Description
DTC DETECTION LOGIC
DTC
CONSULT screen terms
(Trouble diagnosis
content)
DTC detection
condition
...
