Nissan Sentra B18 (2020-2025) Service Manual: Hood Lock
Exploded View
Exploded View
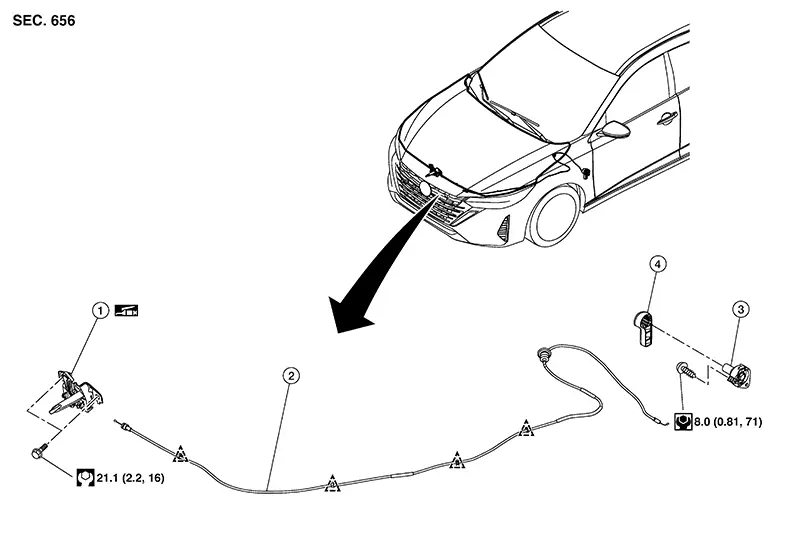
|
1. |
Hood lock |
2. |
Hood lock release cable |
3. |
Hood lock release assembly |
|
4. |
Hood lock release handle |
|
Clip |

Hood Lock
Removal and Installation
Removal and Installation
REMOVAL
Remove front bumper fascia retainer. Refer to Exploded View.
Remove hood lock bolts.
Disconnect harness connector from hood lock.
Disconnect hood lock release cable from hood lock.
Remove hood lock.
INSTALLATION
Installation is in the reverse order of removal.
CAUTION:
-
Check that hood lock release cable and secondary latch cable are properly engaged with hood lock.
-
After installation, perform hood assembly adjustment procedure. Refer to Adjustment.
-
After adjusting, perform hood lock inspection. Refer to Inspection.
Inspection
Inspection
Note:
If the hood lock cable is bent or deformed, replace it.
Check that secondary latch is properly engaged with secondary striker with hoods own weight.
While operating hood lock release handle, carefully check that the front end of hood is raised by approximately 20.0 mm (0.79 in). Also check that hood lock release handle returns to the original position.
Check that hood lock release handle operates at 49 N (5.0 kg-m, 11.0 ft-lb) or below.
Check that primary latch is securely engaged with primary striker when hood assembly is closed. [free-fall from approximately 200 mm (7.8 in) height].
Check the hood lock lubrication condition. If necessary, apply a suitable multi-purpose grease to hood lock.
Hood Lock Release Cable
Removal and Installation
Removal and Installation
REMOVAL
Remove fender protector (LH). Refer to Removal and Installation.
Remove hood lock. Refer to Removal and Installation.
Release clips and remove air inlet duct. Refer to Exploded View.
Remove the dash side finisher. Refer to Removal and Installation.
Remove the hood lock release assembly screw.
Disconnect hood lock release cable from hood lock release assembly.
Release hood lock release cable clips using a suitable tool.
Remove grommet on the lower dash and carefully pull the hood lock release cable into the passenger compartment.
CAUTION:
While pulling, be careful not to damage (peel) the outside of hood lock release cable.
INSTALLATION
Installation is in the reverse order of removal.
CAUTION:
-
Be careful not to bend cable too much, keep the radius 100 mm (3.94 in) or more.
-
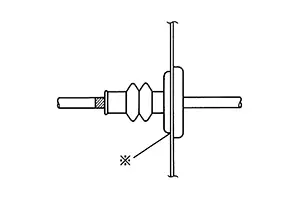
Check that cable is not offset from the positioning grommet, and apply the sealant to the grommet (at * mark) properly.
-
Check that hood lock release cable is properly engaged with hood lock.
-
After installation, perform hood adjustment procedure. Refer to Adjustment.
-
After adjusting, perform hood lock inspection. Refer to Inspection.
Hood Lock Release Assembly
Removal and Installation
Removal and Installation
REMOVAL
Using suitable tool remove hood lock release handle.
Remove dash side finisher. Refer to Removal and Installation.
Remove hood lock release assembly screw.
Disconnect hood lock release cable from the hood lock release assembly and remove.
INSTALLATION
Installation is in the reverse order of removal.
Other materials:
Oil Filter
Removal and Installation
Removal and Installation
REMOVAL
Remove the
front under cover. Refer to Removal and Installation.
Using
suitable tool (A), remove the oil filter (1).
CAUTION:
Oil filter is provided with relief valve.
Be ...
Normal Operating Condition
Description
Description
PRECAUTIONS FOR BLIND SPOT WARNING
The Blind Spot Warning system is not a replacement for
proper driving procedure and is not designed to prevent contact with
Nissan Sentra vehicles or objects. When changing lanes, always use the side and re ...
System Description
Component Parts
Rear View Monitor with 7" Color Display
Component Parts Location
Component Parts
Location
No.
Component
Function
...