Nissan Sentra B18 (2020-2025) Service Manual: Trunk Lid
Exploded View
Exploded View
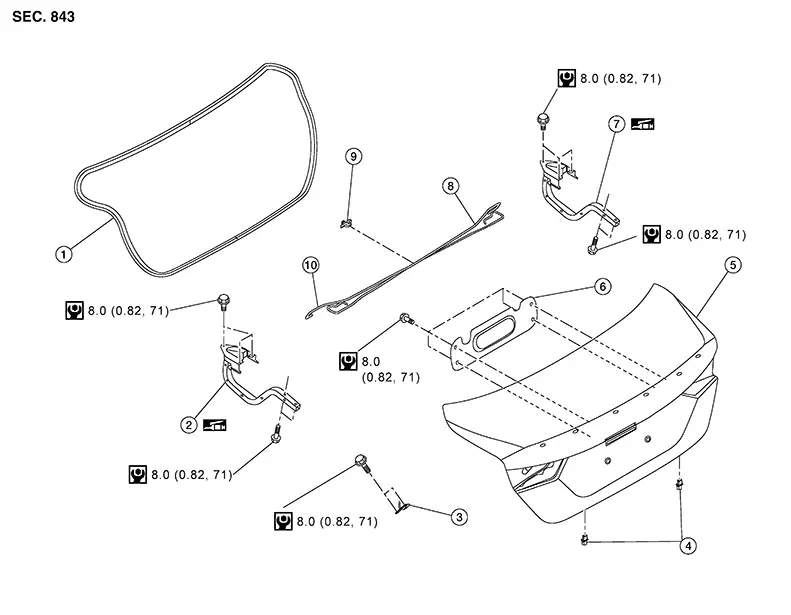
|
1. |
Trunk lid weather-strip |
2. |
Trunk lid hinge (LH) |
3. |
Trunk lid striker |
|
4. |
Bumper rubber |
5. |
Trunk lid assembly |
6. |
Trunk lid dampener |
|
7. |
Trunk lid hinge (RH) |
8. |
Torsion bar (RH) |
9. |
Torsion bar clip |
|
10. |
Torsion bar (LH) |
Trunk Lid Assembly
Removal and Installation
Removal and Installation
CAUTION:
-
Use two people when removing or installing trunk lid assembly due to its heavy weight.
-
Use protective tape or shop cloths to protect surrounding components from damage during removal and installation of trunk lid assembly.
REMOVAL
Remove trunk lid finisher. Refer to Removal and Installation.
Remove the trunk lid dampener bolts and trunk lid dampener.
Using a suitable tool, disconnect all harness connectors.
Using a suitable tool remove all harness retainer clips from trunk lid.
Remove the trunk lid bolts and the trunk lid assembly.
CAUTION:
Use two people when removing or installing trunk lid, due to its heavy weight.
INSTALLATION
Installation is in the reverse order of removal.
CAUTION:
-
After installation, perform trunk lid adjustment procedure. Refer to Adjustment.
-
After installation, check trunk lid open/close and lock/unlock operation.
-
Apply touch-up paint (body color) onto the heads of the trunk lid hinge bolts.
Adjustment
Adjustment
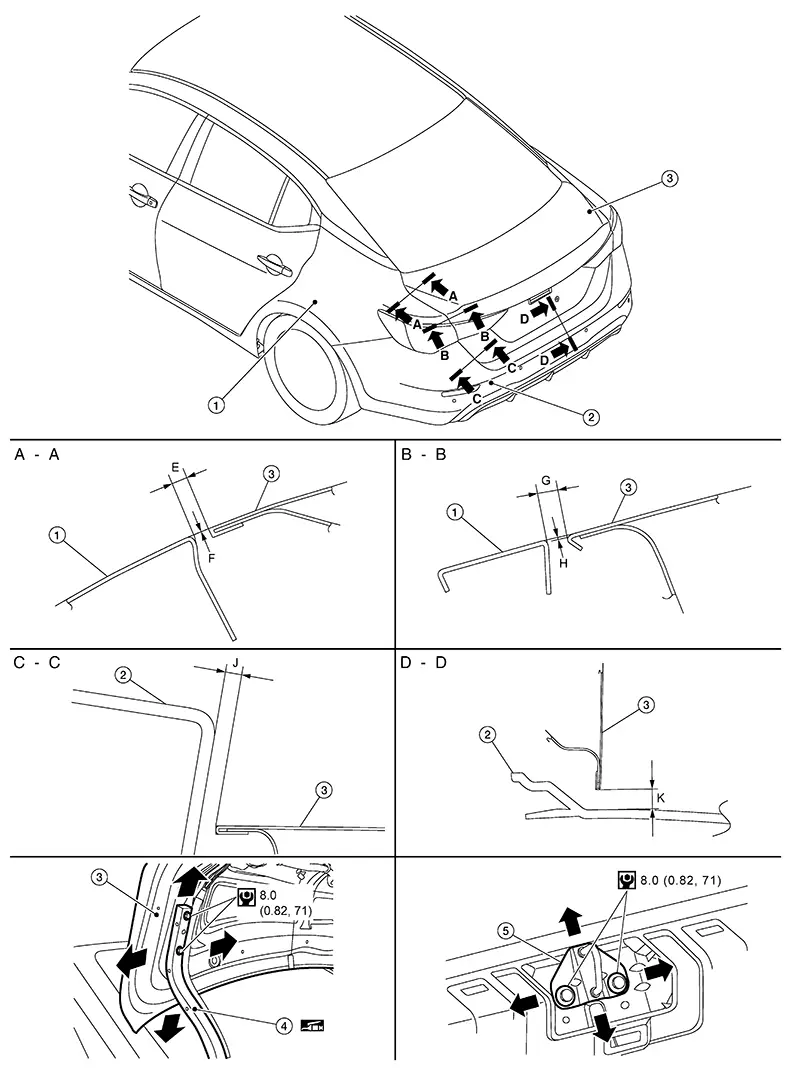
|
1. |
Body side outer |
2. |
Rear bumper fascia |
3. |
Trunk lid assembly |
|
4. |
Trunk lid hinge |
5. |
Trunk lid striker |
Check the clearance and surface height between trunk lid and each part by visual inspection and tactile feel.
If the clearance and surface height are out of specification, adjust them according to the adjustment procedure.
Unit: mm (in)|
Section |
Item |
Measurement |
Standard |
Difference (LH/RH, MAX) |
|---|---|---|---|---|
|
A – A |
E |
Clearance |
3.5 ± 1.0 (0.14 ± 0.04) |
2.0 (0.08) |
|
F |
Surface height |
0.5 ± 1.0 (0.02 ± 0.04) |
1.5 (0.06) |
|
|
B – B |
G |
Clearance |
3.5 ± 1.0 (0.14 ± 0.04) |
2.0 (0.08) |
|
H |
Surface height |
0.8 ± 1.0 (0.03 ± 0.04) |
2.0 (0.08) |
|
|
C – C |
J |
Clearance |
4.1 - 4.2 ± 2.0 (0.16 - 0.17 ± 0.08) |
3.0 (0.12) |
|
D – D |
K |
Clearance |
7.0 - 7.1 ± 2.2 (0.28 ± 0.09) |
— |
Loosen trunk lid hinge bolts (trunk lid side).
Remove trunk rear plate. Refer to Removal and Installation.
Loosen trunk lid striker bolts.
Lift up trunk lid approximately 100 – 150 mm (3.9 – 5.9 in) then close it lightly and check that it is engaged firmly with trunk lid closed.
Check the clearance and surface height.
Tighten trunk lid hinge and trunk lid striker.
Install trunk rear plate. Refer to Removal and Installation.
TRUNK LID STRIKER ADJUSTMENT
Adjust trunk lid striker so that it becomes parallel with trunk lid lock insertion direction.
Trunk Lid Striker
Removal and Installation
Removal and Installation
REMOVAL
Remove the trunk rear finisher. Refer to Removal and Installation.
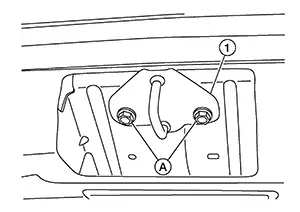
Remove bolts (A).
Remove
trunk lid striker (1).
INSTALLATION
Installation is in the reverse order of removal.
CAUTION:
-
After installation, check trunk lid open/close, lock/unlock operation.
-
After installation, perform the trunk lid adjustment procedure. Refer to Adjustment.
Trunk Lid Hinge
Removal and Installation
Removal and Installation
REMOVAL
Remove trunk lid assembly. Refer to Removal and Installation.
Release
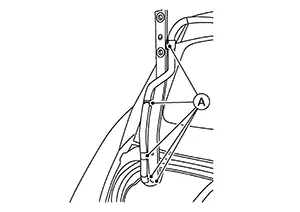
harness retainers (A) from trunk lid hinge (LH only).
Remove torsion bar. Refer to Removal and Installation.
Remove rear parcel shelf finisher. Refer to Removal and Installation.
Remove trunk lid hinge bolts (body side) and then trunk lid hinge.
INSTALLATION
Installation is in the reverse order of removal.
CAUTION:
-
After installation, check trunk lid open/close, lock/unlock operation.
-
After installation, perform the trunk lid adjustment procedure. Refer to Adjustment.
-
Apply touch-up paint (body color) onto the heads of trunk lid hinge bolts.
Torsion Bar
Removal and Installation
Removal and Installation
REMOVAL
Remove torsion bar clip.
Support the trunk lid using suitable tool.
Warning:
Bodily injury may occur if trunk lid is not supported properly when removing torsion bar.
Release
torsion bar using Tool (A) as shown to remove.
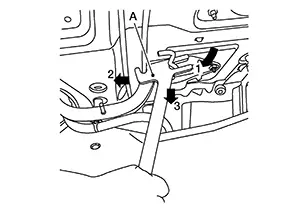
|
Tool number : — (NI-51874) |
INSTALLATION
Installation is in the reverse order of removal.
CAUTION:
After installation check the trunk lid open/close, lock/unlock operation.
Trunk Lid Weather-Strip
Removal and Installation
Removal and Installation
REMOVAL
Remove trunk lid weatherstrip from the trunk lid opening.
CAUTION:
Do not pull excessively on weatherstrip.
INSTALLATION
Beginning with upper section, align weather-strip mark with Nissan Sentra vehicle center position mark and install weather strip to the vehicle.
For the
lower section, align weather-strip seam with center of trunk
lid.
Note: 
Pull weather-strip gently to ensure that there are no loose sections.
Other materials:
U2118-87 Can Comm Err (intelligent Key)
Dtc Description
DTC Description
DESCRIPTION
CAN (Controller Area Network) is a serial communication
line for real time applications. It is an on-Nissan Sentra vehicle multiplex communication
line with high data communication speed and excellent error detection
ability. Modern Nissan ...
P1217 Engine Over Temperature
Dtc Description
DTC Description
ECM controls cooling fan to the maximum speed when receives the
signal abnormality of each sensor, CAN and IPDM E/R, and severed wire short
circuit abnormality.
If the cooling fan or another component in the cooling system
malfunctions, engine coola ...
Fuel Pump
Component Inspection
Component Inspection
CHECK FUEL PUMP
Turn ignition switch OFF.
Disconnect “fuel level sensor
unit and fuel pump� harness connector.
Check the resistance between
...