Nissan Sentra B18 (2020-2025) Service Manual: Hood
Exploded View
Exploded View
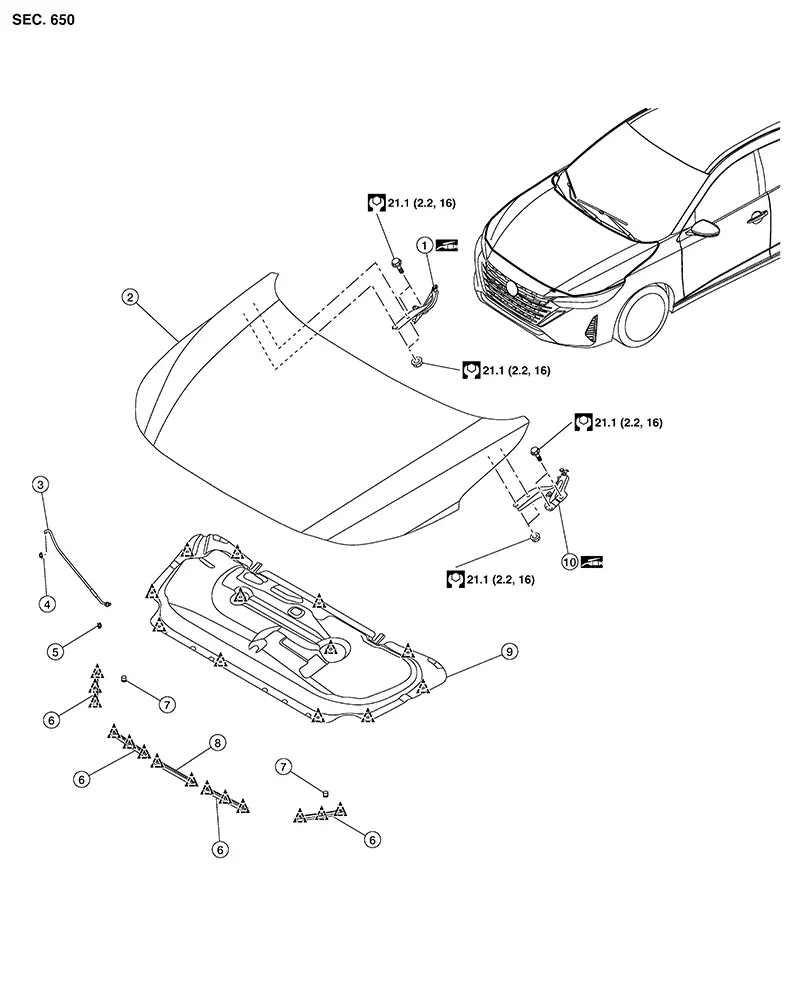
|
1. |
Hood hinge (RH) |
2. |
Hood |
3. |
Hood support rod |
|
4. |
Hood rod grommet |
5. |
Hood rod clamp |
6. |
Hood seal |
|
7. |
Bumper rubber |
8. |
Radiator core support cover seal |
9. |
Hood insulator |
|
10. |
Hood hinge (LH) |
|
Clip |

Hood Assembly
Removal and Installation
Removal and Installation
CAUTION:
-
Use two people when removing or installing hood due to its heavy weight.
-
Use protective tape or shop cloths to protect surrounding components from damage during removal and installation of hood.
REMOVAL
Support the hood using a suitable tool.
Warning:
Bodily injury may occur if hood is not supported properly when removing hood.
Remove hood insulator.
Disconnect front washer tube at front washer tube check valve splitter. Refer to Exploded View.
Remove hood
hinge to hood nuts (A) and hood.
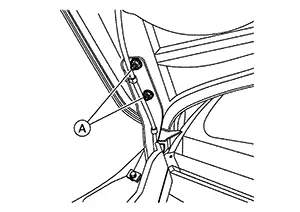 Note:
Note: 
RH side shown; LH similar.
INSTALLATION
Installation is in the reverse order of removal.
CAUTION:
-
Before installing the hood hinge, apply anticorrosive agent onto the surface of the Nissan Sentra vehicle.
-
After installation, perform the hood adjustment procedure. Refer to Adjustment.
Adjustment
Adjustment
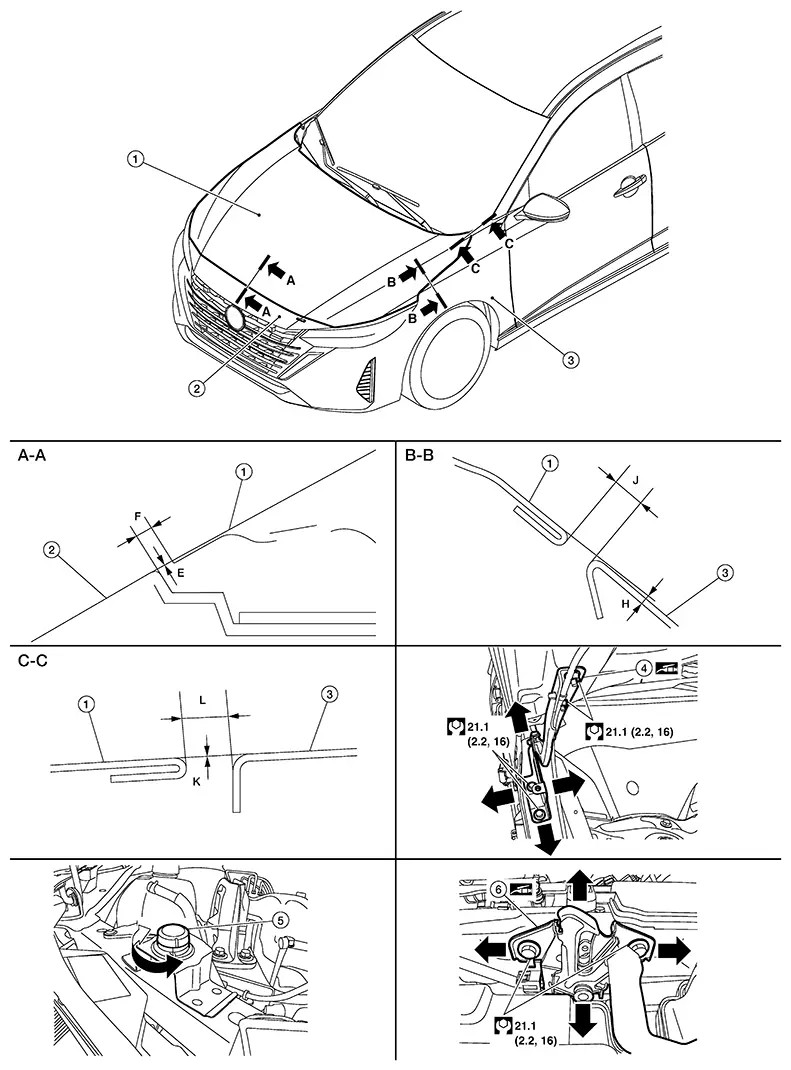
|
1. |
Hood |
2. |
Front fascia |
3. |
Front fender |
|
4. |
Hood hinge |
5. |
Bumper rubber |
6. |
Hood lock |
Check the clearance and the surface height between hood and each part by visual inspection and tactile feel.
If the clearance and the surface height are out of specification, adjust them according to the adjustment procedures.
Unit: mm (in)|
Portion |
Section |
Item |
Measurement |
Standard |
Parallelism |
|---|---|---|---|---|---|
|
Hood - Front fascia |
A - A |
E |
Surface height |
0.8 - 1.3 +1.2, –2.4 (0.03 -0.05 +0.05, –0.09) |
<2.0 (0.08) |
|
F |
Clearance |
4.2 - 5.0 ± 1.5 (0.17 - 0.20 ± 0.06) |
<2.0 (0.08) |
||
|
Hood - Fender |
B - B |
H |
Surface height |
0.1 ± 1.2 (0.00 ± 0.05) |
≤1.5 (0.06) |
|
J |
Clearance |
4.0 ± 1.3 (0.16 ± 0.05) |
≤1.5 (0.06) |
||
|
Hood - Fender |
C - C |
K |
Surface height |
0.0 ± 1.1 (0.00 ± 0.04) |
≤1.5 (0.06) |
|
L |
Clearance |
4.6 - 5.0 ± 1.1 (0.18 - 0.20 ± 0.04) |
≤1.5 (0.06) |
ADJUSTMENT PROCEDURE
Remove hood lock, and then adjust the surface height of hood, and front fender according to the specifications provided.
Engage hood lock with primary striker and check for looseness.
Move hood lock laterally until the center of primary striker and hood lock are vertical when viewed from the front.
After adjustment, tighten hood lock bolts to the specified torque.
Rotate bumper rubber a minimum of 1/2 of a rotation counterclockwise in an upward direction.
CAUTION:
If any looseness is felt in hood striker or hood lock, rotate bumper rubber more than 1/2 of a rotation.
Check that secondary latch is properly engaged with secondary striker with hoods own weight.
Check that hood lock is securely engaged with primary striker when hood is dropped with hood’s own weight from approximately 200 mm (7.8 in) height.
Hood Hinge
Removal and Installation
Removal and Installation
REMOVAL
Remove hood. Refer to Removal and Installation.
For hood hinge (RH) disconnect washer hose clips. Refer to Exploded View.
Remove
front fender bolt (A). 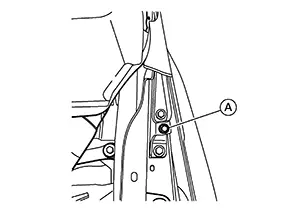 Note:
Note:
LH shown; RH similar
Remove hood hinge bolts, then remove hood hinge.
INSTALLATION
Installation is in the reverse order of removal.
CAUTION:
-
Before installing the hood hinge, apply anticorrosive agent onto the surface of the Nissan Sentra vehicle.
-
After installation, perform hood adjustment procedure. Refer to Adjustment.
Other materials:
Dtc/circuit Diagnosis. Position Switch
Position Switch
Back-Up Lamp Switch
Component Inspection
Component Inspection
CHECK BACK-UP LAMP SWITCH
Disconnect position switch harness connector.
Refer to Removal and Installation.
...
Basic Inspection
Diagnosis and Repair Workflow
Work Flow
Work Flow
OVERALL SEQUENCE
DETAILED FLOW
GET INFORMATION FOR SYMPTOM
Get detailed information from the customer about
the symptom (the condition and the environment when the
incident/ma ...
B2f06-15 Back Door/trunk Opener Switch
Dtc Description
DTC Description
DTC DETECTION LOGIC
DTC No.
CONSULT screen items (Trouble
diagnosis content)
DTC detecting condition
...