Nissan Sentra B18 (2020-2025) Service Manual: Front Suspension :: Unit Removal and Installation. Front Suspension Member
Front Suspension Member. Exploded View
Exploded View
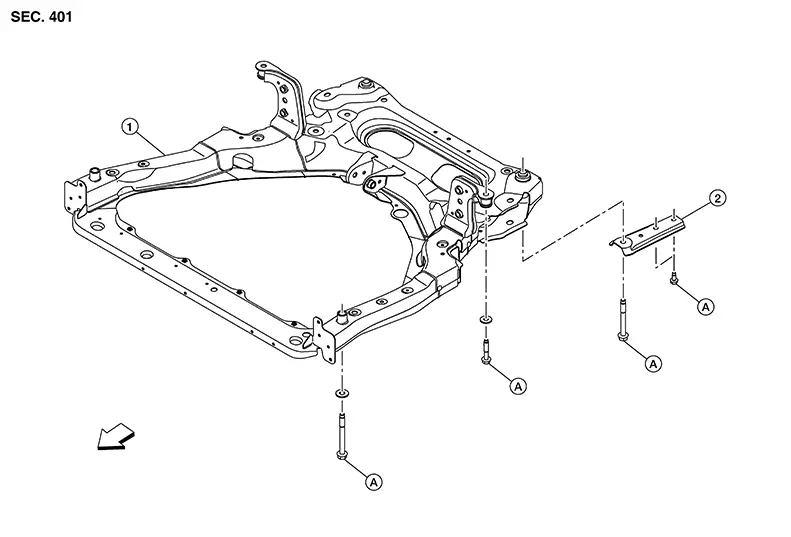
|
1. |
Front suspension member |
2. |
Member stay |
A. |
Refer to Installation. |
|
|
Front |
Removal and Installation
Removal and Installation
REMOVAL
Remove the front wheel and tire using power tool. Refer to Removal and Installation.
Remove the front under cover. Refer to Removal and Installation.
Remove front bumper. Refer to Removal and installation.
Separate the steering gear from the lower shaft. Refer to Exploded View.
Separate the steering outer socket from the steering knuckle. Refer to Exploded View.
Remove the nut and bolt from the lower ball joint. Separate the transverse link from the steering knuckle. Refer to Exploded View.
CAUTION:
Do not reuse nut from lower ball joint.
Remove the rear torque rod and the rear torque rod bracket. Refer to Exploded View.
Separate the stabilizer connecting rod from the strut. Refer to Exploded View.
CAUTION:
Do not reuse stablizer connecting rod nut.
Set a suitable jack under front suspension member.
CAUTION:
Do not damage the front suspension member with the suitable jack.
Note: 
Secure radiator in place prior to removing the front suspension member to prevent radiator from falling.
Remove the bolts and the member stay (LH/RH).
Remove the front suspension member bolts.
Gradually lower the suitable jack to remove the front suspension member from the Nissan Sentra vehicle.
CAUTION:
Make sure the front suspension member is stable when using the suitable jack.
If replacing the front suspension member, perform the following procedures:
-
Remove the steering gear. Refer to Removal and Installation.
-
Remove the transverse links. Refer to Removal and Installation.
-
Remove the stabilizer bar, the stabilizer clamps, and the stabilizer bushings. Refer to Removal and Installation.
Perform inspection after removal. Refer to Inspection.
INSTALLATION
Installation is in the reverse order of removal.
CAUTION:
Do not reuse the transverse link nuts.
-
Install the member stay bolts and the front suspension member bolts in the order shown.
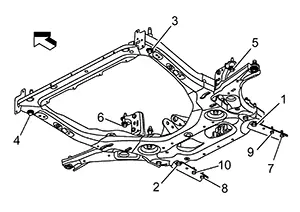

: Nissan Sentra Vehicle front
Final tightening (Specified torque)
: 1-10
Bolts 1-4
160 N·m (16 kg–, 118 ft–lb)
Bolts 5-6
75 N·m, (7.7 kg–m, 55 ft–lb)
Bolts 7-10
62 N·m, (6.3 kg–m, 46 ft–lb)
-
Perform the final tightening of the nuts and bolts under unladen conditions with the tires on level ground.
-
Perform inspection after installation. Refer to Inspection.
Inspection
Inspection
INSPECTION AFTER REMOVAL
Check the front suspension member for cracks, wear or damage. Replace components if necessary.
INSPECTION AFTER INSTALLATION
Check the wheel sensor harness to be sure the connectors are fully seated.
Check the neutral position of the steering angle sensor. Refer to Description.
Check the wheel alignment. Refer to Inspection.
Other materials:
Low Tire Pressure Location Indicator Does Not Display
Symptom Description
Symptom Description
When there is low tire pressure, the low tire
location indicator does not display even though the low tire
pressure warning lamp turns ON.
Diagnosis Procedure
Diagnosis Procedure
Note:
The Signal Tech II Tool [– (NI-50190)] can be used
to ...
Basic Inspection
Diagnosis and Repair Workflow
Work Flow
Work flow
OVERALL SEQUENCE
Reference 1: On Board Diagnosis Function.
Reference 2: DTC Index.
Reference 3: Diagnosis Procedure.
Reference 4: Component Inspection.
Reference 5 ...
Fuel Lines
Inspection
Inspection
Inspect
fuel lines, fuel filler cap, and fuel tank for improper attachment,
leakage, cracks, damage, loose connections, chafing or
deterioration.
(A)
: Engine
...