Nissan Sentra B18 (2020-2025) Service Manual: Front Brake Pad
Exploded View
Exploded View
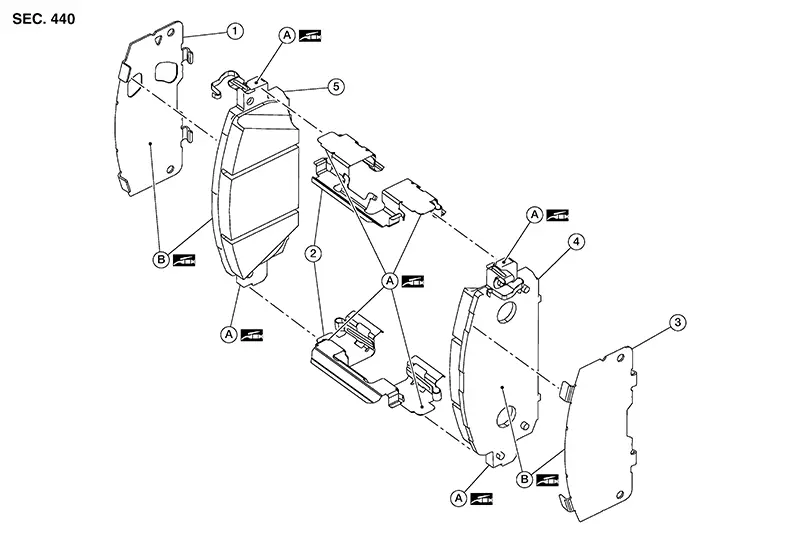
|
1. |
Inner shim |
2. |
Pad retainer |
3. |
Outer shim |
|
4. |
Outer pad |
5. |
Inner pad |
A. |
Molykote® 7439 grease |
|
B. |
Molykote® AS-880N grease |
Removal and Installation
Removal and Installation
Warning:
Clean dust on the brake caliper and the brake pads using a vacuum dust collector to minimize the hazards of airborne particles or other material.
CAUTION:
-
Do not depress the brake pedal while removing the brake pads because the piston may pop out.
-
It is not necessary to remove bolts on the torque member and the brake hose except for disassembly or replacement of the brake caliper. For brake pad removal, hang the brake caliper using a wire so as not to stretch the brake hose.
-
If brake fluid or grease adheres to the brake caliper or the disc brake rotor, quickly wipe it off.
-
Do not reuse drained brake fluid.
REMOVAL
Observe the brake fluid level in the master cylinder reservoir tank. Partially drain brake fluid if necessary. Refer to Draining.
Remove the front wheel and tire using power tool. Refer to Removal and Installation .
Remove the slide pin bolts. Refer to Exploded View.
Remove the brake caliper from the torque member. Leaving the brake hose attached, reposition the brake caliper aside using wire.
Remove torque member bolts. Refer to Exploded View.
Remove the brake pads, shims, and pad retainers from the torque member. Refer to Exploded View.
CAUTION:
-
Do not damage the pad retainers or the piston boot.
-
Do not drop the brake pads, shims, or pad retainers.
-
Note the position of components during removal to aid with installation.
Remove the shims from the brake pads.
INSTALLATION
Apply Molykote® 7439 grease to the matching surfaces between the torque member, the pad retainers, and the brake pad support plates. Refer to Exploded View.
Install the pad retainers to the torque member.
CAUTION:
-
Do not deform the pad retainers.
-
Verify that the pad retainers are secured properly to the torque member.
Apply Molykote® AS-880N grease to the matching surfaces between the shims and the brake pads.
Install the shims to the brake pads.
Install the brake pads and the shims to the torque member.
Install the brake pads, shims, pad retainers, and torque member as an assembly. Tighten the torque member bolts to specification. Refer to Exploded View.
Using a suitable tool, press the piston into the brake caliper body.
CAUTION:
Do not damage the piston boot.
Install the brake caliper to the torque member.
Install the slide pin bolts and tighten to specification.
Depress the brake pedal several times and perform the inspection after installation.
Install the front wheel and tire. Refer to Removal and Installation.
Check brake fluid level and refill as necessary. Refer to Inspection.
INSPECTION AFTER INSTALLATION
Check the drag of the front disc brake. If any drag is found, perform the following procedure: Remove the brake pads. Using a suitable tool, press the piston into the brake caliper body.
CAUTION:
Do not damage the piston boot.
Install the brake pads. Depress the brake pedal several times. Check the drag of the front disc brake again. If any drag is found, disassemble the brake caliper body. Refer to Disassembly and Assembly.Burnish contact surfaces after replacing brake pads or if a soft pedal occurs at very low mileage. Refer to Periodic Maintenance Operation.
Other materials:
Diagnosis System (sonar Control Unit). Consult Function
Consult Function
CONSULT Function
APPLICATION ITEMS
CONSULT performs the following functions via
communication with the sonar control unit:
Diagnosis Mode
CGW Status
...
B24b0-14 Front Heated Seat Relay Lh (hi)
Dtc Description
DTC Description
DTC DETECTION LOGIC
DTC No.
CONSULT screen terms
(Trouble diagnosis name)
DTC detection condition
...
Intelligent Key System
System Diagram
System Diagram
System Description
System Description
Signal name
Input
Output
Description
...