Nissan Sentra B18 (2020-2025) Service Manual: Evap Canister
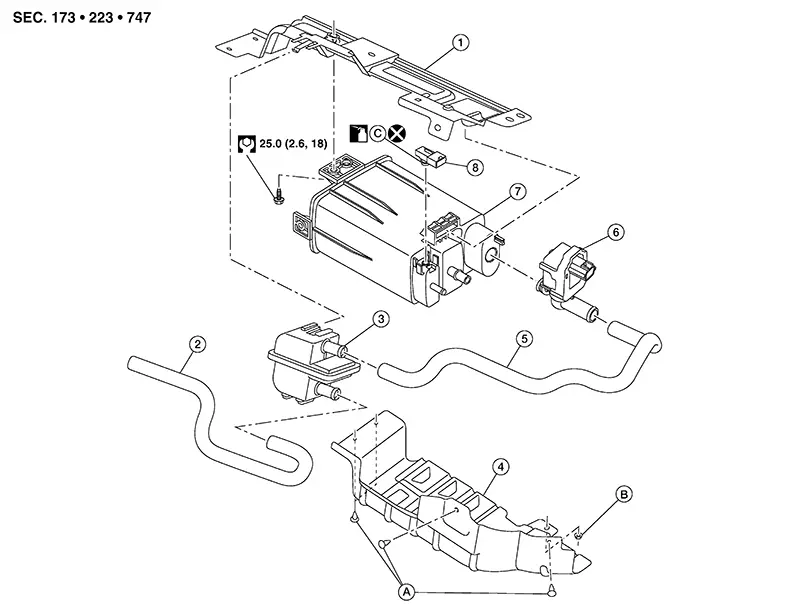
Exploded View
Exploded View
|
1. |
EVAP canister bracket |
2. |
EVAP canister filter drain hose |
3. |
EVAP canister filter |
|
4. |
EVAP canister protector |
5. |
EVAP hose |
6. |
EVAP canister vent control valve |
|
7. |
EVAP canister |
8. |
EVAP control system pressure sensor |
A. |
Clip |
|
B. |
Nut |
C. |
O-ring |
Removal and Installation
Removal and Installation
EVAP CANISTER
Removal
-
Remove EVAP canister protector.
-
Disconnect the harness connector from EVAP canister control pressure sensor.
-
Remove the EVAP canister control pressure sensor (if necessary).
-
Disconnect EVAP canister purge hose.
-
Disconnect fuel tank EVAP breather hose.
-
Disconnect the harness connector from EVAP canister vent control valve.
-
Disconnect the EVAP vent control valve hose.
-
Remove the EVAP canister bolt.
-
Remove the EVAP canister.
-
Remove the EVAP canister vent control valve (if necessary).
Installation
Installation is in the reverse order of removal.
CAUTION:
-
Do not reuse O-ring when installing new EVAP control system pressure sensor. The EVAP control system pressure sensor and O-ring are serviced as an assembly.
-
Do not reuse O-ring for EVAP canister vent control valve.
-
Do not add lubrication to the O-ring for EVAP canister vent control.
-
Make sure the surfaces that the O-ring comes in contact with are clean.
-
Make sure the O-ring is not twisted or rolled over.
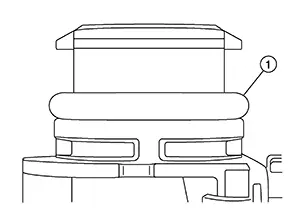
-
Make sure the O-ring (1) is seated all the way down with no gap as shown.
EVAP CANISTER CONTROL PRESSURE SENSOR
Removal
-
Remove EVAP canister protector.
-
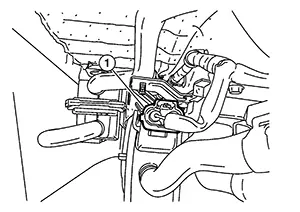
Disconnect the harness connector (1) from EVAP control system pressure sensor.
-
Remove the EVAP canister control pressure sensor.
Installation
-
Apply lubricant to the O-ring for the EVAP canister control pressure sensor.
-
Install the EVAP canister control pressure sensor.
Installation is in the reverse order of removal.
CAUTION:
-
Do not reuse O-ring when installing new EVAP control system pressure sensor. The EVAP control system pressure sensor and O-ring are serviced as an assembly.
- All materials must conform with RNES-B-00027
EVAP CANISTER VENT CONTROL VALVE
Removal
-
Remove EVAP canister protector.
-
Disconnect the harness connector from EVAP vent control valve.
-
Disconnect the EVAP vent control valve hose.
-
Turn EVAP canister vent control valve counterclockwise.
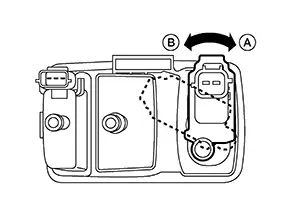
(A)
: Lock
(B)
: Unlock
-
Remove the EVAP canister vent control valve.
Installation
Installation is in the reverse order of removal.
CAUTION:
-
Do not reuse O-ring for EVAP canister vent control valve.
-
Do not add lubrication to the O-ring.
-
Make sure the surfaces that the O-ring comes in contact with are clean.
-
Make sure the O-ring is not twisted or rolled over.
-
Make sure the O-ring (1) is seated all the way down with no gap as shown.
EVAP CANISTER FILTER
Removal
-
Remove EVAP canister protector.
-
Disconnect the EVAP canister filter drain hose (1).
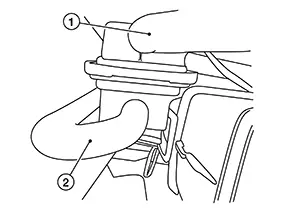
-
Disconnect the EVAP hose (2).
-
Remove the EVAP canister filter.
Installation
Installation is in the reverse order of removal.
Other materials:
P052a Intake Valve Timing Control
Dtc Description
DTC Description
DTC DETECTION LOGIC
DTC No.
CONSULT screen terms
(Trouble diagnosis
content)
DTC detecting
condition
...
P01f0 Engine Coolant Temperature
Dtc Description
DTC Description
DTC DETECTION LOGIC
DTC
CONSULT screen terms
(Trouble diagnosis
content)
DTC detection
condition
...
B1383 Incomp Steering Angle Sensor Adjust
Dtc Description
DTC Description
DTC DETECTION LOGIC
DTC No.
CONSULT screen terms
(Trouble diagnosis
content)
DTC detection condition
...