Nissan Sentra B18 (2020-2025) Service Manual: Body Side Trim
Exploded View
Exploded View
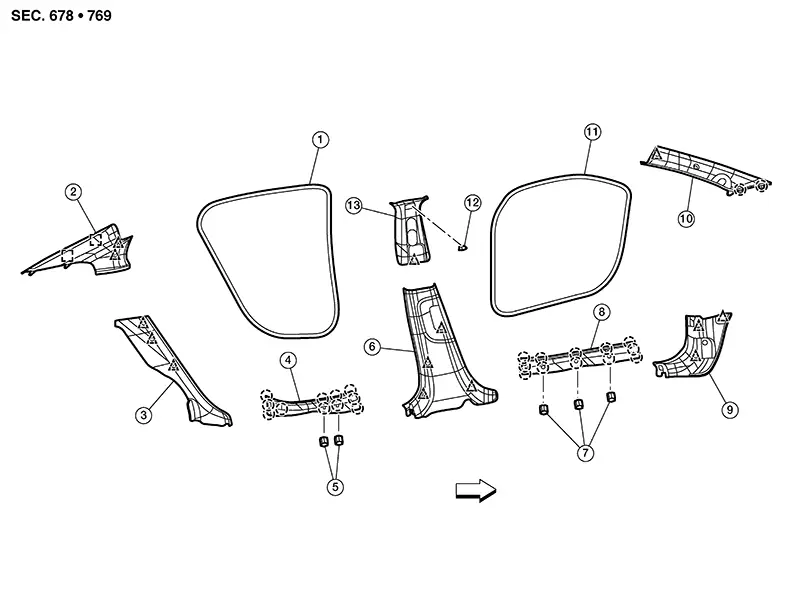
|
1. |
Rear body side welt |
2. |
Rear pillar upper finisher |
3. |
Rear pillar lower finisher |
|
4. |
Rear kicking plate |
5. |
Clip |
6. |
Center pillar lower finisher |
|
7. |
Clip |
8. |
Front kicking plate |
9. |
Dash side finisher |
|
10. |
Front pillar finisher |
11. |
Front body side welt |
12. |
Cap |
|
13. |
Center pillar upper finisher |
|
Clip |
|
Pawl |
|
|
Metal clip |
|
Front |

Front Pillar Finisher
Removal and Installation
Removal and Installation
REMOVAL
Partially remove the front body side welt along the front pillar finisher.
Using a
suitable tool, release clips and pawls of front pillar finisher
(1).
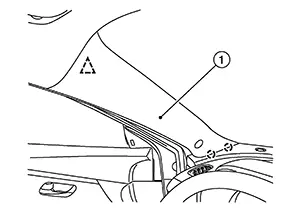
 : Clip
 :
Pawl
:
Pawl
Using a
suitable tool, cut each tether clip to release front pillar
finisher.
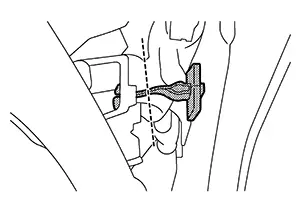
CAUTION:
Do not reuse front pillar finisher tether clip.
Remove front pillar finisher tether clips from front pillar finisher and body panel.
INSTALLATION
Installation is in the reverse order of removal.
CAUTION:
-
Always replace tether clips with new ones after every removal.
-
When installing, check that tether clips are accurately aligned with the holes on body panel, then press in.
Kicking Plate
Removal and Installation
Removal and Installation
FRONT
Removal
Using a
suitable tool, release pawls.
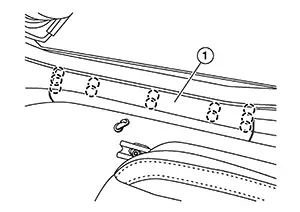
:
Pawl
Remove front kicking plate (1).
Installation
Installation is in the reverse order of removal.
REAR
Removal
Using a
suitable tool, release pawls.
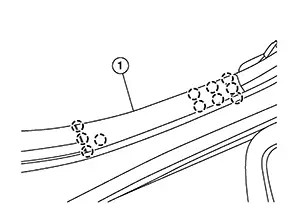
:
Pawl
Remove rear kicking plate (1).
Installation
Installation is in the reverse order of removal.
Dash Side Finisher
Removal and Installation
Removal and Installation
REMOVAL
Remove front kicking plate. Refer to Removal and Installation.
Remove dash
side finisher.
Using
a suitable tool, release pawl and remove hood release handle [1 (LH
only)].
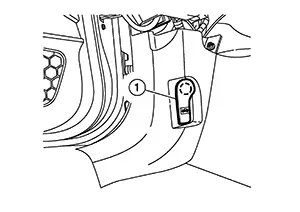
:
Pawl
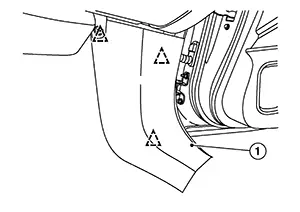 Note:
Note: 
RH shown; LH similar.
: Clip
INSTALLATION
Installation is in the reverse order of removal.
Body Side Welt
Removal and Installation
Removal and Installation
FRONT
Removal
Remove dash side finisher. Refer to Removal and Installation.
Remove front body side welt.
CAUTION:
Use care not to stretch out welt if it is to be reused.
Installation
Installation is in the reverse order of removal.
REAR
Removal
Remove rear kicking plate inner. Refer to Removal and Installation.
Remove rear body side welt.
CAUTION:
Use care not to stretch out welt if it is to be reused.
Installation
Installation is in the reverse order of removal.
Center Pillar Lower Finisher
Removal and Installation
Removal and Installation
CAUTION:
-
When removing, always use a remover tool that is made of plastic to prevent damage to the parts.
-
Do not damage the body panel.
REMOVAL
Move front seat to the full forward position.
Remove front and rear body side welts. Refer to Removal and Installation.
Using a
suitable tool, release clips and remove center pillar lower
finisher (1).
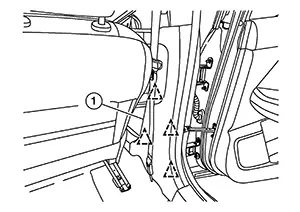
: Clip
INSTALLATION
Installation is in the reverse order of removal.
CAUTION:
When installing, check that clips are accurately aligned with the holes on body panel, then press in.
Center Pillar Upper Finisher
Removal and Installation
Removal and Installation
REMOVAL
Remove center pillar lower finisher. Refer to Removal and Installation.
Pull seat
belt height adjuster cover in the direction shown and
remove.
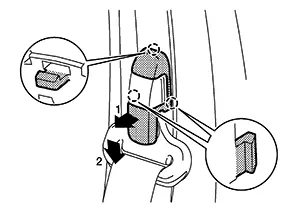
:
Pawl
Remove
D-ring anchor bolt (A).
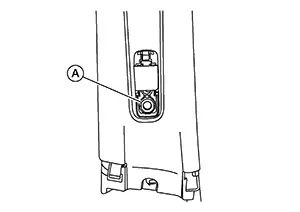
Remove
center pillar upper finisher.
Apply
protective tape (A) to protect the component from damage as
shown.
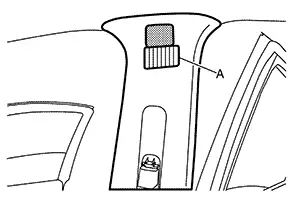 Using
a suitable tool, release center pillar upper finisher (1) cap pawl
and remove.
Using
a suitable tool, release center pillar upper finisher (1) cap pawl
and remove.
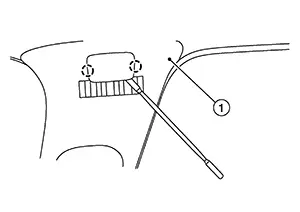
:
Pawl
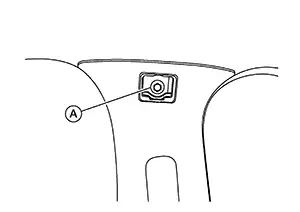 Using
a suitable tool, release clip and remove center pillar upper
finisher. Refer to Exploded View.
Using
a suitable tool, release clip and remove center pillar upper
finisher. Refer to Exploded View.
INSTALLATION
Installation is in the reverse order of removal.
CAUTION:
When installing, check that clips are accurately aligned with the holes on body panel, then press in.
Rear Pillar Finisher
Removal and Installation - Rear Pillar Upper Finisher
Removal and Installation - Rear Pillar Upper Finisher
REMOVAL
Remove rear pillar lower finisher. Refer to Removal and Installation - Rear Pillar Lower Finisher.
Using a
suitable tool, release clips and remove rear pillar upper finisher
(1).
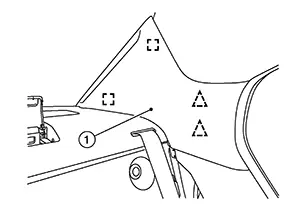
: Clip
 : Metal clip
INSTALLATION
Installation is in the reverse order of removal.
CAUTION:
When installing, check that all clips are accurately aligned with the holes on body panel, then press in.
Removal and Installation - Rear Pillar Lower Finisher
Removal and Installation - Rear Pillar Lower Finisher
REMOVAL
Remove the rear seat bolster. Refer to Removal and Installation - Rear Seat Bolster.
Remove the rear kicking plate. Refer to Removal and Installation.
Using a
suitable tool, release clips and remove rear pillar lower finisher
(1).
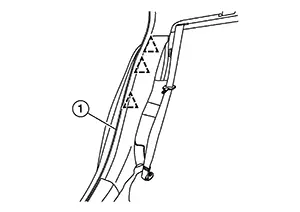
: Clip
INSTALLATION
Installation is in the reverse order of removal.
CAUTION:
When installing, check that clips and pawls are accurately aligned with the holes on body panel, then press in.
Other materials:
P0139 Ho2s2
Dtc Description
DTC Description
The heated oxygen sensor 2 has a much longer switching time
between rich and lean than the air fuel ratio (A/F) sensor 1. The oxygen storage
capacity of the three way catalyst 1 causes the longer switching time. To judge
the malfunctions of heated oxy ...
Preparation. Preparation
Preparation
Special Service Tool
Special Service Tool
The actual shape of the tools may differ from those
illustrated here.
Tool number
(TechMate No.)
Tool name
...
Component Parts
Meter System
Component Parts Location
Component Parts
Location
MODELS WITH CVT
A.
View of engine assembly removed
...