Nissan Sentra B18 (2020-2025) Service Manual: Unit Disassembly and Assembly
Front Combination Lamp
Exploded View
Exploded View
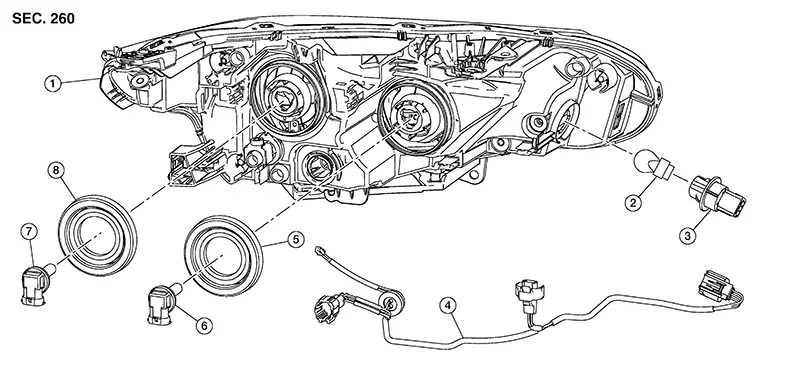
|
1. |
Front combination lamp |
2. |
Turn/parking lamp bulb |
3. |
Turn/park lamp bulb socket |
|
4. |
Combination lamp harness |
5. |
Socket cover |
6. |
Headlamp (high beam)/daytime running lamp bulb |
|
7. |
Headlamp (low beam) lamp bulb |
8. |
Socket cover |
Disassembly and Assembly
Disassembly and Assembly
DISSASSEMBLY
Warning:
Do not touch bulb while it is lit or right after being turned off. Burning may result.
CAUTION:
-
Do not touch glass surface of the bulb with bare hands or allow oil or grease to get on it to prevent damage to bulb.
-
Do not leave the bulb out of the lamp reflector for a long time because dust, moisture, smoke, etc. may affect the performance of the lamp.
Remove front combination lamp. Refer to Removal and Installation.
Rotate the headlamp (low beam) lamp bulb counterclockwise and remove.
Disconnect the harness connector from the headlamp (low beam) lamp bulb and remove.
Rotate the headlamp (high beam)/daytime running lamp bulb counterclockwise and remove.
Disconnect the harness connector from the headlamp (high beam)/daytime running lamp bulb and remove.
Rotate the turn/park lamp bulb socket counterclockwise and remove.
Remove the turn/parkl lamp bulb from the turn/park lamp bulb socket.
ASSEMBLY
Assembly is in the reverse order of disassembly.
CAUTION:
After installing, be sure to install the bulb sockets securely to ensure watertightness.
Rear Combination Lamp (body Side)
Exploded View
Exploded View
|
1. |
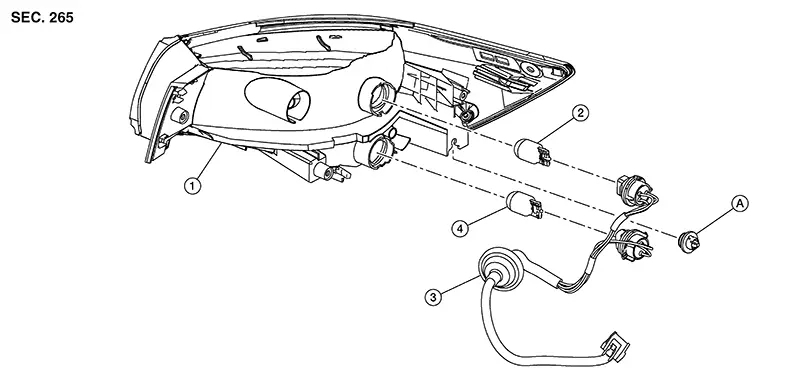
Rear combination lamp |
2. |
Stop/tail lamp bulb |
3. |
Rear combination lamp harness connector |
|
4. |
Turn signal lamp bulb |
A. |
Grommet |
Disassembly and Assembly
Disassembly and Assembly
DISASSEMBLY
Warning:
Do not touch bulb while it is lit or right after being turned off. Burning may result.
CAUTION:
-
Do not touch glass surface of the bulb with bare hands or allow oil or grease to get on it to prevent damage to bulb.
-
Do not leave the bulb out of the lamp reflector for a long time because dust, moisture, smoke, etc. may affect the performance of the lamp.
Remove rear combination lamp. Refer to Removal and Installation.
Rotate rear turn signal lamp bulb socket counterclockwise to remove from rear combination lamp.
Remove the rear turn signal lamp bulb from bulb socket.
Rotate stop/tail lamp bulb socket counterclockwise to remove from rear combination lamp.
Remove the stop/tail lamp bulb from bulb socket.
If necessary, compress grommet as
shown and slide down to remove. 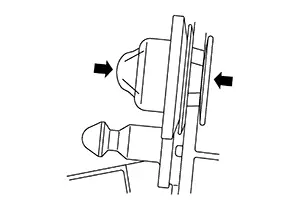
ASSEMBLY
Assembly is in the reverse order of disassembly.
CAUTION:
After installing, be sure to install the bulb sockets securely to ensure watertightness.
Rear Combination Lamp (trunk Lid Side)
Exploded View
Exploded View
|
1. |
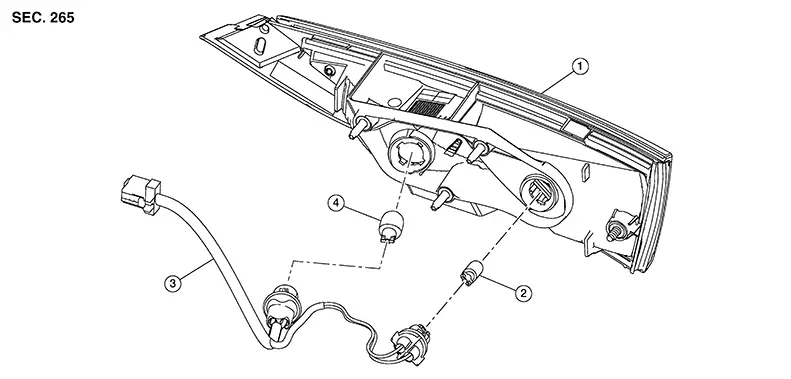
Rear combination lamp (trunk lid side) |
2. |
Tail lamp bulb |
3. |
Rear combination lamp (trunk lid side) harness |
|
4. |
Back-up lamp bulb |
Disassembly and Assembly
Disassembly and Assembly
DISASSEMBLY
Warning:
Do not touch bulb while it is lit or right after being turned off. Burning may result.
CAUTION:
-
Do not touch glass surface of the bulb with bare hands or allow oil or grease to get on it to prevent damage to bulb.
-
Do not leave the bulb out of the lamp reflector for a long time because dust, moisture, smoke, etc. may affect the performance of the lamp.
Remove rear combination lamp (trunk lid side). Refer to Removal and Installation.
Rotate back—up lamp bulb socket counterclockwise to remove from rear combination lamp (trunk lid side).
Remove the back—up lamp bulb from bulb socket.
Rotate tail lamp bulb socket counterclockwise to remove from rear combination lamp (trunk lid side).
Remove the tail lamp bulb from bulb socket.
ASSEMBLY
Assembly is in the reverse order of disassembly.
Other materials:
C1608-49 Control Unit
Dtc Description
DTC Description
DTC DETECTION LOGIC
DTC No.
CONSULT screen terms
(Trouble diagnosis content)
DTC detection condition
...
U2140-87 Can Comm Err (ecm)
Dtc Description
DTC Description
DTC DETECTION LOGIC
DTC No.
CONSULT screen terms
(Trouble diagnosis content)
DTC detection condition
...
Removal and Installation
Combination Meter
Exploded View
Exploded View
1.
Front cover
2.
Combination meter
...