Nissan Sentra B18 (2020-2025) Service Manual: Satellite Sensor
Exploded View
Exploded View
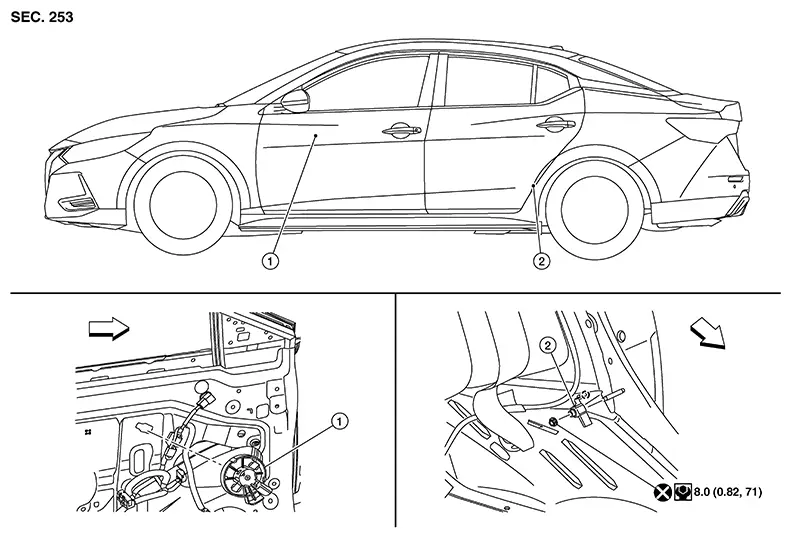
|
1. |
Front door satellite sensor |
2. |
Rear side air bag satellite sensor |
|
Front |
|
|
Pawl |


LH side shown; RH side similar.
Removal and Installation - Front Door Satellite Sensor
Removal and Installation - Front Door Satellite Sensor
Warning:
-
Before servicing the SRS, place the ignition switch in the OFF position, disconnect both battery terminals then wait at least three minutes.
-
Do not use air tools or electric tools for servicing the front door satellite sensor.
-
Do not strike the front door satellite sensor.
-
Replace the front door satellite sensor if it has been dropped or sustained an impact.
-
Replace the front door satellite sensor if either the front side air bag module, rear side air bag module, or side curtain air bag module has been deployed.
Removal
Disconnect negative and positive battery terminals, then wait at least three minutes. Refer to Battery Disconnect.
Remove the front door finisher. Refer to Removal and Installation.
Partially
remove the front door vapor barrier (1) in the direction shown to
access the front door satellite sensor. 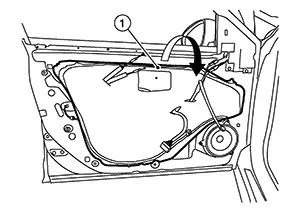
Disconnect the harness connector from the front door satellite sensor.
While
pushing the lock pin (A) in the direction shown, rotate the front
door satellite sensor counter-clockwise, then remove the front door
satellite sensor (1) from Nissan Sentra vehicle. 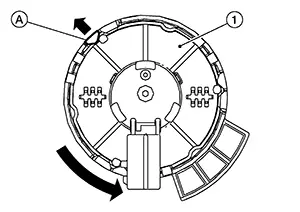
CAUTION:
-
Do not strike the front door satellite sensor.
-
Replace the front door satellite sensor if it has been dropped or sustained an impact.
Installation
Installation is in the reverse order of removal.
CAUTION:
-
Do not allow foreign materials to come in contact with harness connector terminals.
-
Do not damage the harness connector during installation.
-
After installation is complete, check that no system malfunction is detected causing the air bag warning lamp to illuminate.
-
If a malfunction is indicated by the air bag warning lamp after repair or replacement of the malfunctioning parts, perform the SRS final check. Refer to SRS Final Check.
-
Make sure the front door satellite sensor connector (A) and connector barrier (B) is in the unlocked position as shown before installing onto the door.
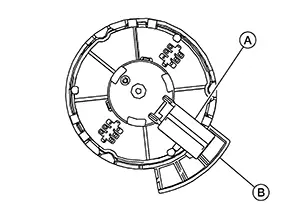
-
Position the front door satellite sensor on the door with the connector barrier in the 5 O’clock position.
-
Rotate the front door satellite sensor clockwise.
-
Verify the lock pin locked the front door satellite sensor with the connector surface in the 6 O’clock position.
Removal and Installation - Rear Side Air Bag Satellite Sensor
Removal and Installation - Rear Side Air Bag Satellite Sensor
Warning:
-
Before servicing the SRS, place the ignition switch in the OFF position, disconnect both battery terminals and wait at least three minutes.
-
Do not use air tools or electric tools for servicing the rear side air bag satellite sensor.
-
Do not strike the rear side air bag satellite sensor.
-
Replace the rear side air bag satellite sensor if it has been dropped or sustained an impact.
-
Replace the rear side air bag satellite sensor if either the front side air bag module, rear side air bag module or the side curtain air bag module has been deployed.
REMOVAL
Disconnect negative and positive battery terminals, then wait at least three minutes. Refer to Battery Disconnect.
Remove rear pillar lower finisher. Refer toRemoval and Installation .
Disconnect the harness connector from the rear side air bag satellite sensor.
Remove and discard the rear side air bag satellite sensor bolt.
CAUTION:
Do not reuse the rear side air bag satellite sensor bolt.
Remove the rear side air bag satellite sensor.
CAUTION:
-
Do not strike the rear side air bag satellite sensor.
-
Replace the rear side air bag satellite sensor if it has been dropped or sustained an impact.
INSTALLATION
Installation is in the reverse order of removal.
-
Position the rear side air bag satellite sensor using the locating pin before tightening the nut to specification.
CAUTION:
-
Position the rear side air bag satellite sensor using the locating pin. Make sure the rear side air bag satellite sensor is flat against Nissan Sentra vehicle body before tightening the nut to specification.
-
Do not allow foreign materials to come in contact with the harness connector terminals.
-
Do not reuse the rear side air bag satellite sensor nut.
-
Do not damage the harness connector during installation.
-
After installation is complete, check that no system malfunction is detected causing the air bag warning lamp to illuminate.
-
If a malfunction is indicated by the air bag warning lamp after repair or replacement of the malfunctioning parts, perform the SRS final check. Refer to SRS Final Check.
Other materials:
Power Outlet. Preparation. Preparation. Special Service Tool
Preparation. Special Service Tool
Special Service Tool
Special Service Tool
The actual shape of the tools may differ from those
illustrated here.
Tool number
(TechMate No.)
Tool name
&nb ...
C161a-83 Abs System
Dtc Description
DTC Description
DTC DETECTION LOGIC
DTC No.
CONSULT screen terms
(Trouble diagnosis content)
DTC detection condition
...
Front Passenger Air Bag Module
Exploded View
Exploded View
1.
Instrument panel
assembly
2.
Front passenger air bag
module
...