Nissan Sentra B18 (2020-2025) Service Manual: Removal and Installation - Seatback Hinge Bracket
REMOVAL
Remove the rear seatback assemblies (LH/RH). Refer to Removal and Installation - 60:40 Split Seatback.
Remove the seat cushion assembly. Refer to Removal and Installation - Seat Cushion Assembly.
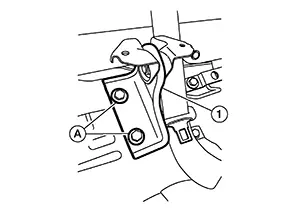
Remove rear
seatback hinge bracket bolts (A) and remove.
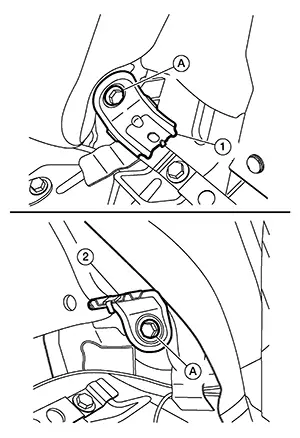
(1): Seatback hinge bracket (RH)
(2): Seatback hinge bracket (LH)
Remove rear
bolts (A) and seatback hinge bracket [center (1)].
INSTALLATION
Installation is in the reverse order of removal.
Note:
-
When installing the seat back bracket (center), tighten bolts to specification in the order shown.
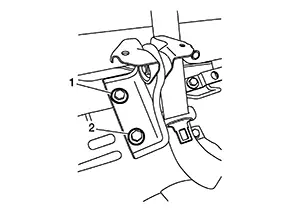
Seat back hinge (center) bolt torque
: 50N·m (5.1 kg-m, 37 lb-ft)
 Removal and Installation - Seatback Striker
Removal and Installation - Seatback Striker
REMOVAL
Remove rear
seat bolster (LH/RH). Refer to Removal and Installation.
Using a
suitable tool, remove clips then rear seat back finish ...

Other materials:
System description
Component parts
Component parts location
Ipdm e/r (contains ignition relay-1)
Bcm (view with instrument panel removed)
Fuse block (j/b) (front)
Fuse block (j/b) (back)
Blower relay
Ignition relay-2
Accessory relay-1
Push-button ignition switch
Component description
...
Water pump
Exploded View
Gasket
Water pump
WARNING:
Do not remove the radiator cap when the engine is hot. Serious burns
could occur from high-pressure
engine coolant escaping from the radiator. Wrap a thick cloth around the cap.
Slowly push down and
turn it a quarter turn to allow built-up ...
Trunk lid trim
Exploded View
Trunk lid finisher
Front
Removal and Installation
REMOVAL
Remove trunk lid finisher clips (A) and trunk lid finisher.
INSTALLATION
Installation is in the reverse order of removal. ...
