Nissan Sentra B18 (2020-2025) Service Manual: Removal and Installation
REMOVAL
Using
suitable tool (A), with protective tape (B), release roof side
molding from rear metal clip. 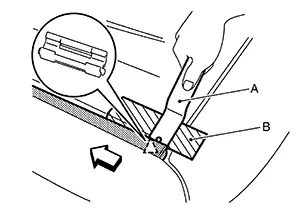
 : Metal clip
![]() :
Front
:
Front
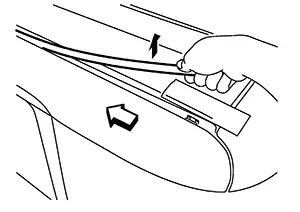
Pull up
roof side molding from rear end to front end.
![]() :
Front
:
Front
CAUTION:
Use care when pulling the roof side molding to avoid damaging.
Using
suitable tool, release roof side molding from front metal clip and
remove roof side molding. 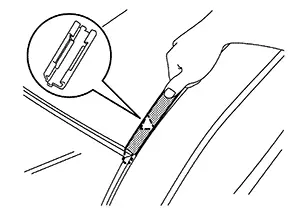
: Metal clip
REMOVAL OF ROOF SIDE MOLDING CLIPS
Heat adhesive tape using a heat gun and peel roof side molding clips (body side) using a suitable tool.
CAUTION:
Be careful not to damage the body.
INSTALLATION
Clean tape removed surface with isopropyl alcohol or equivalent.
Use two-part epoxy adhesive.
|
Adhesive |
: 3M-weld DP–100 or equivalent |
Apply adhesive evenly to clip tape surface.
|
Thickness |
: Approximately 0.5 mm (0.020 in) |
Position clips in the proper location and press-fit until adhesive protrudes.
|
Press-fit limit |
: 19.6 NĂ— 2 seconds |
Secure clips with tape per the following specifications:
|
5 to 10°C (41 to 50°F) |
: 1 hour or more |
|
11 to 23°C (52 to 73°F) |
: 30 minutes or more |
|
24°C or more (75°F or more) |
: 15 minutes or more |
CAUTION:
-
Use double-sided tape after hardening for roof side molding clips.
-
Securely insert molding rear end cap onto roof rear end cutout (installation standard).
-
When installing roof side molding of windshield glass portion, check that body side molding fastener is securely inserted and then press in.
-
Do not wash or expose Nissan Sentra vehicle to a wet environment within 24 hours of installation.
 Exploded View
Exploded View
1.
Roof side molding
2.
...

Other materials:
When Both Main Power Window and Door Lock/unlock Switch and Power Window and Door Lock/unlock Switch Rh Are
Operated
Diagnosis Procedure
Diagnosis Procedure
CHECK POWER WINDOW AND DOOR
LOCK/UNLOCK SWITCH RH
Check power window and door lock/unlock switch
RH.
Refer to Diagnosis Procedure.
Is the inspection result normal?
...
Diagnostic Work Sheet
Diagnostic Work Sheet
Description
In general, customers have their own criteria for
a problem. Therefore, it is important to understand the symptom and
status well enough by asking the customer about his/her concerns
carefully. To systemize all the information ...
Hydraulic Layout
Hydraulic Layout
1.
Clutch tube
2.
Lock pin
3.
CSC (Concentric Slave
...
