Nissan Sentra B18 (2020-2025) Service Manual: Removal and Installation

RH rear door panel shown; LH side similar
REMOVAL
Remove the rear door finisher. Refer to Removal and Installation.
Remove the vapor barrier.
CAUTION:
Use care to not damage or tear vapor barrier during removal.
Temporarily
reconnect the rear power window switch to raise/lower the rear door
glass until the rear door regulator to glass bolts (A) can be
seen. 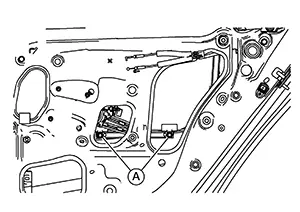
Remove the rear door regulator to glass bolts.
Raise up
the rear door glass and hold with a suitable tool (A).
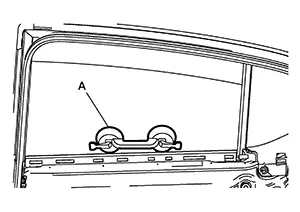
Disconnect the harness connector from the rear door glass regulator.
Loosen bolt
(A) and remove bolts (B). 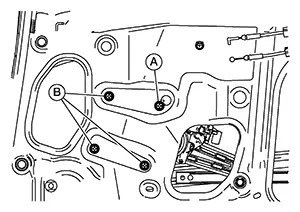
Remove the door glass regulator.
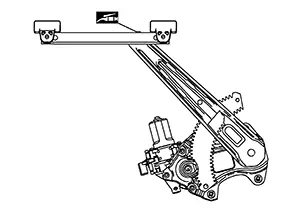
INSPECTION AFTER REMOVAL
Check the rear door glass regulator for the following items:
-
Gear wear
-
Door glass regulator deformation
-
Spring damage
-
Grease condition for each sliding part
If a malfunction is detected, replace or grease it using multi-purpose grease as shown.
If malfunction is detected, replace or grease it using multi-purpose grease as shown.
INSTALLATION
Installation is in the reverse order of removal.
 Exploded View
Exploded View
1.
Door glass rubber
run
2.
...

Other materials:
P2812-00 Pressure Control Solenoid G
Dtc Description
DTC Description
DTC DETECTION LOGIC
DTC
CONSULT screen terms
(Trouble diagnosis
content)
DTC detection
conditi ...
Uniform tire quality grading
DOT (Department of Transportation) Quality Grades apply to all passenger car
tires and are intended to provide comparative information in addition to meeting
federal safety requirements.
Where applicable, these quality grades are molded into the tire sidewall between
the tread shoulder and th ...
Rear Automatic Braking
Symptom Table
Symptom Table
CAUTION:
Perform the self-diagnosis with CONSULT before the symptom
diagnosis. Perform the trouble diagnosis if any DTC is detected.
Symptom
Inspection ite ...
