Nissan Sentra B18 (2020-2025) Service Manual: Rear Seat Belt Retractor
Removal and Installation
Rear Seat Belt Retractor (LH/RH)
REMOVAL
Warning:
-
Before servicing the SRS, place the ignition switch in the OFF position, disconnect both battery terminals then wait at least three minutes.
-
Do not drop the seat belt retractor. Always handle it with care.
-
Always point pre-tensioner cylinder away from body when handling.
Remove the rear parcel shelf finisher. Refer to Removal and Installation.
Remove the
rear seat belt lower anchor bolt (A). 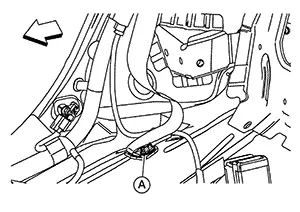
|
|
: Front |

RH side shown, LH side similar
Remove
bolts (A) and (B) from the rear seat belt pre-tensioner (1). 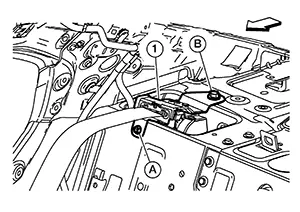
|
|
: Front |
RH side shown, LH side similar
Lift up
rear seat belt retractor in the direction shown, then disconnect
harness connector (A), and remove rear seat belt retractor. 
|
|
: Front |
RH side shown, LH side similar
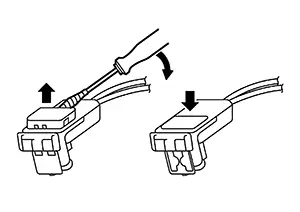
CAUTION:
-
For removing/installing the rear seat belt pre-tensioner harness connector, insert a thin screwdriver wrapped in tape into the notch, then lift the lock and remove the harness connector as shown.
-
Install the harness connector with the lock raised, and push the lock into the harness connector as shown.
-
After installing the harness connector, check that the lock is pushed in securely.
INSTALLATION
Installation is in the reverse order of removal.
-
Tighten the rear seat belt retractor bolts and lower anchor bolts to specification. Refer to Exploded View.
-
Always perform an inspection after repair to be sure the system is functioning within specifications. Refer to Inspection.
-
After installation is complete, check that no system malfunction is detected causing the air bag warning lamp to illuminate.
-
If a malfunction is indicated by the air bag warning lamp after repair or replacement of the malfunctioning parts, perform the SRS final check. Refer to SRS Final Check.
Rear Seat Belt Retractor (Center)
REMOVAL
Warning:
-
Before servicing the SRS, place the ignition switch in the OFF position, disconnect both battery terminals then wait at least three minutes.
-
Do not drop the seat belt retractor. Always handle it with care.
Remove rear parcel shelf finisher. Refer to Removal and Installation.
Remove the
rear lower anchor bolt (A). 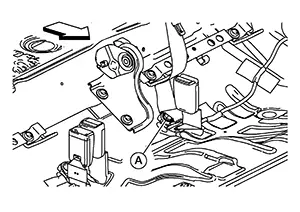
|
|
: Front |
Remove bolt
(A) and remove the rear seat belt retractor (1). 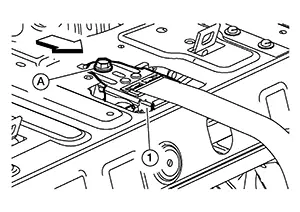
|
|
: Front |
INSTALLATION
Installation is in the reverse order of removal.
-
Tighten the rear seat belt retractor bolts and lower anchor bolts to specification. Refer to Exploded View.
-
Always perform an inspection after repair to be sure the system is functioning within specifications. Refer to Inspection.
-
After installation is complete, check that no system malfunction is detected causing the air bag warning lamp to illuminate.
-
If a malfunction is indicated by the air bag warning lamp after repair or replacement of the malfunctioning parts, perform the SRS final check. Refer to SRS Final Check.
 Exploded View
Exploded View
1.
Rear seat belt retractor
(RH)
...
 Rear Seat Belt Buckle
Removal and Installation
Removal and Installation
Rear Seat Belt Buckle (RH/Center)
REMOVAL
Warning:
Before servicing the SRS, place the ignition
switch in th ...
Other materials:
Calibrating Camera Image (intelligent Around View Monitor)
Description
Description
Calibration must be performed after
removing/replacing the cameras, removing parts (e.g. front grille,
door mirror, and others) mounted on the cameras, or replacing the
Around view monitor control unit.
The use of CONSU ...
System description
Component parts
AUTOMATIC DOOR LOCK/UNLOCK FUNCTION
AUTOMATIC DOOR LOCK/UNLOCK FUNCTION
: Component Parts Location
BCM
(view with instrument panel removed)
Main power window and door lock/unlock
switch
Power window and door lock/unlock
switch RH
Front door lock key cylinder ...
Service Data and Specifications (sds)
Parking Brake Control
Parking Brake Control
Item
Standard
Number of notches [under force
of 196 N (20.0 kg-f, 44.1 lb-f)]
...
